Contenuto principale

Power Measurement

R2026b

Measure active and apparent power from voltage and current signals

Since R2026b

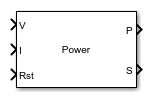
  • Power Measurement block icon

Libraries:
Power Converter Control with Motor Control Blockset / Measurement

Description

The Power Measurement block computes the active power and apparent power from time-domain voltage and current input signals. Use this block to monitor power delivery in AC circuits, evaluate power quality, or compute power metrics for control loops. You can choose to output the active power, the apparent power, or both.

  • Active power (P) — Real power consumed by the circuit.

    P=∑k=1∞VkIkcos(ϕk)

  • Apparent power (S) — The apparent power of a sinusoidal AC circuit is calculated as the product of its RMS values for voltage and current.

    S=∑k=1∞Vk2∑k=1∞Ik2

Ports

Input

expand all

Voltage input signal, specified as a scalar. Connect the measured voltage across the load or source to this port.

Data Types: single | double

Current input signal, specified as a scalar. Connect the measured current through the load or source to this port.

Data Types: single | double

Fundamental frequency input signal, specified as a positive scalar in Hz. The block uses this frequency to determine the measurement window length.

Dependencies

To enable this port, set Fundamental input frequency type to Input port.

Data Types: single | double

Reset trigger signal, specified as a scalar. A rising edge on this port resets the measurement window.

Data Types: single | double | Boolean

Output

expand all

Active power measurement, returned as a scalar in watts.

Dependencies

To enable this port, select the Active power (P) parameter.

Data Types: single | double

Apparent power measurement, returned as a scalar in volt-amperes.

Dependencies

To enable this port, select the Apparent Power (S) parameter.

Data Types: single | double

Parameters

expand all

To edit block parameters interactively, use the Property Inspector. From the Simulink® Toolstrip, on the Simulation tab, in the Prepare gallery, select Property Inspector.

Option to output active power. Select this parameter to enable the P output port that provides the active power measurement. If you clear this parameter, the block does not compute or output active power, which reduces computational load.

Programmatic Use

To set the block parameter value programmatically, use the set_param function.

Parameter: ActivePowerSelect
Values: "on" (default) | "off"

Example: set_param(gcb,"ActivePowerSelect","off")

Option to output apparent power. Select this parameter to enable the S output port that provides the apparent power measurement. If you clear this parameter, the block does not compute or output apparent power, which reduces computational load.

Programmatic Use

To set the block parameter value programmatically, use the set_param function.

Parameter: ApparentPowerSelect
Values: "on" (default) | "off"

Example: set_param(gcb,"ApparentPowerSelect","off")

Simulation discrete sample time, specified in seconds. This value determines how often the block executes and updates the power measurements. Set this to match the fixed-step solver step size of your model. A smaller value increases measurement resolution but adds computational cost.

Programmatic Use

To set the block parameter value programmatically, use the set_param function.

Parameter: BlkSampleTime
Values: "50e-6" (default) | positive scalar in quotes
Data Types: char | string

Example: set_param(gcb,"BlkSampleTime","100e-6")

Source for the fundamental frequency value. Select Specify via dialog to use the Fundamental frequency value (Hz), f₁ parameter. Select Input port to supply the fundamental frequency from an input port.

Programmatic Use

To set the block parameter value programmatically, use the set_param function.

Parameter: InputFrequencyType
Values: "Specify via dialog" (default) | "Input port"

Example: set_param(gcb,"InputFrequencyType","Input port")

Fundamental frequency of the measured signal, specified in Hz. The block uses this frequency to determine the measurement window length. For a 50 Hz grid, set this to 50; for a 60 Hz grid, set this to 60. The measurement window spans one complete cycle at this frequency.

Dependencies

This parameter is visible when Fundamental input frequency type is set to Specify via dialog.

Programmatic Use

To set the block parameter value programmatically, use the set_param function.

To get the block parameter value programmatically, use the get_param function.

Parameter: FundamentalFrequency
Values: "50" (default) | positive scalar in quotes
Data Types: char | string

Example: set_param(gcb,"FundamentalFrequency","60")

Lower bound for the input frequency range, specified in Hz. The block uses this value to allocate the internal buffer that stores samples for one measurement window. A lower frequency requires more buffer memory because the measurement window spans more samples. Set this to the lowest frequency your application needs to measure accurately.

Dependencies

This parameter is visible when Fundamental input frequency type is set to Input port.

Programmatic Use

To set the block parameter value programmatically, use the set_param function.

Parameter: MinimumFrequency
Values: "50" (default) | positive scalar in quotes
Data Types: char | string

Example: set_param(gcb,"MinimumFrequency","40")

Extended Capabilities

expand all

C/C++ Code Generation
Generate C and C++ code using Simulink® Coder™.

Version History

Introduced in R2026b