Test C++ Member Functions in Polyspace Platform User Interface
To write a test for a member function of a C++ class, you generally instantiate the class and invoke the member function using the object you created. Polyspace® Test™ allows you to write graphical tests, where you can create tests in the Polyspace Platform graphical user interface rather than create them by hand. In a graphical test, you can directly call the member function as the code under test and the generated test code takes care of object instantiation and other data management.
This example shows how to test a C++ member function in the Polyspace Platform user interface.
Example Files
This tutorial uses the files in the folder
polyspaceroot\polyspace\examples\doc_pstest\cpp_tabular_tests\srcpolyspacerootC:\Program
Files\Polyspace\R2026a. To continue with this tutorial:
Create a new Polyspace Platform project and add the folder to the project.
Select Parse Code on the toolstrip to analyze the files in the folder.
This folder contains source code defining a class GridPosition with two data members x and y, and member functions getX(), getY(), setPosition(), and shiftPosition():
GridPosition.hpp:#ifndef GRIDPOSITION_H #define GRIDPOSITION_H #include <cstdint> class GridPosition { int32_t x; int32_t y; public: GridPosition(); GridPosition(int32_t xInit, int32_t yInit); int32_t getX(); int32_t getY(); void setPosition(int32_t xPos, int32_t yPos); void shiftPosition(int32_t xShift, int32_t yShift); bool operator==(const GridPosition& other) const; }; #endifGridPosition.cpp:#include "GridPosition.hpp" GridPosition::GridPosition() { x = 0; y = 0; } GridPosition::GridPosition(int32_t xInit, int32_t yInit) { x = xInit; y = yInit; } int32_t GridPosition::getX() { return x; } int32_t GridPosition::getY() { return y; } void GridPosition::setPosition(int32_t xPos, int32_t yPos) { x = xPos; y = yPos; } void GridPosition::shiftPosition(int32_t xShift, int32_t yShift) { x += xShift; y += yShift; } bool GridPosition::operator==(const GridPosition& other) const { return (x == other.x) && (y == other.y); }
In this example, you will test the member functions of the GridPosition class.
Create Simple Test
In a simple test for a C++ member function, you can create a class instance using a constructor call and then invoke the member function.
Suppose that you want to test the member function GridPosition::getX(). To write a test for this function:
On the Projects pane, right-click the function
GridPosition::getX()and select Add Test Case.In the Inputs section of the test step, you see an object of the
GridPositionclass with the namepst_obj. In the Value column for this object, enter a call to the non-default constructor:GridPosition(1,1)In the Assessments section of the test step, set the return value
pst_call_outto 1. Delete any other assessment.Build and run the test to see passing test results.
Create Multistep Test
When testing a C++ class, you might have to invoke several member functions on the same object in a multistep test. To reuse the same object across multiple steps, create a test data out of the object in the first step and refer to this test data in subsequent steps.
Suppose you have to write a multistep test where you perform these steps in sequence:
Set the data members
xandyto (1,1) using the member functionGridPosition::setPosition(int32_t, int32_t).Shift both data members by 1 using the member function
GridPosition::shiftPosition(int32_t, int32_t).Check that the new data member values correspond to (2,2) using the member functions
GridPosition::getX()andGridPosition::getY().
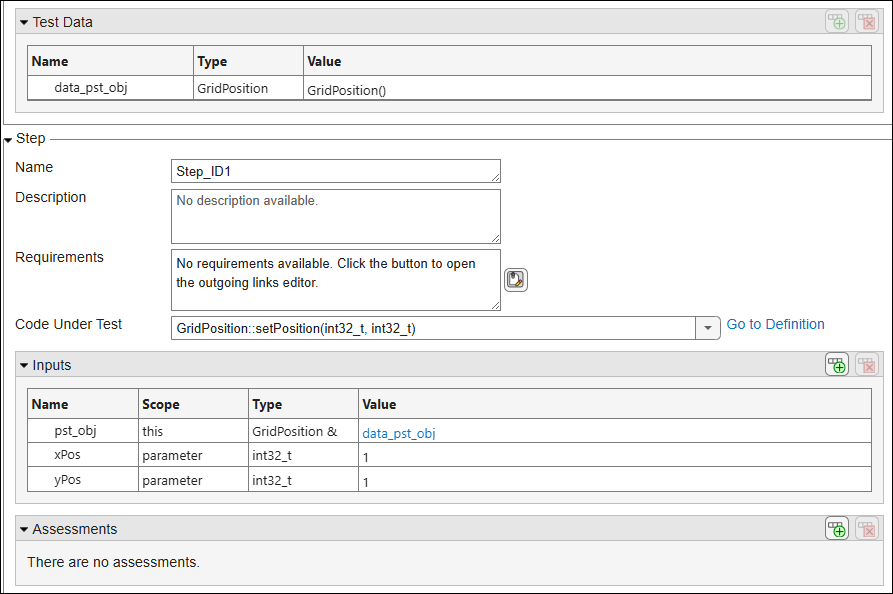
Create Test Data for Object
To begin authoring a test for a member function of the GridPosition class, first create a test data from an object of the class.
On the Projects pane, right-click the function
GridPosition::setPosition(int32_t, int32_t)and select Add Test Case.In the Inputs section of the test step, you see an object of the
GridPositionclass with the namepst_obj. Right-click the Value column for this object and select Add Test Data. Accept the default namedata_pst_objand select OK.You can now refer to this object in subsequent steps.
Set both the inputs
xPosandyPosto 1. Remove the assessment onpst_obj(you will perform an assessment in later steps).
The test step looks like the following:
Instead of the default constructor, you can also initialize the object with a non-default constructor. In this example, in the Test Data section of the test, you can double-click the Value column and directly enter a call to the non-default constructor, for instance:
GridPosition(0,0)Reuse Test Data for Invoking Member Functions
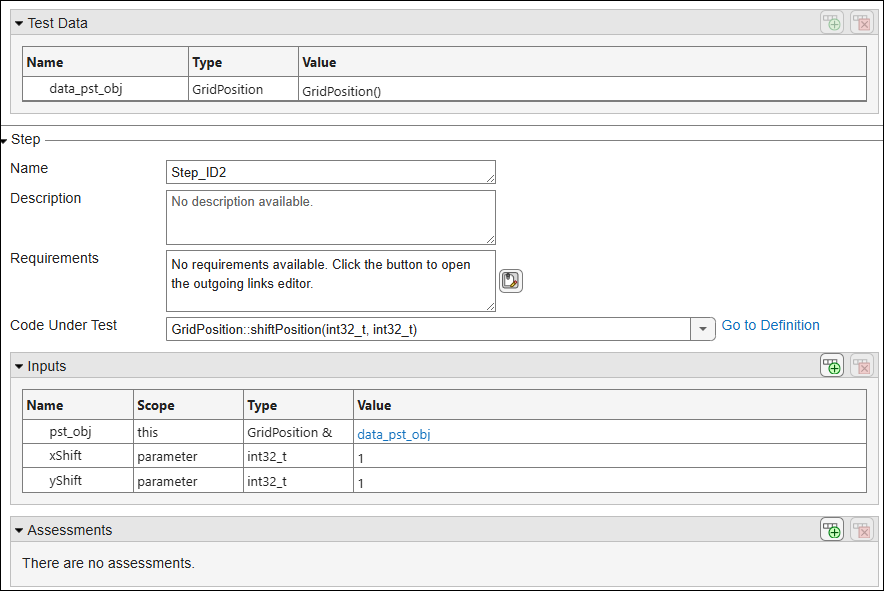
You can now reuse the test data created in the previous section to invoke other member functions of the GridPosition class.
Create a second step to invoke the member function
GridPosition::shiftPosition(int32_t, int32_t):Right-click Step_ID1 in the step browser of the test and select Add Step After.
In the new step Step_ID2, select the member function
GridPosition::shiftPosition(int32_t, int32_t)as code under test.In the Inputs section of the test step, right-click the input
pst_objand select Select Pointer Target/Test Data. Select the previously created test data with namedata_pst_objand select OK.Set both the inputs
xShiftandyShiftto 1. Remove the assessment onpst_obj.
The test step looks like the following:
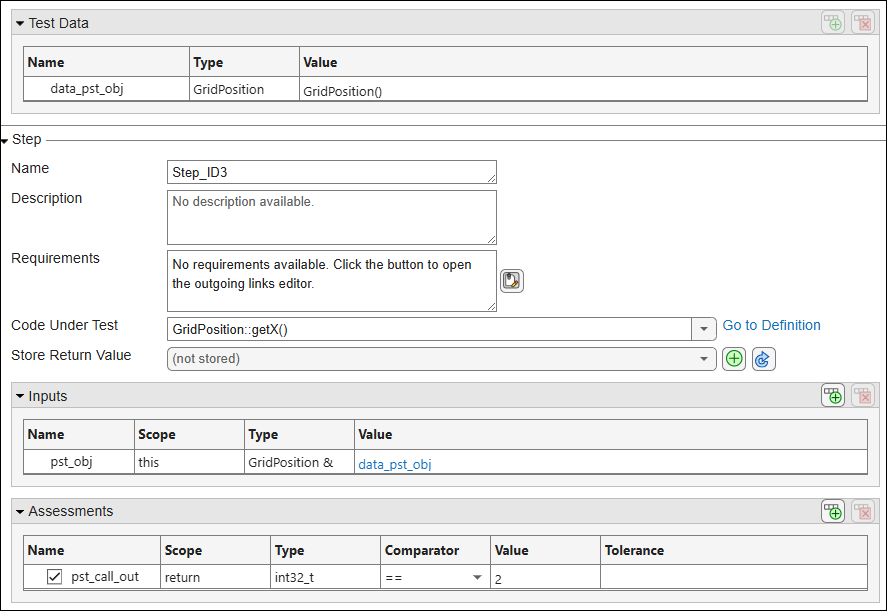
Create a third step to invoke the member function
GridPosition::getX():Right-click Step_ID2 in the step browser of the test and select Add Step After.
In the new step Step_ID3, select the member function
GridPosition::getX()as code under test.In the Inputs section of the test step, right-click the input
pst_objand select Select Test Data. Select the previously created test datadata_pst_objand select OK.In the Assessments section of the test step, set the assessment value for
pst_call_outto 2. Remove the other assessment onpst_obj.
The test step looks like the following:
Create a fourth step to invoke the member function
GridPosition::getY():Right-click Step_ID3 in the step browser of the test and select Add Step After.
In the new step Step_ID4, select the member function
GridPosition::getY()as code under test.In the Inputs section of the test step, right-click the input
pst_objand select Select Test Data. Select the previously created test data and select OK.In the Assessments section of the test step, set the assessment value for
pst_call_outto 2.
Build and run the test to see passing test results.
Invoke Constructor as Code Under Test
You can also invoke the constructor directly as code under test. In this case, the object after initialization is denoted using the return value pst_call_out.
Suppose you want to test that the invocation to the non-default constructor GridPosition::GridPosition(in32_t, int32_t) with both arguments set to 0 is equivalent to the default constructor initialization. To create this test:
On the Projects pane, right-click the function
GridPosition::GridPosition(in32_t, int32_t)and select Add Test Case.In the Inputs section of the test, leave the input values to the default value of 0.
In the Assessments section of the test, leave the return value to the default value of
GridPosition()(call to the default constructor).Build and run the test to see passing test results.