MAT-file Logging on SD Card for PX4 Autopilots
This example shows you how to efficiently log signals in the MAT-file format from a Simulink® model running on a Pixhawk® hardware, and retrieve the log files from the SD card for further analysis.
Introduction
The UAV Toolbox Support Package for PX4® Autopilots supports logging of signals from your Simulink model on Pixhawk hardware in the MAT-file format. Signal logging enables you to monitor the behavior of the signal and perform analysis of historical data. To use the MAT-file logging feature with the Pixhawk hardware, you must have a Embedded Coder® license.
Prerequisites
If you are new to Simulink, watch the Simulink Quick Start video.
Perform the initial Setup and Configuration of the support package using Hardware Setup screens.
Refer to the topic Log Signals on an SD Card
Required Hardware
To run this example, you will need the following hardware:
Pixhawk Series flight controller
Micro USB type-B cable
Micro-SD card (already used during the initial Hardware Setup)
Step 1 - Configure a Simulink Model for MAT-File Logging
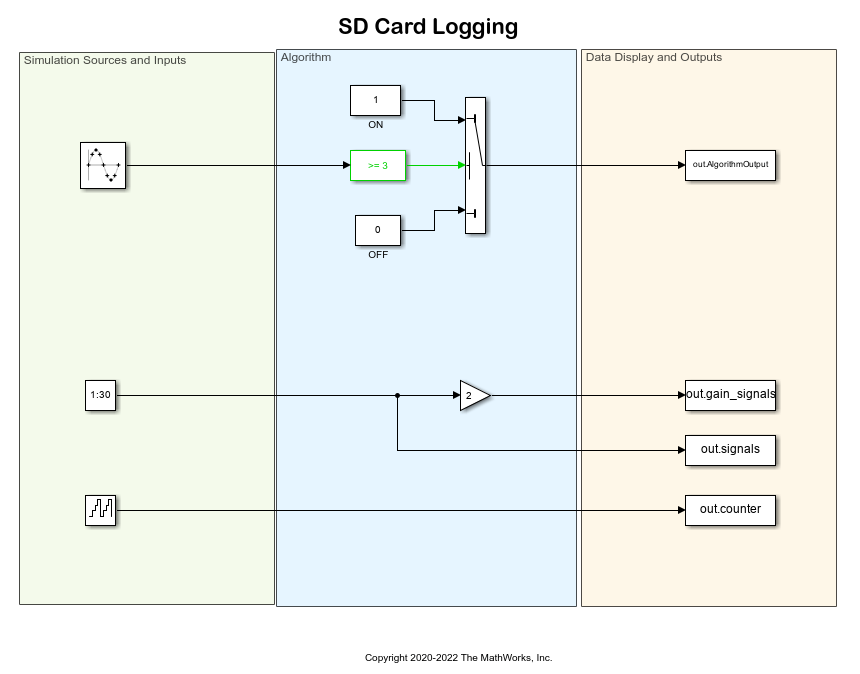
1. Open the px4demo_log model. This Simulink model is pre-configured for the Pixhawk 1 with MAT-File logging enabled. In this example, signals from the 'To Workspace' block are logged.
2. Open the Model Configuration Parameters dialog box (Go to Modeling > Model Settings on the Simulink toolstrip).
3. Go to the Hardware Implementation pane, and select the name of the target hardware from the Hardware board list. If required, you can change the Hardware board selection other than the pre-configured Pixhawk 1 board.
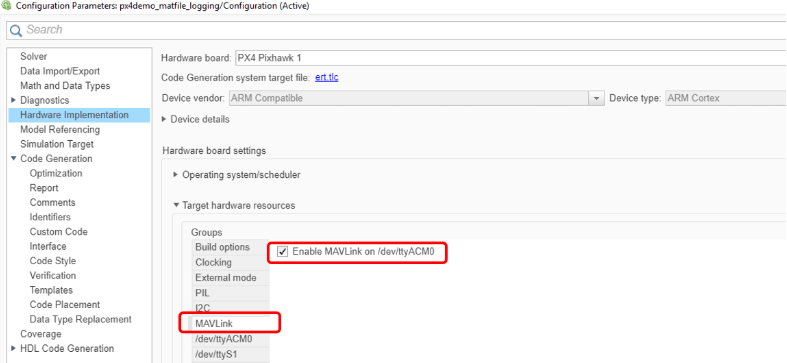
4. MAVLink needs to be enabled to retrieve the log files from SD card inserted on the Pixhawk hardware board. In the Configuration Parameters dialog box, go to Hardware Implementation > Target hardware resources > MAVLink, and select Enable MAVLink on /dev/ttyACM0.
5. Browse to Code Generation > Interface > Advanced Parameters, or type MAT-file logging in the search box.
6. Select the MAT-file logging option and click Apply to save the changes.
7. Click OK to close the dialog box.
8. In the Simulink model, double-click the To workspace blocks, and open the Configuration Properties dialog box.
9. Select the Save format as Array or Structure with Time or Structure, and click Apply and then OK.
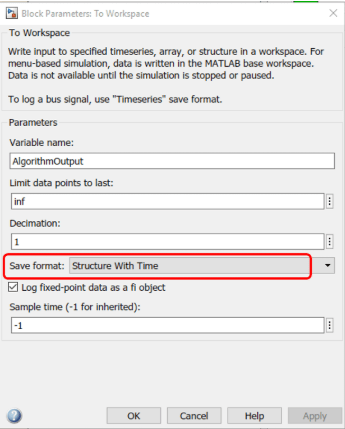
10. Leave the Limit data points to last field as it is.
11. On the Modeling tab of Simulink toolstrip, enter a value for the stop time. This is the duration for which the signal is logged. However, the model continues to run on the hardware and it is not affected by the time specified.
For example, in this demo model (SD Card Logging), the stop time is 30. The signal will be logged for 30 seconds. If the stop time is Inf, the signal will be logged till the Micro SD card is full or the board is disconnected.
Step 2 - Prepare Model for Simulation and Deployment
1. Execute the px4PrepareModelForMATFileLogging function in the MATLAB® command prompt to set the Limit Data points to last in such a way that there will be no data drops. For more information, see Prepare Model for Simulation and Deployment
px4PrepareModelForMATFileLogging('px4demo_log')2. After you run this function, a dialog box opens requesting your permission to fix the values for memory optimization. Click Fix it to optimize the memory.

3. After you click Fix it, the value for |Limit data points to las|t for all the To Workspace blocks in your model is changed. You will see the below warning about Simulink signals taking up lot of memory.

In the next step, we shall see how to optimize the memory required for logging.
Step 3 - Optimize the Simulink Model to Reduce the Memory Required for Logging and Deploy on Pixhawk 1 Hardware
Optimize the Simulink model
In this section, we refer to some of the steps mentioned in Troubleshooting Memory Limitations for MAT-file Logging section to reduce the memory required for logging.
1. Reduce the number of signals in the constant block from 30 to 20. You can manually change the values or execute the below command:
set_param('px4demo_log/Constant','Value','1:20')
2. Execute the function px4PrepareModelForMATFileLogging again to check the warning.
px4PrepareModelForMATFileLogging('px4demo_log')The warning still appears, which implies that we have to optimize more.
There are four To Workspace blocks executing at the rate of 10ms, and all of them have the Save format set to Structure With Time. This will make the 'Time' data for 10ms be logged by multiple blocks and it is redundant.
3. Set the Save Format of To Workspace1, To Workspace2 and To Workspace3 blocks to Structure. Let the Save Format of To Workspace4 remain as Structure with Time as is. You can manually set them or execute the below commands:
set_param('px4demo_log/To Workspace1','SaveFormat','Structure')set_param('px4demo_log/To Workspace2','SaveFormat','Structure')set_param('px4demo_log/To Workspace3','SaveFormat','Structure')
4. Execute the function px4PrepareModelForMATFileLogging again. Always click on Fix It when the pop up appears. The warning can still be seen.
5. To reduce memory further, look at the data types. The constant block has values 1 to 20, but the data type is double. We can use the int8 data type for these values, which will reduce the memory required. Insert a Data Type Conversion block and set its data type to int8.

6. Execute the function px4PrepareModelForMATFileLogging again. Notice that there are no warnings.
You can also try other methods described in the Troubleshooting Memory Limitations for MAT-file Logging section such as decimation and changing the Sample Time of the signal selected for logging, to reduce memory.
Deploy the Simulink model to Pixhawk 1 Hardware
In the Simulink model, on the Hardware tab, in the Mode section, select Run on board and then click Build, Deploy & Start. The build process for the model starts and it is deployed on the Pixhawk 1 Hardware board.
Step 4 - Import the MAT-files from the SD Card on Pixhawk 1 Hardware
In this section, we refer the Import MAT-Files into MATLAB section.
1. The Stop time for the Simulink model is set to 30s. After 30s, execute the getMATFilesFromPixhawk command to import the MAT-Files from the SD card to the present working directory of MATLAB.
getMATFilesFromPixhawk('px4demo_log','DeleteAfterRetrieval',true)A MATLAB window showing the status of the files being imported opens.

2. Once all the MAT-Files are imported into the present working directory, execute the px4MATFilestitcher command to stitch all the MAT-files together.
px4MATFilestitcher()

3. Load the data to the base workspace and analyze the data.
load('px4demo_log_1__stitched.mat')For example, if you want to see the values of rt_AlgorithmOutput, you can execute the below command:
plot(rt_counter.time,rt_AlgorithmOutput.signals.values)
Related Topics
You can also select a web site from the following list:
Americas
- América Latina (Español)
- Canada (English)
- United States (English)
Europe
- Belgium (English)
- Denmark (English)
- Deutschland (Deutsch)
- España (Español)
- Finland (English)
- France (Français)
- Ireland (English)
- Italia (Italiano)
- Luxembourg (English)
- Netherlands (English)
- Norway (English)
- Österreich (Deutsch)
- Portugal (English)
- Sweden (English)
- Switzerland
- United Kingdom (English)