Interface LCD Booster Pack with Texas Instruments C2000 Processors
This example shows how to configure and use the Kentec QVGA Display Booster Pack to display an image using C28x™ peripherals for Texas Instruments™ C2000™ processors.
Using this example, you can:
Configure the Kentec QVGA display through the serial peripheral interface (SPI)
Display the image through the SPI using direct memory access (DMA)
Required Hardware
F28379D Launchpad
BOOSTXL-K350QVG-S1 Kentec QVGA Display Booster Pack
Hardware Connections
Mount the Kentec QVGA Display Booster Pack on the F28379D Launchpad. The display uses the following pin mapping with the F28379D Launchpad.

Configure Kentec QVGA Display Through SPI
Before the image is transferred from host computer to F28379D Launchpad:
Disable serial communication interface (SCI) interrupt ensure DMA channel is in halt state.
Initialize the display.
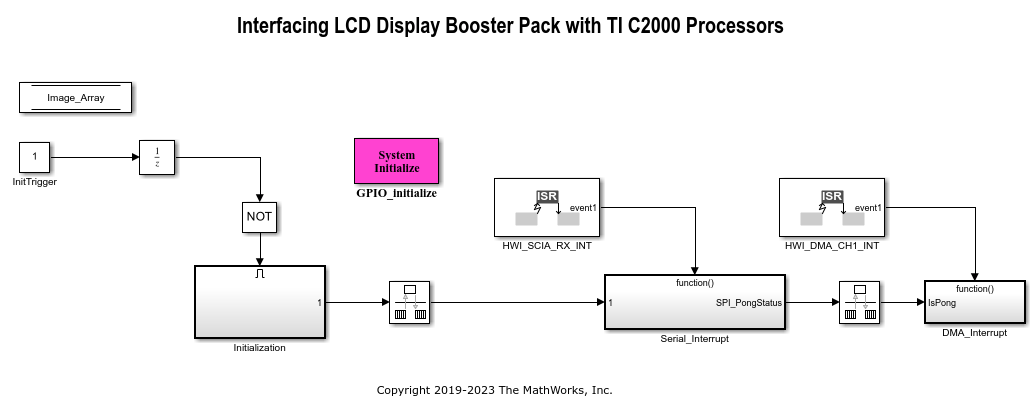
Open the c2837xD_lcd_display.slx model.

Initialize the Kentec QVGA Display
1. Reset the LCD, turn ON the backlight, select the SCS pin and wait for 1 ms.
2. Configure the following registers: Power parameter, Pixel format, Display orientation, MCU interface parameter, Display control, Gamma correction and Power control. To configure Pixel format - Exit sleep mode, wait for 30 ms and then configure the register.
3. Display a Green color image on the LCD to indicate end of initialization.
4. Enable the SCI interrupt and the DMA channel.
Display the Image Through SPI Using DMA
For the image to display on the LCD, the image data must be transferred from the host computer to the target F28379D Launchpad through the SCI.
Due to low memory constraints on the target F28379D Launchpad, it is not possible to send the entire image data from the host computer to the target F28379D. Instead, the image data is transferred in chunks from the host computer to the target F28379D through the SCI. These chunks are stored in a small memory section Image_Array in the target. Double buffer is used in Image_Array to ensure data integrity between data read from the host using SCI and data transferred to the LCD display through the SPI interface. The buffers are referred as ping buffer and pong buffer.
Run the Function on the Host
The function c2837xD_serial_send.m performs the following operation:
Runs on the host computer, reads the image, and sets the SCI parameters.
Sends 16-bit image data for the entire buffer in small chunks to the target F28379D through the SCI.
Adds a constant delimiter, of the same size as a chunk, for each buffer to indicate the beginning of new a buffer.
The following table explains the parameters used with their size.

To send the entire image, buffer transmission must occur 20 times, i.e., Image size/buffer size. Image Size = 20 x buffer size = 20 x (chunk size x number of SCI transfers)
Run the Model on the Target
On the model side of the target, the following sequence of events occurs:
1. The target waits for the SCI interrupt. The SCI interrupt is triggered when the serial receive buffer receives the chunk size data.
2. In the serial interrupt service routines (ISR), the data is copied into the ping/pong buffer of Image_Array. The model uses the serial delimiter to identify the beginning of the data in the target. This process continues until the buffer transfer is complete.
3. The serial is now switched to the alternate buffer among the ping/pong to fill the data and enable the SPI event trigger for DMA transfer.
4. The DMA starts pushing the data from the first filled buffer to the SPI Transmit FIFO buffer. The data is transferred to the display through the SPI, and SPI Transmit triggers the DMA event when the buffer is empty. This process continues till the first filled buffer data is fully transferred to the display.
5. Once the transfer is complete:
The DMA is halted, and the start address of DMA is changed to the alternate buffer
An acknowledgement is sent to the host computer showing the first buffer is empty to receive new serial data
The above sequence continues until the entire image data is transferred to the display.
Configure and Run the Model
1. Open the c2837xD_lcd_display.slx model.
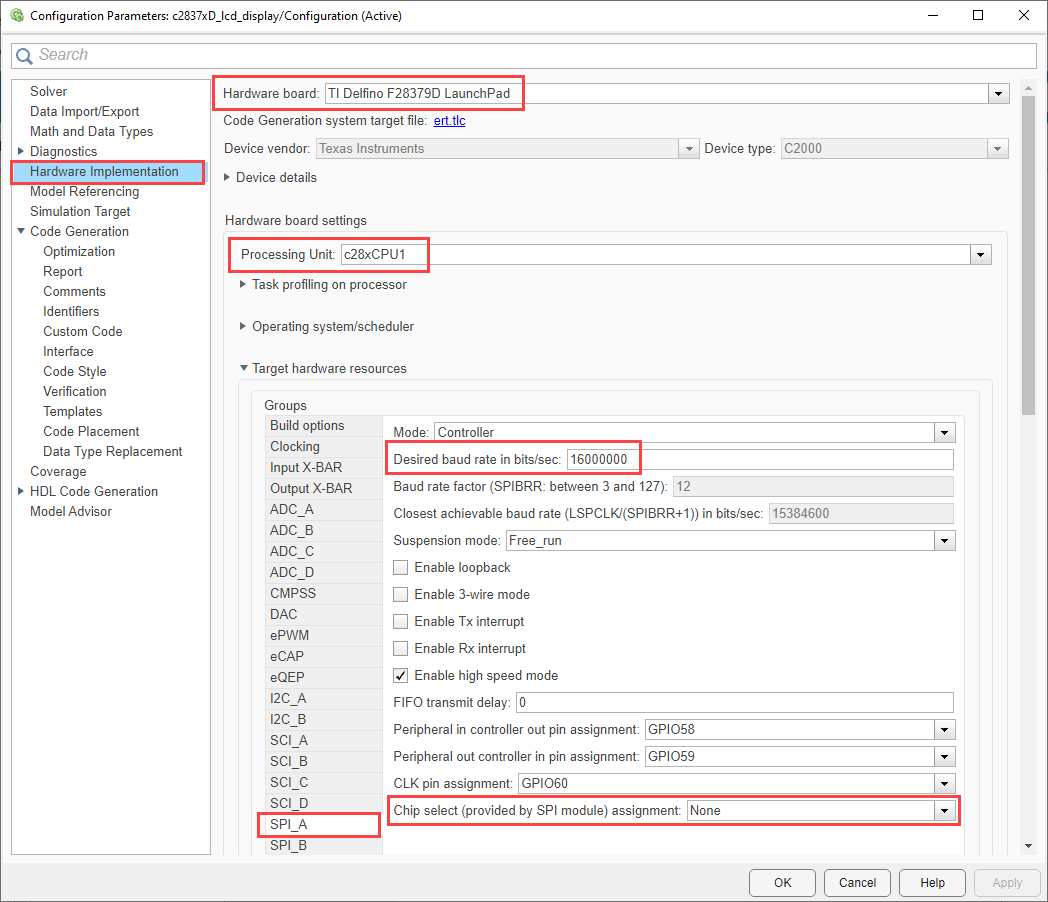
2. Go to the Modeling tab and press Ctrl+E to open the Configuration Parameters dialog box.
3. Go to the Hardware Implementation and select the Hardware board.
4. Go to Hardware Implementation > Target Hardware Resources > Build options and select Enable DMA access to peripheral frame 2 (SPI and McBSP) instead of CLA.
5. Go to Hardware Implementation > Target Hardware Resources > SPI_A and set Desired Baud rate in bits/sec to 16000000 and Chip select (provided by SPI module) assignment to None.

6. Go to Hardware Implementation > Target Hardware Resources > DMA_ch1 and update parameter values as shown.

7. Navigate to the Hardware tab and press Ctrl+B. If the LCD turns green, it indicates that the initialization of the Kentec QVGA display was successful.
8. On the host computer, run the function c2837xD_serial_send. The function takes two arguments:
COM port - browse to Device Manager > Ports (COM & LPT) to find the COM port.
Image name - file name of the image that you want to display.
Run the following command at the MATLAB command prompt:
c2837xD_serial_send('COM2', 'mathworks.jpg');9. Observe the image on the LCD.