Read and Write Vehicle Data in SUMO Scenario Using Cosimulation with Simulink
Read and write vehicle data such as its position, speed, and angle, at each time step in a SUMO™ scenario during cosimulation with Simulink®.
To run this example you must:
Download and install the Automated Driving Toolbox™ Interface for Eclipse SUMO Traffic Simulator.
Download and install SUMO Version 1.20.0 on your system. The Automated Driving Toolbox Interface for Eclipse SUMO Traffic Simulator supports cosimulation with SUMO Version 1.20.0 on Windows® and Linux® platforms.
Open Model
Open the model. The model uses Server and Client blocks that configure and synchronize simulation between SUMO and Simulink.
open_system("ReadWriteVehicleDataInSumoScenario.slx");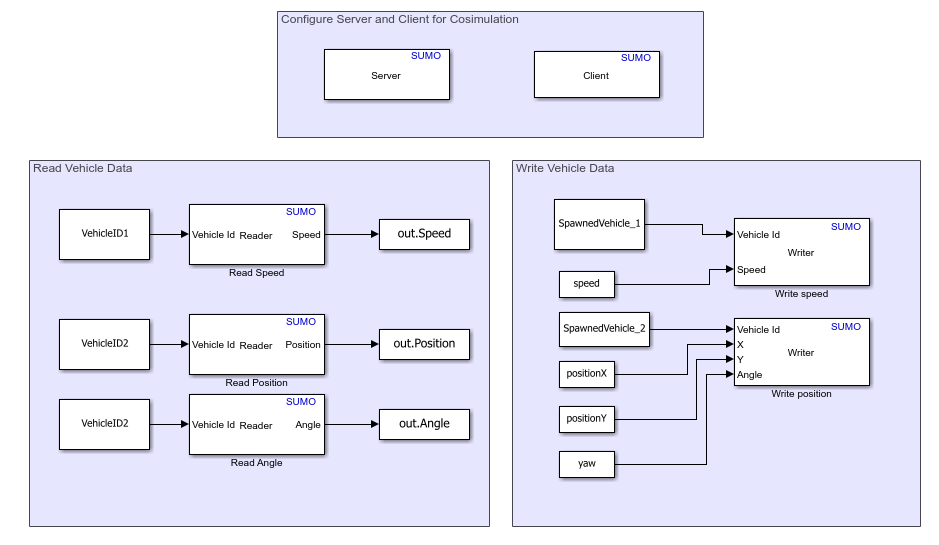
Configure Server and Client for Cosimulation
Double-click the Server block to open its block mask. The SUMO configuration file parameter, specifies the path to a SUMO configuration file, which must have the .sumocfg extension. This example specifies the path to the testConfig.sumocfg file, located at C:\SUMO\MyProject, on a Windows® machine. If you are not using a Windows machine, or have installed SUMO to a directory other than the default, you must manually specify this parameter. The Port parameter specifies the number of the port available on the SUMO server application for communication with clients.
To add two random traffic vehicles to your SUMO scenario, select the Spawn random traffic parameter, and set the Number of vehicles to spawn parameter to 2. This configures the Server block to place two vehicles at random positions in the road network at the start of the simulation, assigning them the IDs SpawnedVehicle_1 and SpawnedVehicle_2.
Double-click the Client block to open its block mask. The Address and Port parameters specify IP address and port number of the SUMO server, respectively, to which the client connects. The port number you specify for the client must match the port number of the server.
Write and Read Vehicle Data
The Writer blocks write data to the spawned vehicles in the scenarios. The Vehicle Id accepts the name of a vehicle to which you want to write data. For this example, one Writer block sets the speed of SpawnedVehicle_1 to 5 meters per second, while the other Writer block sets the x-position, y-position, and yaw of SpawnedVehicle_2 to 8 meters,-3 meters, and 90 degrees, respectively.
Each Reader block reads the data of a vehicle in the scenario at each simulation time step. In this example, the Reader blocks read information from the spawned vehicles during the simulation. One Reader block reads the speed of SpawnedVehicle_1. The other Reader blocks read the xy-position and angle of SpawnedVehicle_2. The Workspace blocks log the vehicle data read by the Reader blocks to the workspace as a TimeSeries.
Perform Cosimulation
To begin cosimulating, on the Simulink Toolstrip, select Run, which launches the SUMO application interface and begins simulating the scenario, defined in the SUMO configuration file. You can visualize the simulation in the SUMO interface. Alternatively, you can simulate the model programmatically by using the sim command.
sim("ReadWriteVehicleDataInSumoScenario.slx");Once the simulation is complete, you can check the workspace variables to verify that they contain the vehicle data read by the Reader block at each simulation time step. Additionally, you can verify that the data matches the values written by the Writer blocks.
Update Simulation Settings
This model uses the default simulation stop time of 10 seconds. If the SUMO simulation runs too fast, you can slow down the simulation by using simulation pacing. On the Simulink Toolstrip, select Run > Simulation Pacing. In the Simulation Pacing Options dialog box, select the Enable pacing to slow down simulation, and decrease the value of Simulation time per wall clock second to a value slightly less than 1, such as 0.8 seconds. Then, run the model again.