Test C/C++ Functions by Using Scripts in Graphical Tests
The Polyspace® Platform user interface supports authoring tests in a graphical format and importing tests authored using the C/C++ xUnit API. Graphical tests with tabular steps are simple to write but are less flexible, while the C/C++ xUnit API supports more forms of testing but requires learning the xUnit API syntaxes. Graphical tests with scripted steps combine the simplicity of graphical test authoring with the flexibility of writing tests as C/C++ code.
Using scripted steps in a graphical test allows you to perform operations that are not supported in tabular steps without going through the learning curve of the xUnit API. To assess variables in scripted steps, instead of using macros from the xUnit API, you can simply add the variable names as observables in a table and then add assessments for those observables just as you do in tabular steps.
This example shows how to write a graphical test case with a scripted step.
Example Files
This tutorial uses the files in the folder
polyspaceroot\polyspace\examples\doc_pstest\scripted_tests\srcpolyspacerootC:\Program
Files\Polyspace\R2026a. To continue with this tutorial:
Create a new Polyspace Platform project and add the folder to the project.
Select Parse Code on the toolstrip to analyze the files in the folder.
Open the project configuration. On the Project tab, add the path
polyspaceroot\polyspace\examples\doc_pstest\scripted_tests\srcEven though the source folder is automatically added to the include search path for building sources, it is not added to the search path for building scripts in tests. In this example, you will be using definitions from source headers in test scripts. Therefore, you must add the source folder explicitly as an include path so that it is used for include search when building test scripts.
This folder contains source code defining a class Position with member functions getX(), getY() and keepValueWithinRange():
Header file
Position.hpp:#ifndef TYPES_H #define TYPES_H #define LOWER_LIMIT 0 #define UPPER_LIMIT 127 class Position { int x; int y; public: Position(int xPos, int yPos); int getX(); int getY(); int keepValueWithinRange(int posValue); }; #endifSource file
Position.cpp:#include "Position.hpp" int Position::keepValueWithinRange(int posValue) { if (posValue > UPPER_LIMIT) { return UPPER_LIMIT; } else if (posValue < LOWER_LIMIT) { return LOWER_LIMIT; } return posValue; } Position::Position(int xPos, int yPos) { x = keepValueWithinRange(xPos); y = keepValueWithinRange(yPos); } int Position::getX() { return x; } int Position::getY() { return y; } void setPosition(int xPos, int yPos) { Position currentPosition(xPos, yPos); }
In this example, you test the constructor and two member functions of the Position class by writing a graphical test with a single scripted step that invokes all three functions. Alternatively, you can test these functions by writing a graphical test with multiple tabular steps. For more information on that approach, see Test C++ Member Functions in Polyspace Platform User Interface.
Add New Test with Scripted Step
To create a new scripted test, on the Polyspace Platform toolstrip, select Add Test > Add Scripted Test. This creates a new graphical test case with a single scripted step that allows you to enter a test script.
Add Test Preamble
You must declare all variables, functions, and types used in the test script. The simplest way to add declarations already present in your source headers is to include the headers in the test preamble:
In the test header, expand the Preamble, Setup, Teardown section.
Include the header file
Position.hppcontaining the class definition in the Preamble section of the test:#include "Position.hpp"
You can now enter scripted steps that invoke methods from the Position class.
Note that the Preamble section is best suited to add #include statements for headers containing definitions required for the test scripts. If you want to add code for test setup and teardown, enter them in the Setup and Teardown sections respectively. The test setup code runs before test execution while the test teardown code runs after test execution. For instance, you can allocate memory to a
global pointer in the test setup and deallocate the memory in the test teardown.
Enter Script in Step Body
A scripted step has the sections Inputs and Assessments similar to a regular step. However, a scripted step also contains:
A Step Body box where you enter the script.
An Observables section where you specify variables in the script that you want to observe (and assess against expected values).
If you introduce new variables in the script, you can declare them in the script itself or specify them in one of these two sections:
Inputs – If you specify a variable as an input, the variable is declared and assigned an initial value in the generated test code.
Observables – If you specify a variable as an observable, the variable is declared only in the generated test code.
To author tests for the constructor Position() and the methods getX() and getY() of the Position class:
Enter this code in the Step Body field:
Position currentPosition(xPos, yPos);
xMeasured = currentPosition.getX();
yMeasured = currentPosition.getY();
In the Inputs section, add these inputs (to add a new input, select the
 button):
Variable Name Variable Type Value xPosint1 yPosint2 In the Observables section, add these observables:
Variable Name Variable Type xMeasuredintyMeasuredintYou can see the same variables automatically added to the Assessments section of the test. The assessments are populated with default values.
In the Assessments section, change the Value column of the assessments to the following:
Variable Name Variable Type Comparator Value xMeasuredint==1 yMeasuredint==2 The test now looks like this:

Build and run the test just like any other test. For more information, see Build and Run Tests in Polyspace Platform User Interface.
After the test completes execution, you see a result with one passing test on the Results pane. For more information on reviewing test results, see Review C/C++ Test Execution Results.
Mock Callees as Needed
You can create mocks to replace functions that are called from scripted steps.
For example, to mock the method Position::keepValueWithinRange(int) called from the constructor Position::Position(int, int), create a mock from within the test that you wrote earlier.
In the Callees section of the test, click the Add a function to override button
 to add a new callee.
From the Select Function list, select the callee
Position::keepValueWithinRange(int).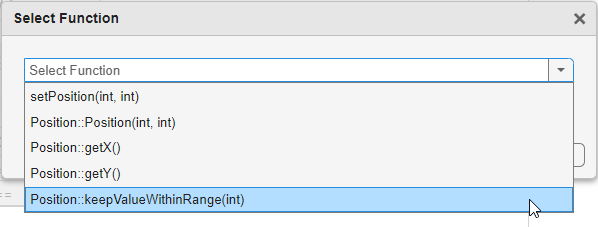
Right-click the row with the callee name and select Create Mock.
Retain the default mock body or change the body as needed. For more information on mocking, see Override Callee Definitions When Testing Functions in Polyspace Platform User Interface.
Build and run the test as usual.
The mock usage is reflected in the test results. For example, if you retain the default mock body that returns 0, your test now fails.