Read and Write to ThingSpeak Channel Using Arduino WiFi HTTP Client Block
This example shows how to use the WiFi HTTP Client block from the Simulink® Support Package for Arduino® Hardware to read and write data to a field in a ThingSpeak™ channel.
In this example, the data from the analog to digital converter (ADC) is read and written to a field of ThingSpeak channel.
Supported Arduino Hardware
Arduino MKR 1000
Arduino MKR WiFi 1010
Arduino Nano 33 IoT
Arduino Boards with WiFi shield
ESP32-WROOM (Arduino Compatible)
ESP32-WROVER (Arduino Compatible)
Prerequisite
We recommend that you complete the Get Started with Arduino Hardware example.
Required Hardware
This example uses the Arduino compatible ESP32-WROOM board. You can use any of Arduino boards from the list of supported boards.
Micro USB cable
Create ThingSpeak Channel
For more details on how to create a new ThingSpeak channel, see Create a Channel (ThingSpeak). Update the name and fields of the ThingSpeak channel for the data you are publishing and retrieving. To find your Channel ID and Write API Key, refer to Channel Info on the My Channels tab. You can use the Write API key to update the channel. Similarly, you can use the Read API key to read data from the API. To get the Write or Read API key, click Channels > My Channels. Select the API channel and then select the API Keys tab. For more information, see Channel Data Control (ThingSpeak).
Configure Simulink Model and Calibrate Parameters
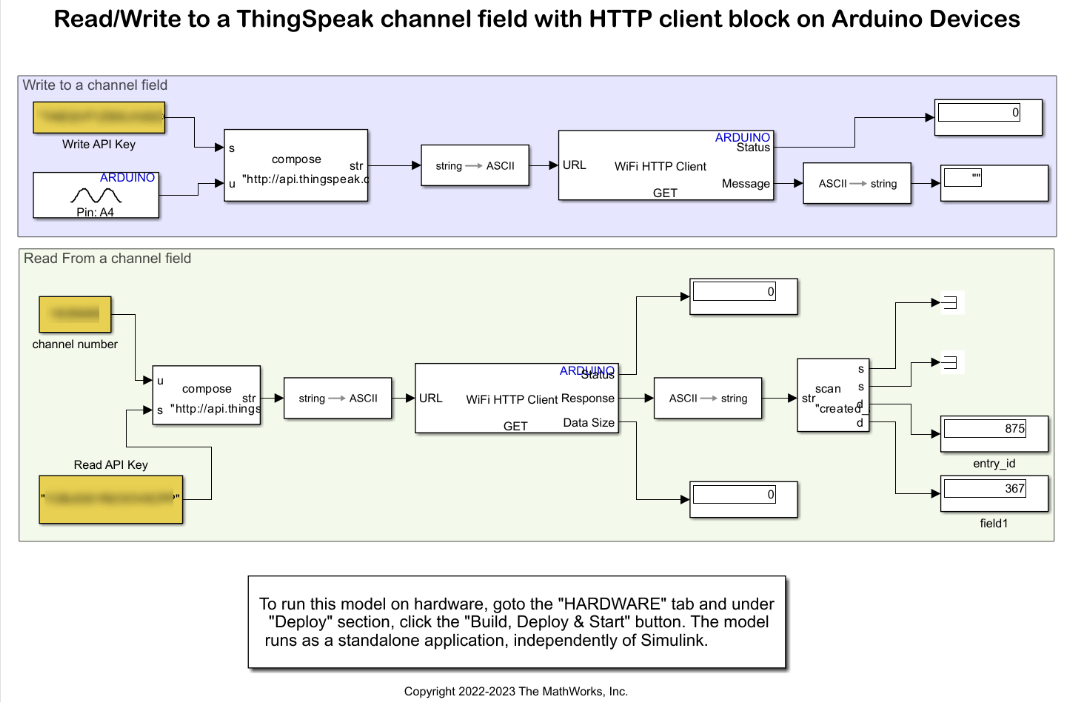
This example uses a preconfigured Simulink model that uses two WiFi HTTP Client blocks, one to write the ADC data to the ThingSpeak channel while, the other to read the ADC data from the ThingSpeak channel and display it on your Arduino hardware.
Open the arduino_HTTPClient Simulink model.

In the Write to a channel field area, update the Write API key. In the Read from a channel field area, update the Read API key and channel number.
In the Configuration Parameters dialog box, update the WiFi properties and ESP32 board properties.
Run Simulink Model
On the Hardware tab of the Simulink model, in the Run on Hardware section, select Monitor & Tune. On your ThingSpeak channel, click the Private View tab. The view displays the ADC data that is published to ThingSpeak.

Observe the ADC data written on field 1 of the ThingSpeak channel on your Simulink model.
See Also
Warn Dry Soil Moisture with Notification from IFTTT Using Arduino Based Smart Watering System
Select a Web Site
Choose a web site to get translated content where available and see local events and offers. Based on your location, we recommend that you select: United States.
You can also select a web site from the following list
Americas
- América Latina (Español)
- Canada (English)
- United States (English)
Europe
- Belgium (English)
- Denmark (English)
- Deutschland (Deutsch)
- España (Español)
- Finland (English)
- France (Français)
- Ireland (English)
- Italia (Italiano)
- Luxembourg (English)
- Netherlands (English)
- Norway (English)
- Österreich (Deutsch)
- Portugal (English)
- Sweden (English)
- Switzerland
- United Kingdom (English)