Create Spreadsheets in the Safety Analysis Manager
The Safety Analysis Manager manages the documents that you use for safety analyses, such as Failure Mode and Effects Analyses (FMEAs) or Functional Hazard Assessments (FHAs). You can create spreadsheets in the Safety Analysis Manager that you can then use to analyze your model.
When you create a spreadsheet, you can manually specify the contents, or create columns that update based on the content of other columns. In this tutorial, you create a simple spreadsheet that takes inputs from two columns and generates the values in a third column.
Create the Spreadsheet
To create a new spreadsheet, open the Safety Analysis Manager. In the Apps tab, click Safety Analysis Manager.

Create a new spreadsheet. In the New section, click Empty Spreadsheet. The new spreadsheet has one row and one column.

Create Spreadsheet Cells
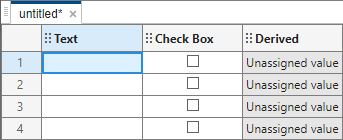
Add three rows and two columns. In the Spreadsheet section, click Add Row three times and click Add Column two times. The rows display their assigned index on the left, and the columns display their labels at the top.

If you add too many rows or columns, you can delete them. To delete a row, click the row index and, in the Edit section, click Delete. To delete a column, click the column label and, in the Edit section, click Delete. If you select multiple rows or columns, you can delete them simultaneously.
You can specify more informative labels for the columns. To change the labels:
Right-click the column label and click Edit Label.
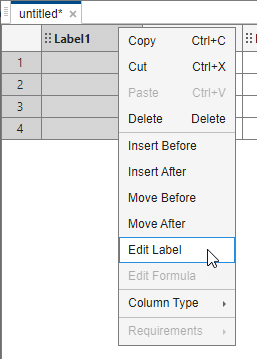
In the Column Label window, in the Enter column label field, enter
Text.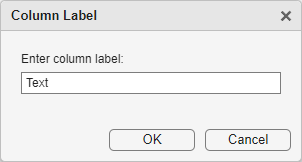
Click OK. The column label updates.
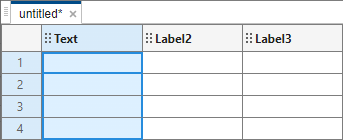
Repeat steps
1–3for the second and third column. Set the label of the second column toCheck Boxand the third column toDerived.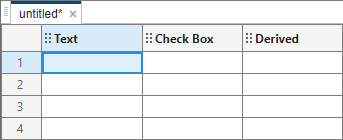
Specify Column Types
By default, new columns accept only text in their cells. You can specify four types of columns:
Text — The column accepts text in the cell values.
Checkbox — The column accepts a logical in the cell values. The values display as a check box.
Enumeration — The column accepts a value specified in an enumeration class defined on the path. You can select the value from the drop down in each cell. For more information, see Create an Enumeration Column.
Derived — The column produces values derived from a formula.
Change the column type of the second and third column. Right-click the column label and click Column Type > Checkbox.
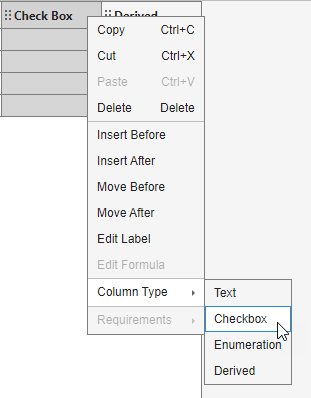
For the third column, set Column Type > Derived.
Define Derived Values
After setting the column types, you need to specify how the derived column cells generate their values. The derived column evaluates the formula for each cell in the column. You can set the derived column cells to return different values based on the values in the other columns.
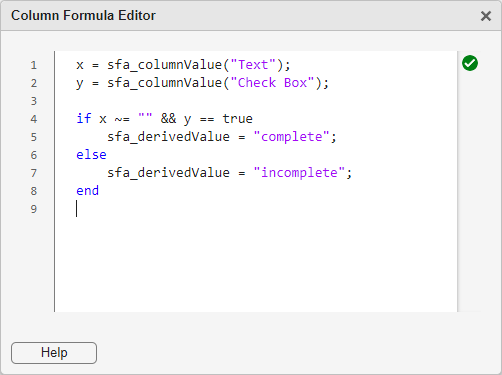
Right-click the column label and click Edit Formula.

The column formula determines the values for each cell in the column. You write the formula in MATLAB®. You can access the contents of the other cells by using the
sfa_columnValueoperator. Thesfa_columnValueoperator retrieves the value associated with the specified column in the same row of each derived cell that the formula evaluates.Retrieve the values of the cells from the
TextandCheck Boxcolumns, and store each of them in a variable. In the Column Formula Editor window, delete the default code and enter this code:x = sfa_columnValue("Text"); y = sfa_columnValue("Check Box");
To specify the value of the cells in the derived column, use the
sfa_derivedValuekeyword and set it equal to the value that you want. If you do not definesfa_derivedValue, the derived cell value is undefined.The default column formula sets the cell output to an empty string (since R2024b) Delete the line that defines
sfa_derivedValueand specify anifstatement where if the cell in theTextcolumn is empty and the check box cell is selected, the derived value is"complete". Otherwise, set the derived value to"incomplete".if x ~= "" && y == true sfa_derivedValue = "complete"; else sfa_derivedValue = "incomplete"; end
The final code in the Column Formula Editor window is:
To save the code, close the Column Formula Editor window.
The derived column now calculates the cell values based on the values in the first and second column. To test this, update the content in the Text and Check Box columns.
Enter text in text column cell by selecting the cell, typing the content, and selecting another cell. Alternatively, enter the text and press Enter (since R2025a).
Click the check boxes to change the value of the cell.
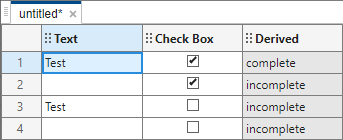
You can also add lines to text column cells. To create a new line, enter content in the cell and press Shift+Enter.
Save the spreadsheet as get_started_spreadsheet. In the
File section, click Save and save the
spreadsheet as get_started_spreadsheet in the folder of your
choice.