Configure and Start the Cluster Admin
The Cluster Admin is an agent that enables you to install, configure, and start the Docker containers for the different Polyspace® Access™ services.
Prerequisites
Before configuring and starting the Cluster Admin:
Download the Polyspace Access installation image:
Go to the MathWorks® download page.
From the I Want To menu, select
Install Productsto install a new version of Polyspace Access, orGet Updatesto install an update, for example R2025b Update 2.Expand the Get Polyspace Access Web Server section and click Download. Check that the text under the download button lists the release and update number (when applicable) that you want to get.
Confirm you are using a minimum Docker API version of 1.44. To force Docker to use the correct API version, set the environment variable
DOCKER_API_VERSIONto 1.44 or later. For more information, see the Docker Engine API documentation.Check that Docker is running on your machine. At the command line, type:
If you get an error message, run the commanddocker ps
sudo systemctl start
                                docker
. Ifsystemctlis not available, useserviceinstead.After you start Docker, you must be logged in as a member of the
dockergroup to run Docker commands. To see a list of current members of this group, use the command:grep 'docker' /etc/group
To add the current user to the
dockergroup, use the command:sudo usermod -aG docker $USER
Unzip Installation Image and Start Cluster Admin Agent
The Cluster Admin admin-docker-agent binary is included with
the polyspace-access-
installation image for Polyspace Access. VERSION.zipVERSION is the release version, for
instance R2025b. After you download the installation image, unzip it to extract these
files and
folders:
admin-docker-agent*
admin-docker-agent.exe*
admin.tar
appdata/
download/
gateway.tar
issuetracker-server-main.tar
issuetracker.tar
issuetracker-ui-main.tar
lm/
polyspace-access-db-main.tar
polyspace-access-download-main.tar
polyspace-access-etl-main.tar
polyspace-access.tar
polyspace-access-web-server-main.tar
products/
usermanager-db-main.tar
usermanager-server-main.tar
usermanager.tar
usermanager-ui-main.tar
VERSION
To start the admin-docker-agent binary, from the command line,
navigate to the installation folder where you extracted the contents of the
zip installation image. Once inside this folder, at the
command-line, enter:
admin-docker-agent
time="2020-07-10T14:23:11Z" level=info msg="Cluster Admin started. You can now connect to the Cluster Admin through
your web browser at http://localhost:9443/admin using the initial password randomPass
randomPass
is a randomly generated initial password. Copy this password. The command-line
output shows the password only the first time you start Cluster
Admin. By default, the Cluster Admin uses the HTTP protocol and starts with hostname localhost and port 9443.
To configure the Cluster Admin with HTTPS, see Choose Between HTTP and HTTPS Configuration for Polyspace Access.
If the default port is already in use, you get a
Permission
                                denied
error message. Use the flag--portto specify a different port number, for instance:admin-docker-agent --port 9999
To generate a Polyspace Access URL that does not require specifying a port number, for instance
https://accessServerHost.cominstead ofhttps://accessServerHost:9443.com, use the--portflag and select port 443 for HTTPS or port 80 for HTTP.
To reset the password, press CTRL+C to stop the
admin-docker-agent binary and enter this
command:
admin-docker-agent --reset-password
The Cluster Admin agent creates a
settings.json file the first time it starts, and stores this
file in the same folder as the admin-docker-agent binary by
default. Ensure that only the user who starts the
admin-docker-agent has read/write permissions on the
settings.json file.
Choose Between HTTP and HTTPS Configuration for Polyspace Access
HTTP Configuration for Polyspace Access
By default, the Cluster Admin uses the HTTP protocol. When
you start the admin-docker-agent binary, you do not need
to specify any additional flags. The communications between Polyspace Access and client machines are not encrypted.
HTTPS Configuration for Polyspace Access
To encrypt the data between Polyspace Access and client machines, configure the Cluster Admin with the HTTPS protocol.
To complete the configuration:
Generate a private key and a certificate signing request (CSR) with a subject alternative name (SAN) extension.
Submit the CSR to your organization's certificate authority (CA) to obtain a signed X.509 certificate in PEM format. Alternatively, use the private key and CSR to create a self-signed PEM certificate.
Start the
admin-docker-agentbinary and use these options to pass the private key and certificate files. All the files must be in PEM format.Option Option Parameter --ssl-cert-filePath of certificate signed by CA or self-signed certificate file. --ssl-key-filePath of private key file. --ssl-ca-filePath of CA trust store file or self-signed certificate file.
It is recommended that you use a certificate issued by a certificate authority to configure HTTPS. The use of self-signed certificates is not recommended outside of testing environments as most web browser cannot establish the authenticity of a server that uses a self-signed certificate and consider the connection to that server not secure. Before you configure Polyspace Access for HTTPS in a production environment using a self-signed certificate, contact your network security administrator.
The configuration of HTTPS for the Cluster Admin enables HTTPS for the API Gateway service. This service handles all communications between the other Polyspace Access services and client machines. To configure HTTPS for communications between the different Polyspace Access services, see Enable HTTPS Between Polyspace Access Services.
1. Generate Private Key and Certificate Signing Request
These steps illustrate how to generate a private key and CSR configured with a
SAN extension on a Debian Linux system by using the openssl utility
and an openssl configuration file.
Copy this configuration file to a text editor and save it on your machine as
openssl.cnf.hostNameis the fully qualified domain name (FQDN) of the server machine on which you run the API Gateway service.hostNamemust match the FQDN that you specify when you start theadmin-docker-agentbinary. You can obtainhostNameby running the commandhostname -f. Editing the other fields in the[ req_distinguished_name ]section does not affect the configuration.To configure HTTPS for multiple hostnames that resolve to the same IP address, add each hostname (DNS or IP address) on a new line in the
[ alt_names ]section of theopensslconfiguration file. For instance:[ alt_names ] DNS.1 = server-machine.example.com DNS.2 = server-machine IP.1 = 192.168.0.1
Generate a CSR by using your
openssl.cnfconfiguration file. In a command line terminal, enter:The command outputs a private key fileopenssl req -new -out myRequest.csr -newkey rsa:4096 -keyout myKey.pem -nodes -config openssl.cnf
myKey.pemand the filemyRequest.csr, which contains a public key and data that describes your server.
Do not reuse the private key file that you use in the User Manager configuration for the Authentication private key file field. See Configure User Manager.
Secure your private key by following best practices such as:
Do not transfer the private key between machines. Instead, generate and store the private key on a local file system.
Restrict read/write permissions. Grant access to the private key file only to the Cluster Admin administrators.
Rotate your private key and certificate regularly (annually) and audit which users have access to the private key file.
2. Obtain and Verify CA Certificate or Self-Signed Certificate
Submit the CSR file myRequest.csr to your organization's
certificate authority. The certificate authority uses the file to generate a
signed server certificate. For instance,
admin_cert.cer.
Alternatively, you can generate a self-signed certificate by running this
command and using the private key, CSR, and openssl
configuration
files:
openssl x509 -req -days 365 -in myRequest.csr -signkey myKey.pem -out self_cert.cer -extensions x509 -extfile openssl.cnf
self_cert.cer.After you obtain your CA certificate or you generate a self-signed
certificate, you can use the openssl utility to verify the
content of the certificate. For instance, To check that the DNS is listed
correctly in the subject alternative name section of your self-signed
certificate, run this
command:
openssl x509 -text -noout -in self_cert.cer | grep -A 1 "Subject Alternative Name"
3. Start the Admin Docker Agent
After you obtain a CA certificate or you generate a self-signed certificate,
start the admin-docker-agent by running the
corresponding command.
| CA Certificate | Self-Signed Certificate |
|---|---|
./admin-docker-agent --hostname hostName\
--ssl-cert-file absolutePathTo/admin_cert.cer \
--ssl-key-file absolutePathTo/myKey.key \
--ssl-ca-file  /etc/ssl/certs/ca-certificates.crt
| ./admin-docker-agent --hostname hostName\ --ssl-cert-file absolutePathTo/self_cert.cer \ --ssl-key-file absolutePathTo/myKey.key \ --ssl-ca-file absolutePathTo/self_cert.cer The
self-signed |
The hostName that you specify in this
command must match the hostName you specified in
openssl configuration file.
absolutePathTo is the absolute file path.
Enable HTTPS Between Polyspace Access Services
To enable HTTPS for communications between the Polyspace Access services, after you Open the Cluster Admin Interface, click
Configure Nodes on the Cluster
Dashboard and select Enable SSL on the
General tab. Enabling SSL in the Nodes
settings affects communications only between the Polyspace Access services that are installed on that node. The SSL certificate,
private key, and CA files that you provide when you start the admin-docker-agent binary are reused in the
Nodes settings, unless the node is already configured with
a different set of files.
By default, all services are installed on the same node and the services ports
are not exposed. You do not need to enable HTTPS for the User
Manager, Issue Tracker, and Polyspace
Access services unless you install these services on different nodes,
or you start the admin-docker-agent binary with option
--force-exposing-ports.
If you install all the services on the same node and you start the
admin-docker-agent binary without using option
--force-exposing-ports, and then you select Enable
SSL in the Nodes setting, you see warning
messages about the Certificate File and the
Certificate Key File not being used because the ports are
not exposed. If you do not plan on exposing the services ports, you can ignore the
warnings and proceed with the next steps in your installation.
Open the Cluster Admin Interface
After you configure and start the Cluster Admin, open your
web browser and go to URL specified in the command-line output when you started the
admin-docker-agent binary.
Log in with the initial password that you obtained when you started the Cluster Admin agent. If this is your first time logging in, follow the prompts.

It is best practice to change your Cluster Admin password after your first login. To set a new password, click Account in the upper right corner of the web interface and select Change password. Share the Cluster Admin password only with users who configure and manage the Polyspace Access services.
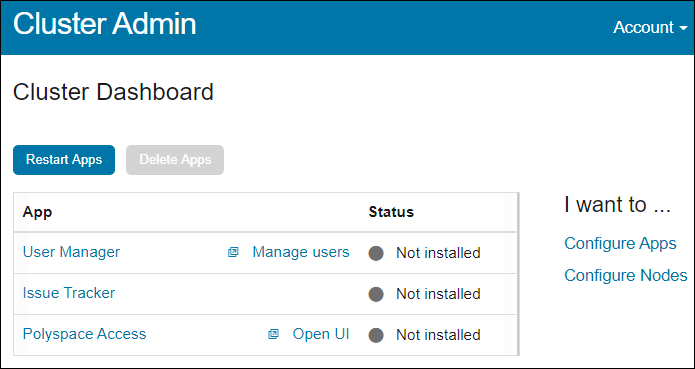
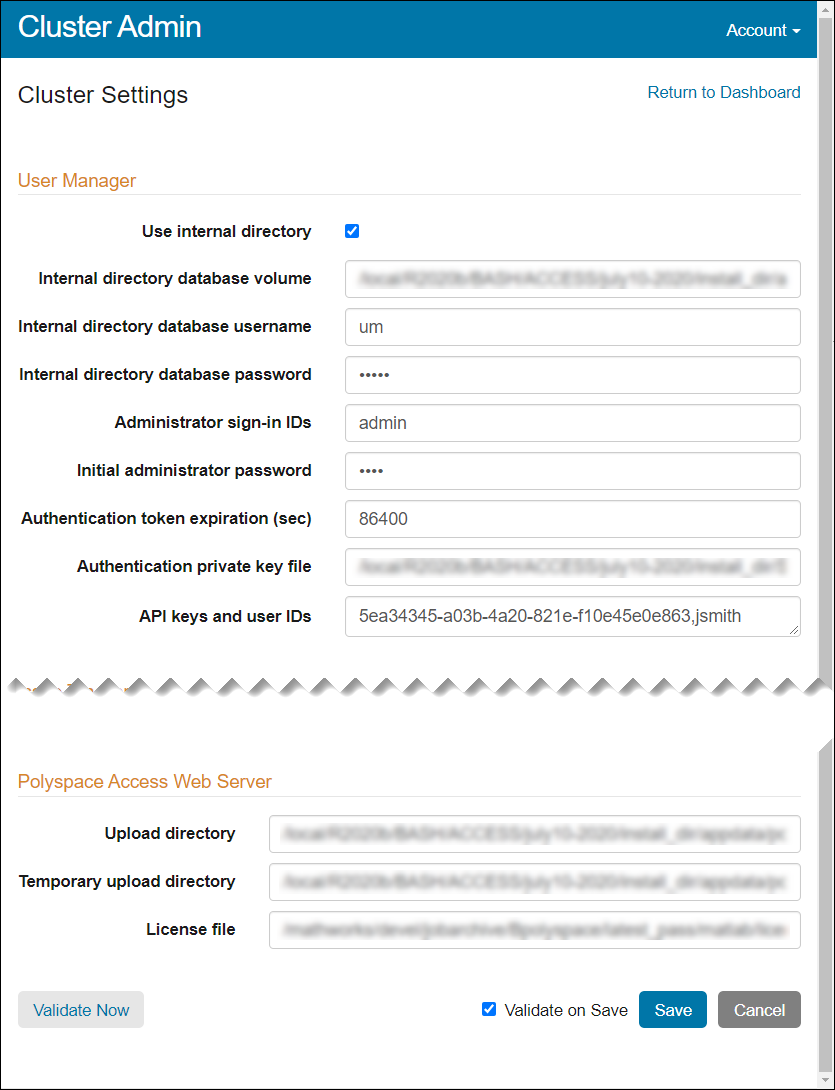
On the Cluster Dashboard, click Configure Apps to open the Cluster Settings. On this page, you can:
Configure user authentications to use the user credentials from your company LDAP or by using custom credentials. See Configure User Manager.
Integrate bug tracking tools such as Jira Software and Redmine with Polyspace Access. See Configure Issue Tracker.
Specify the paths of the license file and of the different folders used by the Polyspace Access database, ETL, and web server. See Configure Polyspace Access App Services.
Once you fill all settings, click Save, return to the Cluster Dashboard, and click Restart Apps for the changes to take effect. Make sure that Validate on Save is enabled before you click Save.
To save partially filled settings, clear Validate on Save and click Save.

Note
On Windows® systems, all the file paths that you specify must point to local drives.
