Main Content

polyspace-access -set-project-information

Set project-specific information

    Description

    The system command polyspace-access -set-project-information displays the text that you specify as banner text in the Polyspace® Access™ web interface.

    polyspace-access -set-project-information <projectPath> -banner <bannerText> -host <hostname> [login options] [output options] sets the text you specify in <bannerText> within a banner in the Polyspace Access user interface. The banner appears when you select the folder or project that you specified with <projectPath>. If a banner already exists in the project, this command replaces the banner with <bannerText>.

    To remove project information, use polyspace-access -unset-project-information.

    example

    Examples

    collapse all

    You can set, replace, or remove a banner from individual projects or project folders. The banner shows when viewing the project or project folder in the Polyspace Access web interface.

    Set the banner in the project public/Bug_Finder_Example (Bug Finder).

    polyspace-access -set-project-information "public/Bug_Finder_Example (Bug Finder)" ^
    -banner "Must adhere to MISRA C++:2023" ^
    -host myAccessServer
    The banner appears in the Polyspace Access web interface.

    Banner applied on a Polyspace Access project

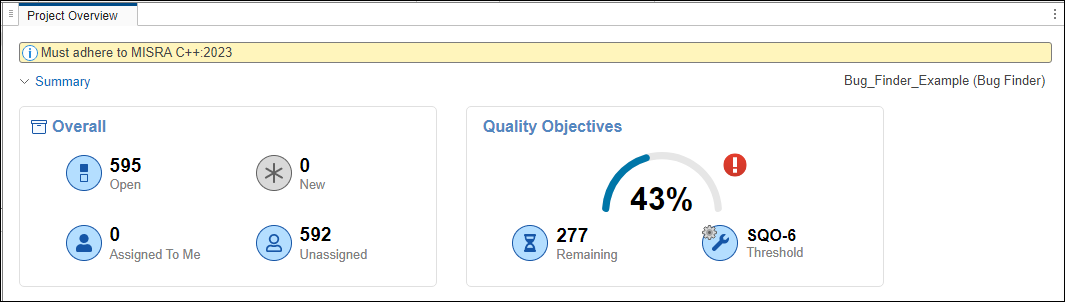
    Remove the banner from the project public/CP/Code_Prover_Example (Polyspace Code Prover).

    polyspace-access -unset-project-information "public/CP/Code_Prover_Example (Polyspace Code Prover)" ^
    -host myAccessServer

    Input Arguments

    collapse all

    Manage and View Projects

    Absolute path of the project, specified as a string. If the path name includes spaces, use double quotes.

    Example: public/Folder/projectName

    Example: "public/Folder/Project with spaces"

    Text to display in the project banner, specified as a string. Use the \n newline character to create banners with multiple lines. If the banner text includes spaces, use double quotes.

    The Polyspace Access user interface displays the project banner on the aggregate project folder or individual project runs. Click on the banner to display longer banner messages in full.

    Example: -banner "My banner text."

    Example: -banner "Multi-line banner example.\n\nMy banner text."

    Connection Configuration

    Polyspace Access machine hostname that you specify in the URL of the Polyspace Access interface, such as https://hostname:portNumber/metrics/index.html. If you are unsure about which hostname to use, contact your Polyspace Access administrator.

    You must specify a hostname with all polyspace-access commands, except the -generate-migration-commands and -encrypt-password commands.

    Example: -host myAccessServer

    Port number that you specify in the URL of the Polyspace Access interface, such as https://hostname:portNumber/metrics/index.html. If you are unsure about which port number to use, contact your Polyspace Access administrator.

    HTTP protocol used to access Polyspace Access, specified as http or https.

    Full path to the text file where you store your login credentials. Use this option if you use a command that requires your Polyspace Access credentials in a script but you do not want to store your credentials in that script. While the script runs, someone inspecting currently running processes cannot see your credentials.

    You can store only one set of credentials in the file, either as -login and -encrypted-password entries on separate lines, for instance:

    -login jsmith
    -encrypted-password LAMMMEACDMKEFELKMNDCONEAPECEEKPL
    You can also store credentials as an -api-key entry:
    -api-key keyValue123
    Make sure that the file where you store your credentials is UTF-8 encoded and that you restrict the read and write permissions on the file. For example, to restrict read and write permissions on file login.txt in Linux®, use this command:
    chmod go-rwx login.txt

    API key you use as a login credential instead of providing your login and encrypted password. To assign an API key to a user, see Configure User Manager or contact your Polyspace Access administrator.

    Use the API key if you use a command that requires your Polyspace Access login credentials as part of an automation script with a CI tool such as Jenkins®. If a user updates their password, you do not need to update the API key associated with that user in your scripts.

    It is recommended that you store the API key in a text file and pass that file to the command by using the -credentials-file option.

    Login username that you use to interact with Polyspace Access.

    Use the options -login and -encryped-password together. If you do not use these two options together, you are prompted to enter your credentials at the command line, unless you use -api-key.

    Login password you use to interact with Polyspace Access. <ENCRYPTED_PASSWORD> is the output of the polyspace-access -encrypt-password command.

    Use the options -login and -encryped-password together. If you do not use these two options together, you are prompted to enter your credentials at the command line, unless you use the -api-key option.

    Number of times the polyspace-access command retries to upload results when you upload from a client machine to the server machine that hosts Polyspace Access before failing. Specify this option to retry the upload command in the event of sporadic network outages. The command waits 10 seconds between retries.

    Full path to command outputs.

    Path to the folder for storing temporary files generated by polyspace-access commands. The default folder path depends on your platform:

    • Windows — C:\Users\%username%\AppData\Local\Temp\ps_results_server

    • Linux — tmp/ps_results_server

    File path where you store the command output log. By default the command does not generate a log file.

    Version History

    Introduced in R2019a