Stream Images from Raspberry Pi Using Robot Operating System
This example shows how to stream images captured from a webcam on a Raspberry Pi® board to the host computer using a ROS communication interface. In this example, you stream images from your Raspberry Pi board to your host computer using the ROS Publish blocks. You use the ROS MATLAB® command line interface to display the images on your host computer.
Prerequisites
Complete the Get Started with Robot Operating System on Raspberry Pi example.
Verify that you have ROS Noetic installed on your Raspberry Pi hardware board. For more information on release-wise support for recommended ROS and ROS 2 distributions, see ROS Toolbox System Requirements (ROS Toolbox).
Required Hardware
Raspberry Pi board
USB webcam
Task 1 - Connect USB webcam
In this task, you connect a USB webcam to your Raspberry Pi hardware and verify if the webcam was detected by the Linux® kernel.
1. If you are using a USB webcam, connect it to one of the USB ports on your Raspberry Pi board. Some webcams need more power and can require a powered USB hub to operate correctly.
2. Verify if the Linux kernel recognizes the webcam.
system(r,'ls -al /dev/video*')
Typical output will be:
crw-rw---T+ 1 root video 81, 0 Dec 16 14:43 /dev/video0
Task 2 - Configure and Run Simulink Model
In this task you create a ROS node that publishes the images captured from the webcam attached to your Raspberry Pi board.
1. Open the rosberrypi_publish_camera Simulink model.

2. Verify that the video device filename you determined in Task 1 matches to the value of the Device name parameter in the V4L2 Video Capture block mask. In this example, the parameter is set to '/dev/video0'.
2. Start a ROS master on the host computer.
rosinit('NodeHost',<IP address of your computer>)For example, if the IP address of your host computer is 10.10.10.2, use the following command.
rosinit('NodeHost','10.10.10.2')3. On the Hardware tab of the Simulink model, in the Mode section, select Run on board and then click Build, Deploy & Start to automatically generate a ROS node and run it on the Raspberry Pi hardware.
NOTE: The rosberrypi_publish_camera Simulink model publishes only the Y (luminance) component of the captured image at a relatively small size of 160-by-120 pixels to keep network latency to a minimum when viewing images on the host computer. You can increase the image size and publish the image in color by enhancing the Simulink model. However, this usually introduces additional delay and needs more resources from the CPU on the Raspberry Pi board.
Task 3 - Verify ROS Node
In this task, you verify the behavior of the newly built ROS node using the MATLAB command line interface for ROS.
1. The rosberrypi_publish_camera Simulink model publishes messages to the /camera topic using sensor_msgs/Image message type. First, verify that a new topic called /camera has been generated:
rostopic info /camera
You should see the IP address of your Raspberry Pi in the publishers list.
2. Create a ROS subscriber for the /camera topic.
s = rossubscriber('/camera')The subscriber s uses the std_msgs/Image message type to represent black and white images captured from a webcam attached to Raspberry Pi board.
3. Create a callback function attached to the subscriber s to automatically display images on your host computer as they are published by the Raspberry Pi board.
s.NewMessageFcn = @(~,msg) imagesc(reshape(msg.Data,[160,120])');
Once you execute this command, a figure window displays the images published from Raspberry Pi board. To display black and white images, set the colormap to gray.
colormap gray
4. Stop streaming the images.
d = rosdevice();
stopNode(d,'rosberrypi_publish_camera');
You can restart the ROS node at any time by executing the following command at the MATLAB command prompt.
runNode(d,'rosberrypi_publish_camera');
Task 4 - Display Published Images Using Simulink
In this task, you publish the images using Simulink ROS Subscriber blocks.
1. Clear the ROS subscriber you created in Task 3.
clear('s')
2. Open the rosberrypi_subscribe_camera Simulink model.
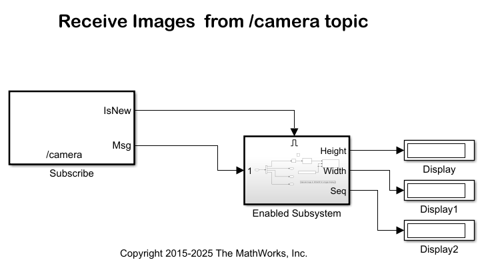
Click Play to view the images sent from the Raspberry Pi board in the SDL Video Display window. The Simulink model also displays the width, height and sequence number of the images.