Create Local Git Repository in MATLAB
You are creating utilities to standardize the developing process in your team. You made good progress and want to use Git™ source control to track your changes to the files locally.
Open the example to download the supporting files under Git source control.
Initialize Local Git Repository
To initialize a local Git repository in a folder or project, in the Files or Project panel, right-click and select Initialize Git Repository. MATLAB® creates the .gitignore and .gitattributes files and adds them to the repository.

If you are using MATLAB Projects, you can also initialize a local Git repository by clicking Initialize Git Repository in the Project toolstrip.
Alternatively, use the gitinit function.
repo = gitinit("TeamUtilities");
Add Files to Git Repository
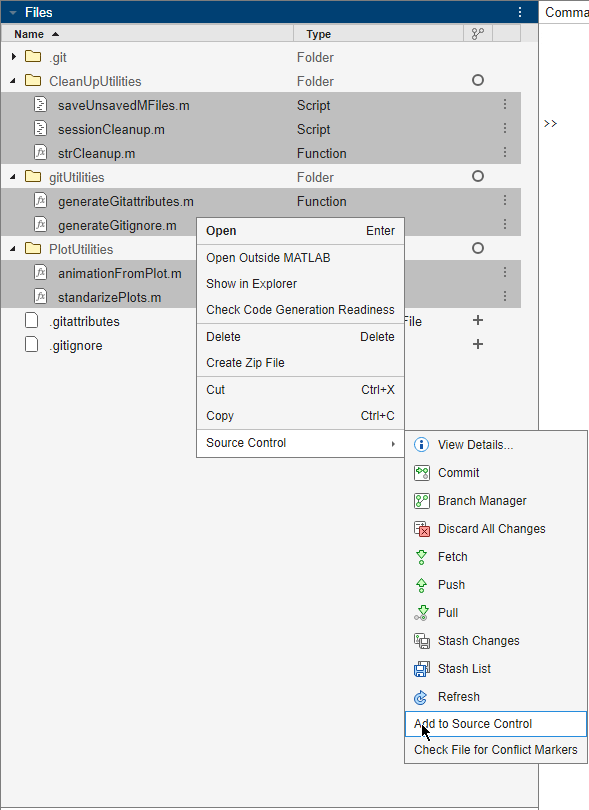
To add files to the repository, in the Files or Project panel, select and right-click the files you want to add. Then, select Source Control > Add to Source Control. The source control status changes in the source control column to Added ![]() . To add files to the list of ignored files instead, see Ignore Files.
. To add files to the list of ignored files instead, see Ignore Files.
To add all untracked files to source control, right-click the white-space and select Source Control > Add Untracked Files. In the Add Files dialog box, with all the check boxes selected, click Add.

If you are using MATLAB projects to manage the files in the folder, MATLAB automatically adds all files with the status In project to source control.
Tip: As a design grows, managing referenced files and dependencies becomes more complicated. MATLAB Projects help you organize large hierarchies by finding required files, managing the path, creating shortcuts, and sharing files and settings. For more information, see Projects.
In large repositories, to view only the list of untracked files, use the Source Control panel. If the Source Control icon is not in the sidebar, click the Open more panels button ![]() and select the Source Control panel.
and select the Source Control panel.
To add a file to source control, in the Untracked Files section, right-click a file and select Add to Source Control.
To add a folder and its files to source control, in the Untracked Files section, right-click the folder and select Add Untracked Files. In the Add Files dialog box, clear the files that you do not want to add to source control and click Add.
To add all untracked files in the repository to source control, click the More source control options button
 . Then, select Add Untracked Files. In the Add File dialog box, select everything and click Add.
Alternatively, use the add function.
add(repo,repo.UntrackedFiles)
Ignore Files
It is a best practice to exclude derived and temporary files from source control.
To ignore a file from Git source control, in the Files or Project panel, right-click a file and select Source Control > Ignore File. Alternatively, in the Source Control panel, in the Untracked Files section, right-click a file and select Ignore File.
To ignore all files with a specific extension from Git source control, in the Files or Project panel, right-click a file and select Source Control > Ignore (.ext) Files. Alternatively, in the Source Control panel, in the Untracked Files section, right-click a file and select Ignore (.ext) Files.
To ignore the content of a folder from Git source control, in the Files or Project panel, right-click a folder and select Source Control > Ignore Folder. Alternatively, in the Source Control panel, in the Untracked Files section, right-click a file and select Ignore Folder.
MATLAB adds the corresponding lines in the .gitignore file. To stop ignoring files, delete the lines from the .gitignore file.
Manage Files
You can manage the files in your local Git repository using several actions from the Files and Project panels. You can refresh the source control status of your files, and move, rename, delete, and revert the files.
This table describes the actions that you can take to manage your files.
Action | Procedure |
|---|---|
Refresh source control status of one or more files | If you make changes to files outside of MATLAB, to update the list of modified files, refresh the source control status. In the Files or Project panel, select one or more files, right-click and select Source Control > Refresh. To refresh the source control status for all files in the repository, right-click the white space and select Source Control > Refresh. |
Move file | In the Files or Project panel, select the file. Then, drag the file into the new location. If you are using a MATLAB project, moving, deleting, or renaming a file triggers a dependency analysis to find all the mentions of the file that you need to update. For more information, see Manage Project Files. |
Rename file | In the Files or Project panel, select the file, right-click and select Rename. Then, enter the new name. If you are using a MATLAB project, moving, deleting, or renaming a file triggers a dependency analysis to find all the mentions of the file that you need to update. For more information, see Manage Project Files. |
Remove file from source control and retain copy in working folder | In the Files or Project panel, right-click the file and select Source Control > Remove from Source Control. When the file is marked for deletion from source control, the symbol in the source control column changes to Deleted. The file is removed from the repository at the next commit. |
Remove file from source control and from working folder | In the Files or Project panel, right-click the file and select Source Control > Remove from Source Control. Then, right-click and select Delete. The file is removed from the repository at the next commit. If you are using a MATLAB project, moving, deleting, or renaming a file triggers a dependency analysis to find all the mentions of the file that you need to update. For more information, see Manage Project Files. |
Discard changes to file in local repository | In the Files or Project panel, right-click a file and select Source Control > Discard Changes. |
Revert file to specified revision | In the Files or Project panel, right-click a file and select Source Control > Show Revisions. Then, select a revision and click the Revert button. |
Perform Initial Commit
Make the initial commit to add the files to your repository. In the Source Control panel, click Commit. Alternatively, in the Files or Project panel, right-click and select Source Control > Commit.
Tip: You can combine the Files and Source Control panels for an easier interaction by dragging one panel on top of the other.

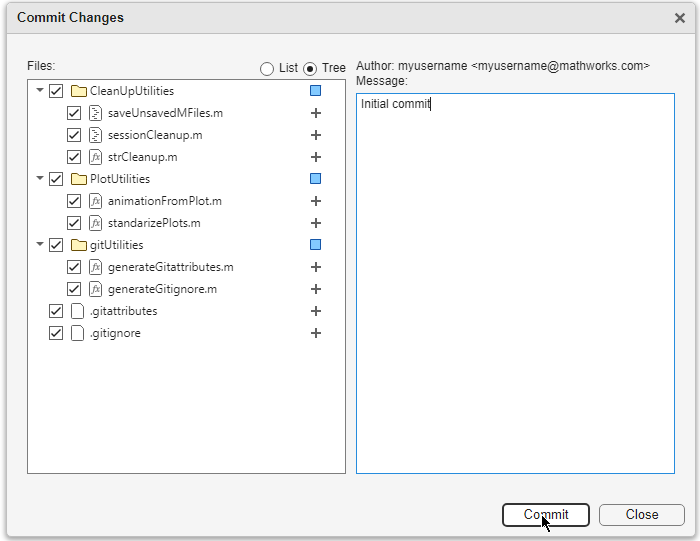
In the Commit Changes dialog box, enter the commit message and click Commit.
You can configure MATLAB to prompt you about unsaved changes before performing source control actions such as commit, merge, and branch switch. For more information, see Configure Source Control Settings.
Alternatively, use the commit function.
commit(repo,Message="Initial commit");
The source control status changes from Added ![]() to Unmodified
to Unmodified ![]() .
.