Generate Profiles Using PMU Metrics
Execution-time profiling captures code execution times, which can help you to identify bottlenecks–see Aggregate Execution-Time Profiles to Identify Worst Execution and View and Compare Code Execution Times. If you are unable to explain the observed execution times by examining the generated code, for Linux®-based hardware, you can investigate further by analyzing metrics from the Performance Monitoring Unit (PMU) of the hardware.
For example, if the generated code multiplies two matrices, you might notice that the execution time increases significantly with matrix size. In this case, if you use the number of data cache misses as the metric for profiling generated code, you might observe how the cache size for the chosen algorithm affects its operation on the selected hardware. You can use the information to tailor the algorithm, improving its performance on the selected hardware.
PMU Metric Options
In a software-in-the-loop (SIL) or processor-in-the-loop (PIL) simulation, use the model
parameter CodeProfilingCodeMetrics to specify the metric that you want to
extract from the PMU.
This table shows the options you can use to extract PMU metrics.
| Model Parameter | Option | Metric Extracted from PMU |
|---|---|---|
CodeProfilingCodeMetrics | 'time' (default) | Not applicable |
'totinstr' | Total instruction count | |
'floatinsts' | FPU instruction count | |
'floatopts' | FPU operation count | |
'intinstr' | ALU instruction count | |
'loadinstr' | Load instruction count | |
'storeinstr' | Store instruction count | |
'totcyc' | Total cycle count | |
'l1dcm' | L1 data cache misses | |
'l1icm' | L1 instruction cache misses | |
'l2dcm' | L2 data cache misses | |
'l2icm' | L2 instruction cache misses | |
'tlbdm' | TLB data misses | |
'tlbim' | TLB instruction misses | |
'memstall' | Memory stall cycles | |
'totstall' | Total stall cycles |
Check PMU Support on Target or Development Computer
The default driver provided for Linux-based target hardware uses the Performance Application Programming Interface (PAPI) for collecting performance counter information. PAPI provides an abstraction layer between the generated code and the kernel and PMU underneath. To check that you can use the PMU on your target or development computer:
Install PAPI (if it is not already available). The software supports PAPI 6.0 or later for the Debian®, Ubuntu®, Red Hat® Enterprise Linux™, CentOS®, and Fedora® operating systems. If you prefer, you can download the PAPI code and compile it manually.
To make
perfenable the use of the performance events system by unprivileged users, write -1 to theperf_event_paranoidfile. In your Linux terminal, enter:sudo sh -c "echo -1 > /proc/sys/kernel/perf_event_paranoid"To verify that counters are available and to view the events that you can log, run the PAPI utility program.
Or, if you intend to run a SIL simulation on your Linux development computer, in the Command Window, enter:papi_availcoder.profile.pmu.verifyPMUOnHost(metricOption)
By default,
metricOptionis'totcyc'. This command generates, compiles, and runs a simple test program to verify that the drivers work on your development computer.
Generate and Analyze Profile
The workflow for producing a profile using a PMU metric is similar to the workflow that produces an execution-time profile.
Configure the model for execution-time profiling.
openExample('ecoder/SILPILVerificationExample', ...
             supportingFile='SILTopModel.slx')

set_param(gcs,'CodeExecutionProfiling','on');
set_param(gcs,'CodeProfilingInstrumentation','coarse');
set_param(gcs, ...
          'CodeProfilingSaveOptions','AllData');

set_param(gcs, ...
          'CovEnable','off');
covSettings = get_param(gcs,'CodeCoverageSettings');
covSettings.CoverageTool = 'None';
set_param(gcs,'CodeCoverageSettings',covSettings);
Specify the metric you want to extract from the PMU. For example, to extract L1 data cache misses, enter:
set_param(gcs,'CodeProfilingCodeMetrics','l1dcm');
Run the simulation.
simOut = sim(gcs);
When the simulation is complete, the profiled model components are blue in the
Simulink® Editor. For top-model SIL or PIL simulations, the Simulink Editor background is also blue. The simulation generates the variable
executionProfile (default) in the object
simOut.
To view the results in the Code Profile Analyzer app, in the Profiling details panel, click the Code Profile Analyzer link. Or, from the Command Window, run:
coder.profile.show(simOut.executionProfile)
The app displays information on the Function Execution tab and Summary pane.
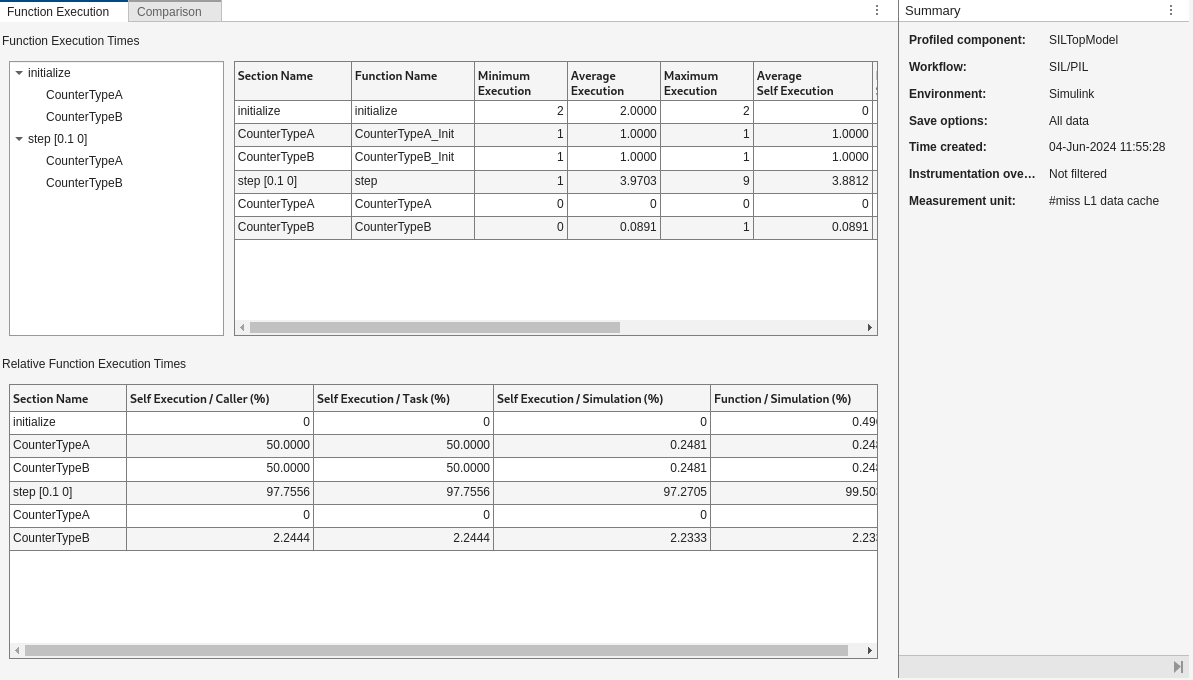
On the Function Execution tab, the Function Metrics pane provides a function-call tree and metrics for functions and their child functions.
The Function Metrics pane provides this information:
Section Name — Name of profiled code section.
Function Name — Name of profiled function.
Minimum Metric — Minimum metric value for function.
Average Metric — Average metric value for function.
Maximum Metric — Maximum metric value for function.
Average Self Metric — Average metric value, excluding metric values for child functions.
Maximum Self Metric — Maximum metric value, excluding metric values for child functions.
Calls — Number of calls to the function.
Standard Deviation — A measure of the spread of function metric values about the average value.
Variance — A measure of the dispersion of function metric values. The metric standard deviation is the square root of this value.
The Relative Function Metrics pane provides function metric values as percentages of caller function and total metric values.
| Relative Metric | Comparison Performed |
|---|---|
| Self / Caller (%) | Function self metric value compared with the total metric value for the caller function. |
| Self / Task (%) | Function self metric value compared with the total metric value for the task. |
| Self / Simulation (%) | Function self metric value compared with the total metric value for the simulation. |
| Function / Simulation (%) | Function metric value, which includes self metric value and metric value for child functions, compared with the total metric value for the simulation. |
The Results section of the toolstrip provides features that you can use in your analysis of functions:
To trace the model component associated with a generated function and its metric values:
In the function-call tree or a table, click the function. For example, click
CounterTypeA, which is called bystep [0.1 0].On the toolstrip, in the Results section, click Highlight Source. The Simulink Editor identifies the subsystem.
To view the function call in generated code, click Highlight Code. The call is highlighted in the code generation report.
To display the metric value distribution for the function, click Generate Distribution.
To view metric values for the generated code in an HTML report, click Generate Report.
Compare Profile Against Baseline
You can compare metric values from the current simulation against values from a baseline simulation.
In the Analysis section, click Comparison, which displays these controls.

From the Select a profile variable list, select the workspace variable that contains results from the baseline simulation.
Click Compare.
The panel displays the function-call tree and a percentage comparison of metric values for the two simulations.
The table cells are green if the current metric value is less than the baseline value and yellow if the current metric value is greater than the baseline value.
If the workspace variable for the baseline simulation does not contain data for a code
section, the panel displays NaN.
If you click Compare in SDI, the Simulation Data Inspector uploads and compares the selected results.
To invert the comparison order, that is, to make results from the current simulation the reference, click Invert order.

Register Custom Driver to Extract PMU Metrics
If your target hardware is not supported natively, you can register custom drivers to extract the required metrics from the PMU. Provided you define the API, you can extract metrics from the PMU of any target hardware. You are not limited to Linux-based target hardware or the PAPI library.
The Add profiling timer step in Use rtiostream API for PIL Target Connectivity shows how you can create a timer object for time retrieval. You can modify the step to enable the use of PMU metrics in code profiling.
Create a hardware counter object that describes the retrieval of counter information from the PMU. The object description must include a description of the function that retrieves counter values and its implementation.
This example uses a C function, pmu_counter, which returns a counter
value as a uint64 data
type.
HWCounterSignature = target.create('Function');
HWCounterSignature.Name = 'pmu_counter';
HWCounterSignature.ReturnType = 'uint64';
Capture the function in an API object.
HWCounterApi = target.create('API');
HWCounterApi.Functions = HWCounterSignature;
HWCounterApi.Language = target.Language.C;
HWCounterApi.Name = 'Hardware Counter API';
Capture the dependencies of the function, that is, the source and header files required to run the function.
HWCounterDependencies = target.create('BuildDependencies');
HWCounterDependencies.IncludeFiles = {'HWCounter.h'};
timerDependencies.IncludePaths = {'/home/user/Desktop/PMUDrivers'};
timerDependencies.SourceFiles = {'HWCounter.c'};
Create an object that combines the API and dependencies.
HWCounterImplementation = target.create('APIImplementation');
HWCounterImplementation.API = HWCounterApi;
HWCounterImplementation.BuildDependencies = HWCounterDependencies;
HWCounterImplementation.Name = 'Hardware Counter Implementation';
Create the hardware counter object and associate it with the L1 data cache miss counter.
HWCounter = target.create('HardwareCounter');
HWCounter.APIImplementation = HWCounterImplementation;
HWCounter.Name = 'Hardware Counter';
HWCounter.Type = target.HardwareCounterType.L1DCMiss;
Append the new hardware counter to the timer and counters list in the processor object.
processor.Timers = [processor.Timers HWCounter];
The software supports these hardware counter types.
| Hardware Counter Type | Metric Extracted from PMU |
|---|---|
target.HardwareCounterType.NumInstrs | Total instruction count |
target.HardwareCounterType.FPUInstrs | FPU instruction count |
target.HardwareCounterType.FPUOpts | FPU operation count |
target.HardwareCounterType.ALUInstrs | ALU instruction count |
target.HardwareCounterType.LdInstrs | Load instruction count |
target.HardwareCounterType.StInstrs | Store instruction count |
target.HardwareCounterType.TotCycles | Total cycle count |
target.HardwareCounterType.L1DCMiss | L1 data cache misses |
target.HardwareCounterType.L1ICMiss | L1 instruction cache misses |
target.HardwareCounterType.L2DCMiss | L2 data cache misses |
target.HardwareCounterType.L2ICMiss | L2 instruction cache misses |
target.HardwareCounterType.DTLBMiss | TLB data misses |
target.HardwareCounterType.ITLBMiss | TLB instruction misses |
target.HardwareCounterType.MemStalls | Memory stall cycles |
target.HardwareCounterType.TotStalls | Total stall cycles |
See Also
Topics
- Aggregate Execution-Time Profiles to Identify Worst Execution
- View and Compare Code Execution Times
- Use rtiostream API for PIL Target Connectivity