Configure MQTT Client in Simulink
Configure an MQTT client to read or write messages to topics using the MQTT Client Subscribe or MQTT Client Publish blocks in Simulink®.
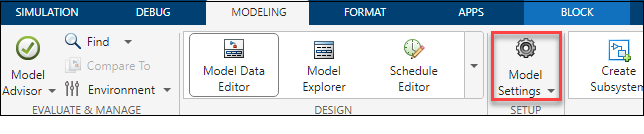
In the Simulink toolstrip, click Model Settings in the Modeling tab to open the Configuration Parameters dialog box. In the dialog box, click the MQTT pane to configure the required MQTT clients.
Alternately, click Configure clients in the MQTT Client Subscribe or MQTT Client Publish blocks to open the MQTT pane.

The MQTT pane lists all the MQTT clients that you configure in the current model. You can use the buttons in this window to add, delete, and configure the clients.
Add: Create a new MQTT client.
Delete: Delete the selected client.
Configure: Edit the selected client properties.

MQTT Client Configuration
Complete these steps to configure an MQTT client for a Simulink model.
Note
To enable the MQTT pane in the Configuration Parameters dialog box of the model, you must include an MQTT Client Subscribe or MQTT Client Publish block in the model.
Step 1: Create MQTT Client
To create a new MQTT client, click Add. The Add MQTT Client dialog box lists the default values of the Name, Port, Timeout, and Keep Alive Duration properties as
MQTTClient,8883,5, and60, respectively. You must specify a valid broker address in the Broker Address field.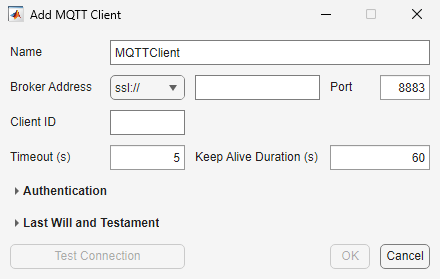
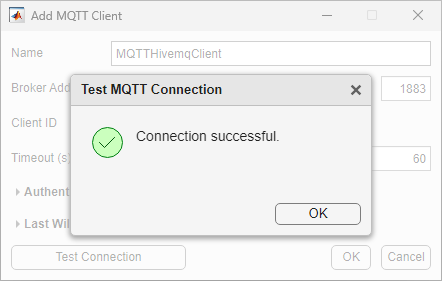
To test the connection, click Test Connection. If the client connects to the specified broker, the Test MQTT Connection dialog box displays a Connection successful message. Click OK.
To edit or view the authentication and last will and testament settings, expand the Authentication and Last Will and Testament panel, respectively. Modify the required settings and click OK.

Simulink creates a new MQTT client for the specified MQTT broker and adds the client to the MQTT clients table.

Step 2 (Optional): Configure Authentication and Last Will and Testament for MQTT Client
Simulink does not configure the authentication or last will and testaments settings of an MQTT client by default. To edit the authentication or last will and testament settings, select the client, click Configure, and expand the Authentication or Last Will and Testament panel. For more information, see Authentication and Last Will and Testament.

In the Configure MQTT Client window, edit the authentication and last will and testament settings. You can also edit the client connection properties such as Client ID, Timeout, and Keep Alive Duration. Modify the required settings and click OK. The client ID is updated in the MQTT clients table.

Step 3: Update Client Information in Model
Click OK in the Configuration Parameters window to update the model with information about the new MQTT client.
Step 4: Select Client Connection for MQTT Block
The Client parameter of the MQTT blocks lists all the client connections that you have added in the MQTT clients table. You must click Refresh to update the block with the latest client information.

Select a client to associate the block with the MQTT client.