Create an App to Segment Images with SAM
R2026bThis example shows how to build an app to interactively segment images with the Segment Anything Model (SAM) using App Designer. Using the SAMSegmentationApp app, users can interactively create labeled masks for images. Users specify simple visual prompts, such as a bounding boxes or foreground and background points, and the app previews an updated segmentation mask immediately. Users can then commit the previewed region into a saved label mask and export that final mask to a file or to the workspace.
In this example, you first build a custom UI component you can use to segment an image using SAM, and then build an app that specifies the settings of the SAM algorithm and uses the custom UI component for segmentation. The custom UI component inherits from the matlab.ui.componentcontainer.ComponentContainer class. You can reuse the custom UI component in different apps to improve code reusability, logic isolation, and maintainability.
This example requires the Image Processing Toolbox™ Model for Segment Anything Model 2. You can install the Image Processing Toolbox Model for Segment Anything Model 2 from Add-On Explorer. For more information about installing add-ons, see Get and Manage Add-Ons. The Image Processing Toolbox Model for Segment Anything Model 2 requires desktop MATLAB®, as MATLAB® Online™ and MATLAB® Mobile™ do not support the add-on.
Open App Designer
App Designer is an interactive development environment for designing custom UI components and apps and programming their behavior.
To build the app from scratch, open App Designer using this command. Alternatively, you can open App Designer by selecting the Design App option on the Apps tab of the MATLAB® toolstrip.
appdesigner
In this example, you build the SAMSegmenter custom UI component and the SAMSegmentationApp app. The SAMSegmenter component and the SAMSegmentationApp app are also attached to this example as supporting files. For information on running the app, see the Segment Image with SAM Using App section.
You can also open this example from the App Designer home page by clicking Show examples in the Apps section of the home page and selecting Generate Labeled Mask Using SAM from the list of examples.
You can customize the code of the app in the attached supporting files. For information on customizing the app, see the Customize the App section.
App Layout Design
The SAMSegmentationApp app has two main regions: a toolstrip and a working area.
The toolstrip contains these sections:
Import Image — Consists of UI components used to import image data from a file or the workspace.
Settings — Consists of UI components used to specify the properties of the
SAMSegmentercomponent.Export — Consists of UI components used to export the segmented images.
The working area of the app consists of a single section containing an instance of the custom UI component SAMSegmenter, which segments the image.
Each SAMSegmenter component contains these sections:
View — Consists of a
ViewerUI component that displays the imported image and the segmented mask. The component displays the image using theimageshowfunction. The handle of the displayed image is anImageobject, for which theViewerobject is the parent. For more information about theViewerobject, see Viewer Properties. For more information about theImageobject, see Image Properties.Controls — Consists of UI components used to interactively draw a bounding box, mark foreground and background points, append the current segmentation mask, and specify pixel IDs.
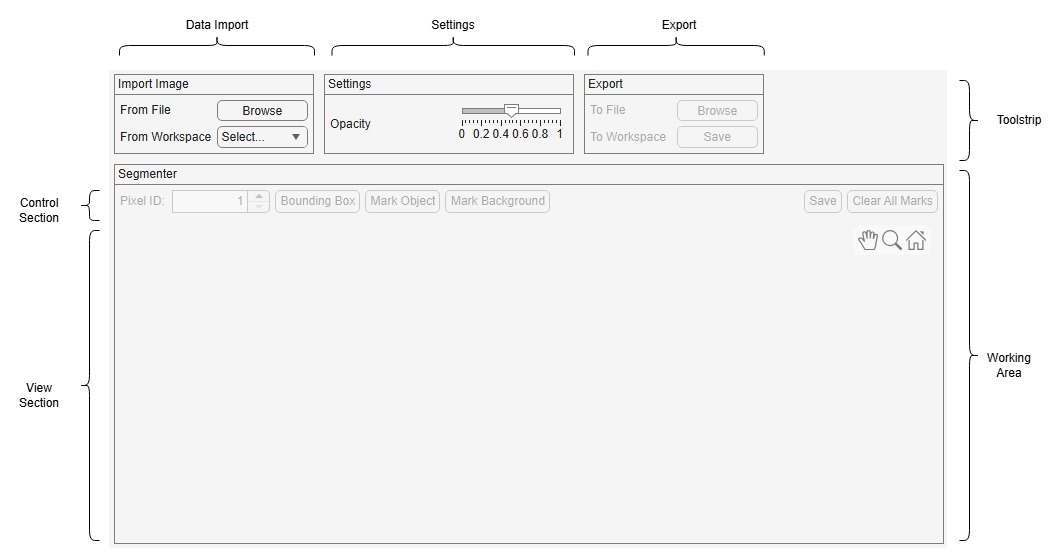
The app uses this grid layout structure to create the defined layout.
Main app figure
Main app grid layout
Toolstrip grid layout
Toolstrip elements like import, settings, export
Working area grid layout
SAMSegmentercustom UI component
For more information on using grid layout with App Designer, see Use Grid Layout Managers in App Designer.
Create the SAMSegmenter Custom UI Component
Each SAMSegmenter custom component includes these properties:
Image— Image to be segmented.Mask— Current labeled mask, of the same size asImage. If the user has not currently saved a mask,Maskis a matrix of zeros.SavedMask— Last committed mask of the same size asImage.SegmentationAlpha— Transparency value for the overlay mask, in the range [0, 1].Model— SAM model object for the current image.Embeddings— Extracted embeddings for the current image.SegmentRequired— Flag to trigger theupdatemethod of the component. This is a private flag, not accessible to the users of the app.
Custom UI components inherit from the of the matlab.ui.componentcontainer.ComponentContainer class and have two primary methods, setup and update.
The setup method and other custom functions of the ImageFilter custom component create and set up its layout, including these UI components.
A grid layout for the UI components
The
Viewerobjects used to display the image.UI elements used to interactively draw bounding boxes, mark foreground and background points, and specify segmentation pixel IDs.
When the user loads a new image, the SAMSegmenter component extracts the embeddings from the loaded image using the extractEmbeddings function. Every time the user creates visual prompts such as a foreground mark, background mark, or bounding box, the component sets the SegmentRequired flag to true. This flag triggers the update method of the SAMSegmenter component, which computes the segmentation using the segmentObjectsFromEmbeddings function with the new visual prompt as input. The component updates the last committed mask with the new segmentation, and previews the updated mask. If the user selects the Save option, the component saves the updated mask as the last committed mask. The update method defines this behavior.
function update(comp)

    if ~isvalid(comp) || ~comp.SegmentRequired
        return
    end

    % Reset flag
    comp.SegmentRequired = false;

    n = numel(comp.Viewer.Annotations);

    if ~isempty(comp.Embeddings) && n > 0
        imageSize = size(comp.ImageObject.Data);

        annotationObjects = comp.Viewer.Annotations;

        foreground = [];
        background = [];


        for idx = 1:numel(annotationObjects)
            if isa(annotationObjects(idx),"images.ui.graphics.roi.Point") && isvalid(annotationObjects(idx))
                if annotationObjects(idx).UserData
                    foreground(end+1,:) = annotationObjects(idx).Position(1:2); %#ok<AGROW>
                else
                    background(end+1,:) = annotationObjects(idx).Position(1:2); %#ok<AGROW>
                end
            end
        end

        % Foreground information
        if isempty(foreground) && isempty(comp.Bbox)
            return;
        end

        % Get segmented mask from current foreground and background
        % information
        mask = segmentObjectsFromEmbeddings(comp.Model,comp.Embeddings,imageSize, ...
            ForegroundPoints=foreground,BoundingBox=comp.Bbox,BackgroundPoints=background);

        % Append the new segmentation to the existing
        % segmentation for preview
        priorMask = comp.SavedMask;
        priorMask(mask) = uint8(comp.Spinner.Value);

        comp.ImageObject.OverlayData = priorMask;

        % Enable saving or reverting the current state
        comp.SaveMask.Enable = "on";
    end
end
Define Callbacks for SAMSegmenter Custom UI Component
The SAMSegmenter component uses callback functions to handle user interactions.
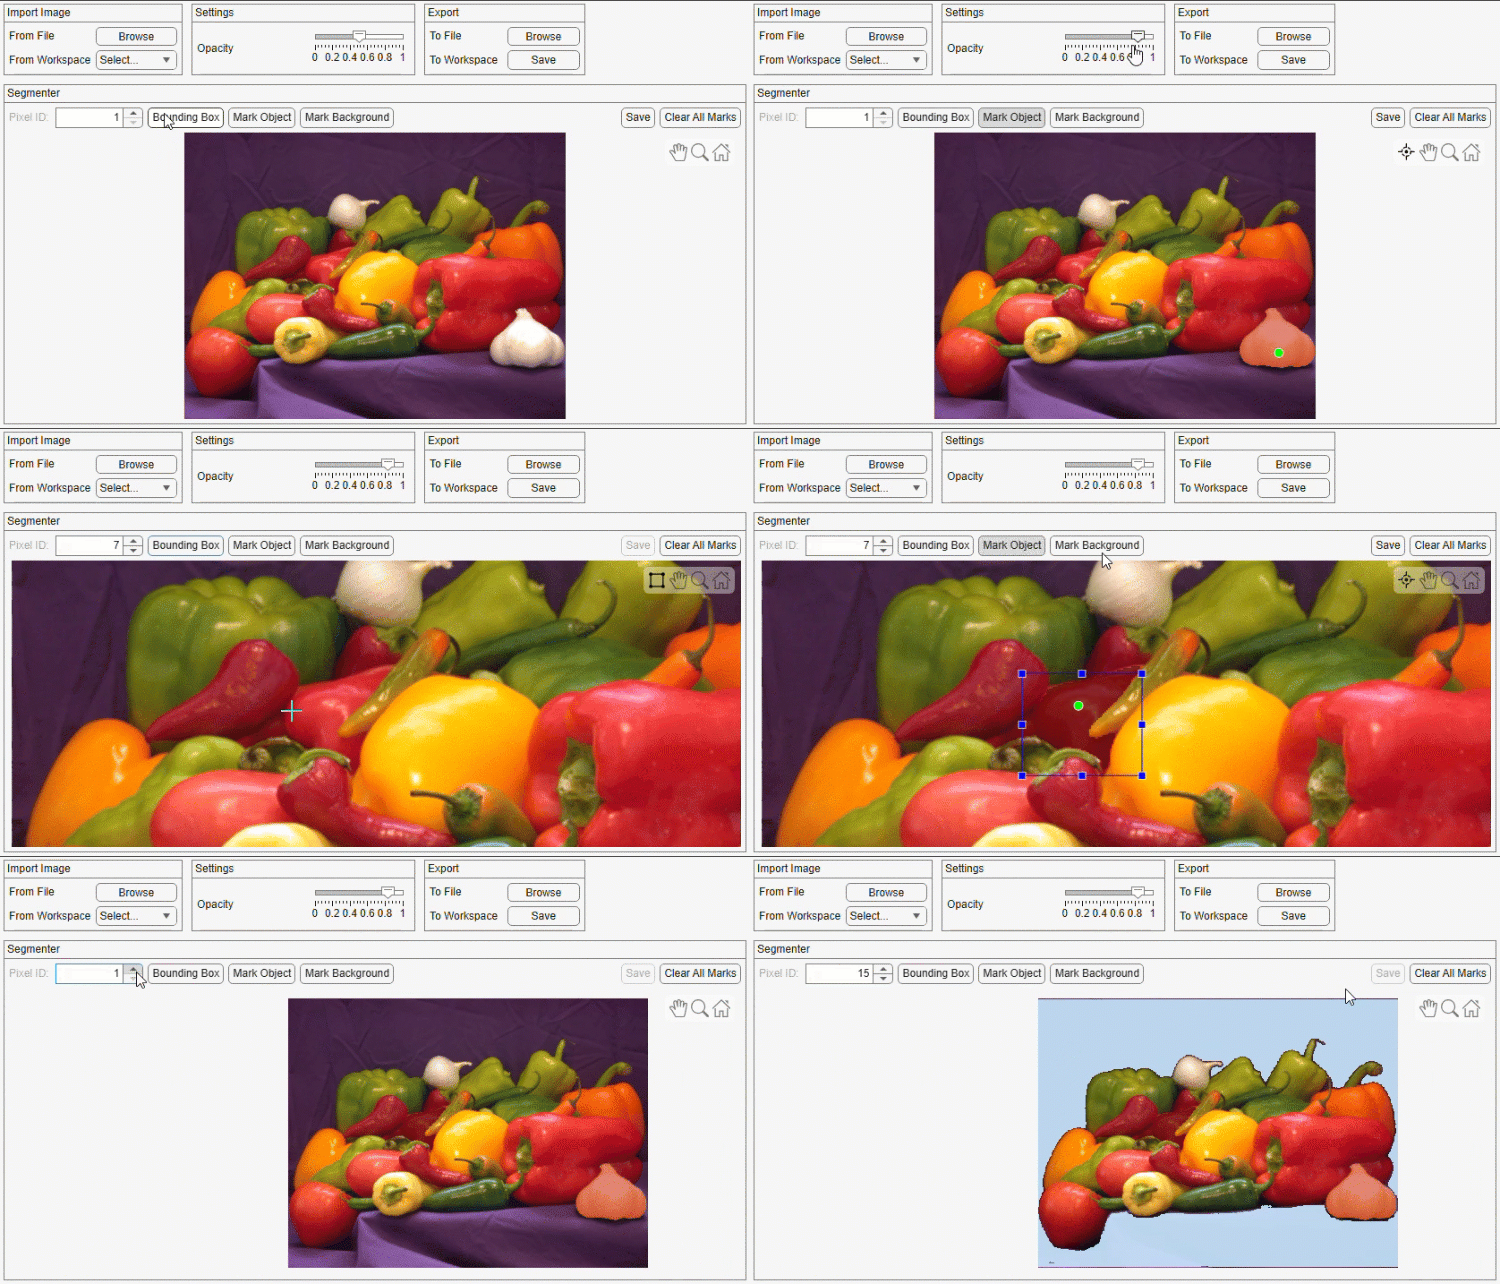
When the user adds a new annotation, the component calls the annotationAdded callback from the AnnotationAdded event listener of the Viewer object. If the annotation is of the type Rectangle, the callback interprets the rectangle as a bounding box input and saves its position as the position of a bounding box. Then, the component enables the user to mark foreground points to refine the foreground region within the bounding box. If the annotation is of the type Point, the component checks if a bounding box already exists to check if the point is being marked as a foreground point to refine the bounding box prompt. If a bounding box already exists, the callback checks whether the point lies within the box. If not, it deletes the point and does nothing. If no bounding box exists, the callback interprets the point as an independent visual prompt. The callback tags the point as foreground or background based on flags that indicate if the point was added when the Mark Object or Mark Background button was selected, respectively. Finally, the callback sets the SegmentRequired flag to true to trigger the update method that recomputes the preview overlay with the new prompts.
function annotationAdded(comp,event)
    % Callback function to process newly added foreground point,
    % background point, or bounding box

    event.Annotation.Interactions = "click";

    if isa(event.Annotation,"images.ui.graphics.roi.Rectangle")
        % If a bounding box has been added, save its position and
        % enable the user to add foreground points to refine the segmented
        % region generated by the bounding box.

        comp.Bbox = event.Annotation.Position;
        % Switch to foreground point selection mode
        comp.MarkForeground.Value = true;
        comp.BoundingBox.Value = false;

        comp.Viewer.Mode.Annotate.Style = "point";
        comp.Viewer.Mode.Annotate.ContinueAnnotating = true;
        comp.Viewer.Mode.Annotate.DefaultLabel = "";
        comp.Viewer.Mode.Annotate.DefaultColor = [0 1 0];
        comp.Viewer.Mode.CurrentMode = "annotate";
    else
        % If a point has been added, mark it as a foreground or
        % background point.
        if ~isempty(comp.Bbox)
            % If a bounding box exists, then the added point must
            % be within the box. Otherwise, remove the point and do
            % nothing.
            pos = event.Annotation.Position;

            if pos(1) < comp.Bbox(1) || pos(2) < comp.Bbox(2) || ...
                    pos(1) > (comp.Bbox(1) + comp.Bbox(3)) || pos(2) > (comp.Bbox(2) + comp.Bbox(4))
                % If point is outside the bounding box, discard it
                delete(event.Annotation);
                return;
            end
        end

        % Tag points as foreground or background
        if comp.MarkForeground.Value
            event.Annotation.UserData = true;
        else
            event.Annotation.UserData = false;
        end
    end

    % Request for segmentation with the updated foreground,
    % background, and bounding box data
    comp.SegmentRequired = true;
end
When the user removes an annotation, the component calls the annotationRemoved callback from the AnnotationRemoved event listener of the Viewer object. The callback sets the SegmentRequired flag to true to trigger the update method that recomputes the preview overlay with the remaining prompts.
function annotationRemoved(comp)
    % Callback function to rerun segmentation when the user removes a
    % foreground point, background point, or bounding box.
    comp.SegmentRequired = true;
end
If the user selects the Clear All Marks button to remove all annotations, the clearAll callback resets the segmented image preview to the last saved mask and resets all annotation button states to indicate that there is no active annotation in progress.
function clearAll(comp)
    % Callback function to clear all existing foreground marks,
    % background marks, bounding box and newly segmented image

    % Clear out annotations and mask
    comp.Viewer.Annotations = [];
    comp.Viewer.Interactions = ["zoom","pan"];
    comp.ImageObject.OverlayData = comp.SavedMask;

    % Clear state buttons
    comp.BoundingBox.Value = false;
    comp.MarkForeground.Value = false;
    comp.MarkBackground.Value = false;
    comp.SaveMask.Enable = "off";

    % Clear saved bounding box position
    comp.Bbox = [];

    if ~isempty(comp.ImageObject.Data)
        % Enable annotation drawing
        comp.Viewer.Interactions = ["zoom","pan"];

        comp.BoundingBox.Enable = "on";
        comp.MarkForeground.Enable = "on";
        comp.MarkBackground.Enable = "on";
        comp.ClearAll.Enable = "on";
    else
        % Lock annotation drawing
        comp.BoundingBox.Enable = "off";
        comp.MarkForeground.Enable = "off";
        comp.MarkBackground.Enable = "off";
        comp.ClearAll.Enable = "off";
    end
end
When the user commits the currently previewed segmentation mask, the saveMask callback function saves the mask and calls the clearAll callback to reset the interaction state for the next prompt.
function saveMask(comp)
    % Callback function to commit the newly segmented image to
    % SavedMask property
    comp.SavedMask = comp.ImageObject.OverlayData;
    clearAll(comp);
    comp.SaveMask.Enable = "off";
end
Define App Methods
The app uses methods to import and visualize data, process user input and update the display, export the segmentation masks, and control the app state. The app also uses some helper functions to improve code readability and code reusability. These are some of the important app methods.
Create SAMSegmenter Component
Create an instance of the SAMSegmenter custom UI component. The startupFcn method defines the creation and placement of the custom UI component.
% Code that executes after component creation
function startupFcn(app)
    % Function to create the SAMSegmenter component container on
    % start up
    app.SamSegmenterComponent = SAMSegmenter(app.SegmenterGridLayout);
end
Reset App on New Image Load
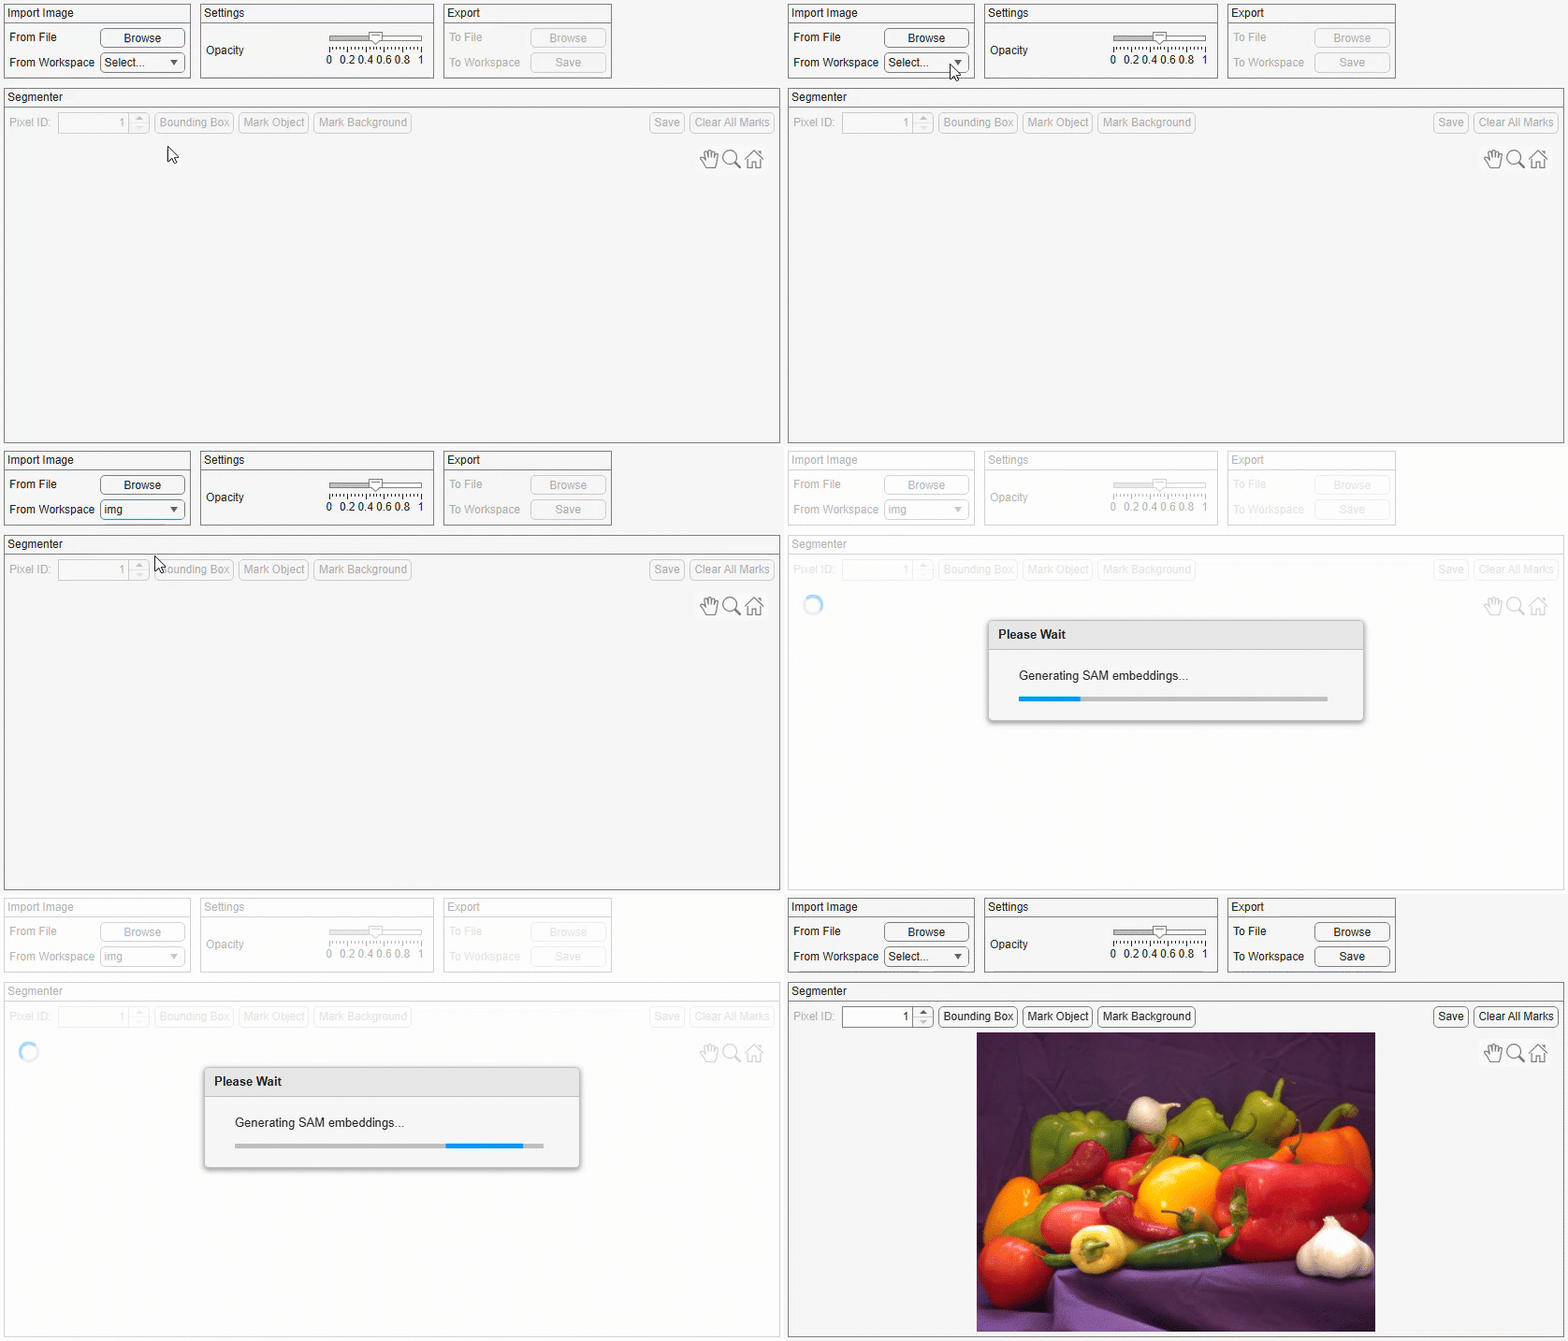
When the user loads a new image into the app, the SAMSegmenter component clears the existing data and displays the loaded image with no segmentation. The app also enables the Export section of the app toolstrip. The resetAppOnNewDataLoad method defines this behavior.
function resetAppOnNewDataLoad(app,imageData)
    % Function to reset the app state and set the newly loaded data
    d = uiprogressdlg(app.SegmentUsingSAMUIFigure, ...
        Title="Please Wait", ...
        Message="Generating SAM embeddings...", ...
        Indeterminate="on");
    app.SamSegmenterComponent.Image = imageData;
    close(d);

    app.ToWorkspaceLabel.Enable = "on";
    app.SaveButton.Enable = "on";
    app.ToFileLabel.Enable = "on";
    app.ExportBrowseButton.Enable = "on";
end
Import Image in App
Users can load an image into the app from a file or from the workspace using the Import section of the app toolstrip. If the user loads the image from a file by selecting the Browse option, the app opens a dialog box enabling the user to browse for files that have image file formats. When the user selects a new image file, the app resets. The BrowseButtonPushed method defines this file browsing behavior.
% Button pushed function: BrowseButton
function BrowseButtonPushed(app,event)
    % Function to import an image file by browsing file system
    filterSpec = app.getSupportedFileFilter();

    [file,location] = uigetfile(filterSpec,"Select an image file");
    if ~isequal(file,0)
        try
            imageData = imread(fullfile(location,file));
        catch
            uialert(app.SegmentUsingSAMUIFigure,"Unable to read image file.","Invalid File");
            return;
        end
        app.resetAppOnNewDataLoad(imageData);
    end
end
If the user loads the image from the workspace by selecting the Select option, the app filters workspace variables for potential images and displays the variable names in the drop-down. When the user selects a new image from the workspace, the app resets. The FromWorkspaceDropDownOpening and FromWorkspaceDropDownValueChanged methods define these behaviors.
% Drop-down opening function: FromWorkspaceDropDown
function FromWorkspaceDropDownOpening(app,event)
    % Callback function to filter possible images in workspace and
    % display them in FromWorkspaceDropDown for input selection
    vars = evalin("base","whos");
    supportedClasses = {'int8','uint8','int16','uint16','int32','uint32','single','double'};
    ValidInputVariables = {app.DefaultImportFromWorkspaceDropDownValue};
    for idx = 1:numel(vars)
        var = vars(idx);
        TF = ismember(var.class,supportedClasses) && (length(var.size)==3 && var.size(3)==3);
        if TF
            ValidInputVariables{end+1} = vars(idx).name;
        end
    end
    app.FromWorkspaceDropDown.Items = ValidInputVariables;
end

% Value changed function: FromWorkspaceDropDown
function FromWorkspaceDropDownValueChanged(app,event)
    % Callback function to read an image variable from the workspace and
    % load it to the app
    value = app.FromWorkspaceDropDown.Value;
    if ~strcmp(value,app.DefaultImportFromWorkspaceDropDownValue)
        imageData = evalin("base",value);
        app.resetAppOnNewDataLoad(imageData);
    end
    app.FromWorkspaceDropDown.Items = {app.DefaultImportFromWorkspaceDropDownValue};
end
Update Opacity Slider
Users moving the opacity slider updates the opacity of the segmentation mask in the preview. The OpacitySliderValueChanged method defines this behavior.
% Value changed function: OpacitySlider
function OpacitySliderValueChanged(app,event)
    % Callback function to interactively update the opacity of the
    % segmented image overlay
    value = app.OpacitySlider.Value;
    app.SamSegmenterComponent.SegmentationAlpha = value;
end
Export Segmentation Masks
Users can export the segmentation masks to files or to the workspace using the Export section of the app toolstrip. The ExportBrowseButtonPushed and SaveButtonPushed methods define these behaviors.
% Button pushed function: ExportBrowseButton
function ExportBrowseButtonPushed(app,event)
    % Callback function to write segmented image to disk
    finalMask = app.SamSegmenterComponent.Mask;
    filterSpec = app.getSupportedFileFilter(true);
    [file,location] = uiputfile(filterSpec,"Save Segmented Image","segmentation.png");
    if ~(isequal(file,0) || isequal(location,0))
        try
            imwrite(finalMask,fullfile(location,file));
            uialert(app.SegmentUsingSAMUIFigure,"Segmented image exported successfully","Export Success",Icon="success");
        catch ME
            uialert(app.SegmentUsingSAMUIFigure,ME.message,"Export Failed");
        end
    end
end

% Button pushed function: SaveButton
function SaveButtonPushed(app,event)
    % Write segmented image to base workspace
    finalMask = app.SamSegmenterComponent.Mask;
    assignin("base","SegmentedImage",finalMask);
    uialert(app.SegmentUsingSAMUIFigure,"Segmented image saved to workspace successfully","Export Success",Icon="success");
end
Segment Image with SAM Using App
Run the SAMSegmentationApp app.
Import an image either from a file or from the workspace using the options in the Import Image section of the app toolstrip. If you choose to import the image from a file, the app opens a dialog box enabling you to browse files that have image file formats. If you choose to import the image from the workspace, the app filters workspace variables for potential images and displays the variable names in the drop-down. When you import an image, the app resets and displays the imported image in the Segmenter section of the app.
To segment regions in the image, select Bounding Box to draw a bounding box, select Mark Object to mark foreground points, and select Mark Background to mark background points. You can specify the pixel label ID for the object being segmented by specifying Pixel ID. You can specify the opacity of the segmentation mask using the Opacity slider in the Settings section of the app toolstrip, clear all annotations by selecting the Clear All Marks button, and commit the currently previewed mask using the Save button in the Segmenter section of the app.
You can export segmentation masks to a file or to the workspace by selecting the Browse or Save option, respectively, in the Export section of the app toolstrip.
Customize the App
You can customize the code of the SAMSegmenter custom UI component and SAMSegmentationApp app in the attached supporting files. You can support previewing the prediction scores of the segmentation to help the user decide whether to commit the mask by adding relevant UI elements and callbacks. You can also add support for using one among multiple available GPUs for users that have multiple GPUs and Parallel Computing Toolbox™ by using the gpuDevice (Parallel Computing Toolbox) object.
To customize the app, you can choose one of these options:
Open the attached MLAPP files in App Designer and edit the code in the Code View.
Open the attached MLAPP files in App Designer, select Share in the Designer tab and then Export to MATLAB Class (.m), and save the M file. You can then edit the M file.

