Develop an App for a Simulink Model Using CAN
This example shows how to use App Designer to construct a test application user interface (UI) and connect it to a Simulink® model using virtual CAN channels.
The test application UI is constructed using MATLAB® App Designer along with several Vehicle Network Toolbox™ functions to provide a virtual CAN bus interface to a Simulink model of an automotive cruise control application. The test application UI allows a user to provide input stimulus to the cruise control algorithm model, observe results fed back from the model, log CAN messages to capture test stimuli, and replay logged CAN messages to debug and correct issues with the algorithm model. The example shows the key Vehicle Network Toolbox functions and blocks used to implement CAN communication in the following areas:
The test application UI supporting communication with the Simulink algorithm model for testing via CAN
The test application UI supporting logging and replaying of CAN data
The Simulink algorithm model

Add Virtual CAN Channel Communication to the UI
This section describes the key Vehicle Network Toolbox functions used to add a CAN channel interface to the Simulink Cruise Control algorithm test application model. This covers the following topics:
Getting a list of available CAN channels
Formatting the channel information for channel creation
Creating the channel in the UI
Configure the UI to transmit and receive CAN messages
Starting and stopping the channel
Extracting selected messages
Open App Designer
Open the test application UI in App Designer. With the test application UI open in App Designer you can alternate between the "Design" and "Code" views to follow along as you explore the controls and corresponding MATLAB code to communicate with the Simulink Cruise Control algorithm model via virtual CAN channels.
Run the preparatory script to preload necessary data, then open App Designer to develop the test app:
helperPrepareTestBenchParameterData;
appdesigner('CruiseControlTestUI.mlapp')
List Available CAN Channels
First, implement a mechanism to find and present a list of the available CAN channels for a user to select. For this, we added a "Channel Configuration" menu item at the top left corner of the test application UI. It has a "Select CAN Channel" sub-menu.
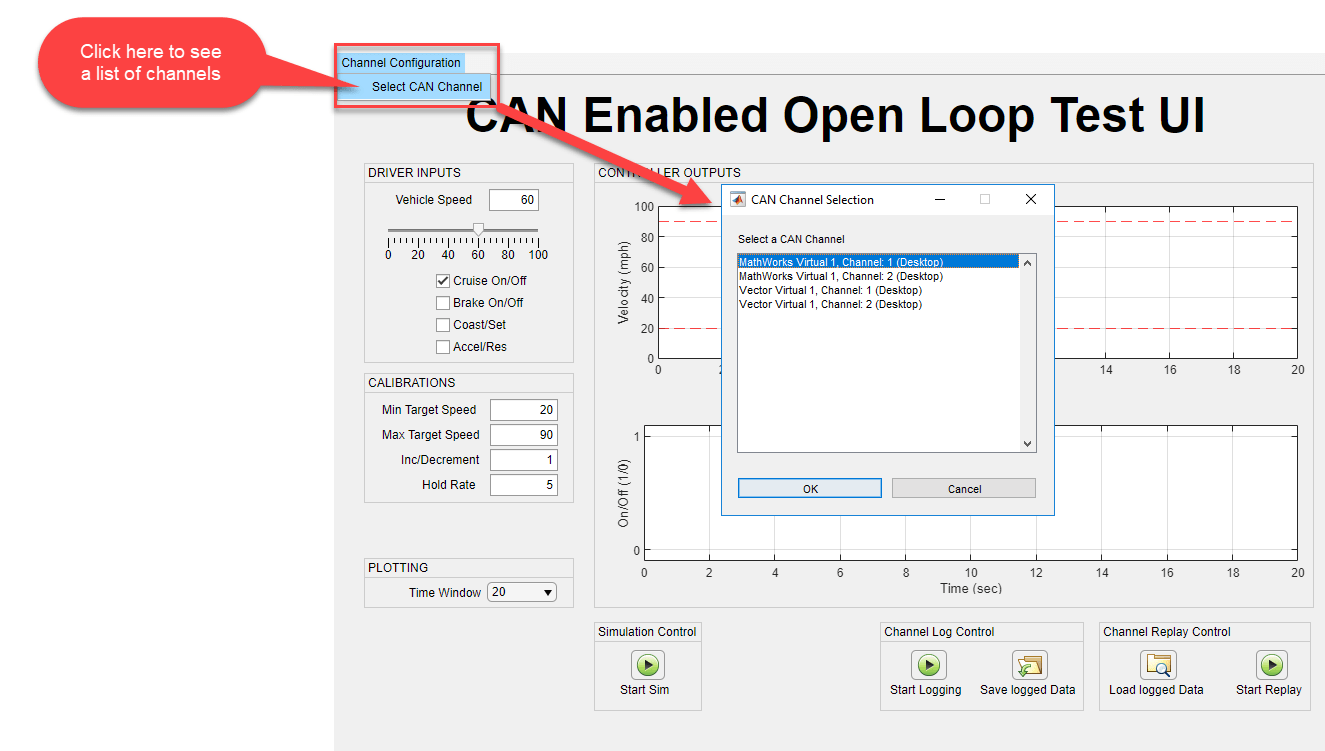
When the user clicks the Select CAN Channel sub-menu, the helper function getAvailableCANChannelInfo(app) is called via the sub-menu callback. getAvailableCANChannelInfo() uses the Vehicle Network Toolbox function canChannelList to detect the available CAN channels, as shown in this code fragment:
function getAvailableCANChannelInfo(app)
    % Get a table containing all available CAN channels and devices.
    app.canChannelInfo = canChannelList;

    % Format CAN channel information for display on the UI.
    app.availableCANChannelsForDisplay = formatCANChannelEntryForDisplay(app);

    % Save the number of available constructors.
    app.numConstructors = numel(app.canChannelInfo.Vendor);
end
Run canChannelList to see how the available CAN channel information is stored.
canChannels = canChannelList
canChannels=4×6 table
    "MathWorks"    "Virtual 1"    1    "Virtual"    "CAN, CAN FD"      "0"
    "MathWorks"    "Virtual 1"    2    "Virtual"    "CAN, CAN FD"      "0"
       "Vector"    "Virtual 1"    1    "Virtual"    "CAN, CAN FD"    "100"
       "Vector"    "Virtual 1"    2    "Virtual"    "CAN, CAN FD"    "100"
The list of channels returned from canChannelList is stored in the UI property app.canChannelInfo and then displayed as shown above.
Format Channel List for Channel Configuration
The user selects a CAN channel from the "CAN Channel Selection" listdlg. The listdlg returns an index corresponding to the user's selection. This index is passed to the helper function formatCANChannelConstructor.
function canChannelConstructor = formatCANChannelConstructor(app, index)
    canChannelConstructor = "canChannel(" + "'" + app.canChannelInfo.Vendor(index) + "'" + ", " + "'" + app.canChannelInfo.Device(index) + "'" + ", " + app.canChannelInfo.Channel(index) + ")";
end
As shown in the code fragment above, formatCANChannelConstructor uses the strings stored in the table of CAN channels, app.canChannelInfo, to assemble the channel object constructor string corresponding to the channel the user selected from the channel selector list dialog box. To see an example of a CAN channel constructor string, execute the code shown below.
index = 1;
canChannelConstructor = "canChannel(" + "'" + canChannels.Vendor(index) + "'" + ", " + "'" + canChannels.Device(index) + "'" + ", " + canChannels.Channel(index) + ")"
canChannelConstructor =
"canChannel('MathWorks', 'Virtual 1', 1)"
The CAN channel constructor string is stored in the app UI property app.canChannelConstructorSelected and will be used later to create the selected CAN channel object in the application UI as well as to update the Vehicle Network Toolbox Simulink blocks that implement the CAN channel interface in the Simulink Cruise Control algorithm model.
Create CAN Channel in the UI
When the UI is first opened and used, the formatted CAN channel constructor string stored in app.canChannelConstructorSelected is used by the helper function setupCANChannel to create an instance of a CAN channel object, connect a network configuration database (.dbc) file, and set the bus speed as shown in the following code fragment. The resulting channel object is stored in the UI property app.canChannelObj.
function setupCANChannel(app)
    % Open CAN database file.
    db = canDatabase('CruiseControl.dbc');

    % Create a CAN channel for sending and receiving messages.
    app.canChannelObj = eval(app.canChannelConstructorSelected);

    % Attach CAN database to channel for received message decoding.
    app.canChannelObj.Database = db;

    % Set the baud rate (can only do this if the UI has channel initialization access).
    if app.canChannelObj.InitializationAccess
        configBusSpeed(app.canChannelObj, 500000);
    end
end
To see an example CAN database object, execute the following:
db = canDatabase('CruiseControl.dbc')db =
Database with properties:
Name: 'CruiseControl'
Path: 'C:\Users\jvijayak\OneDrive - MathWorks\Documents\MATLAB\ExampleManager\jvijayak.Bdoc23b.j2277816\vnt-ex00964061\CruiseControl.dbc'
UTF8_File: 'C:\Users\jvijayak\OneDrive - MathWorks\Documents\MATLAB\ExampleManager\jvijayak.Bdoc23b.j2277816\vnt-ex00964061\CruiseControl.dbc'
Nodes: {2×1 cell}
NodeInfo: [2×1 struct]
Messages: {2×1 cell}
MessageInfo: [2×1 struct]
Attributes: {'BusType'}
AttributeInfo: [1×1 struct]
UserData: []
To see an example CAN channel object, execute the following:
% Instantiate the CAN channel object using the channel constructor string.
canChannelObj = eval(canChannelConstructor);

% Attach the CAN database to the channel object.
canChannelObj.Database = db
canChannelObj =
  Channel with properties:

   Device Information
            DeviceVendor: 'MathWorks'
                  Device: 'Virtual 1'
      DeviceChannelIndex: 1
      DeviceSerialNumber: 0
            ProtocolMode: 'CAN'

   Status Information
                 Running: 0
       MessagesAvailable: 0
        MessagesReceived: 0
     MessagesTransmitted: 0
    InitializationAccess: 1
        InitialTimestamp: [0×0 datetime]
           FilterHistory: 'Standard ID Filter: Allow All | Extended ID Filter: Allow All'

   Channel Information
               BusStatus: 'N/A'
              SilentMode: 0
         TransceiverName: 'N/A'
        TransceiverState: 'N/A'
       ReceiveErrorCount: 0
      TransmitErrorCount: 0
                BusSpeed: 500000
                     SJW: []
                   TSEG1: []
                   TSEG2: []
            NumOfSamples: []

   Other Information
                Database: [1×1 can.Database]
                UserData: []
setupCANChannel uses the following Vehicle Network Toolbox functions:
canChannelto instantiate the channel object using the eval command and the CAN channel constructor string stored in the app UI propertyapp.canChannelConstructorSelected. The resultant channel object is stored in the app UI propertyapp.canChannelObj.canDatabaseto create a CAN database (.dbc) object representing the DBC file. This object is stored in theDatabaseproperty of the channel object.
Set Up to Transmit CAN Messages
After setting up the selected CAN channel object and storing it in the UI property app.canChannelObj, the next step is to call the helper function setupCANTransmitMessages, shown in the code fragment below. setupCANTransmitMessages defines the CAN message to transmit from the UI, populates the message payload with signals, assigns each signal a value, and queues the message to transmit periodically once the CAN channel is started.
function setupCANTransmitMessages(app)
    % Create a CAN message container.
    app.cruiseControlCmdMessage = canMessage(app.canChannelObj.Database, 'CruiseCtrlCmd');

    % Fill the message container with signals and assign values to each signal.
    app.cruiseControlCmdMessage.Signals.S01_CruiseOnOff = logical2Numeric(app, app.cruisePowerCheckBox.Value);
    app.cruiseControlCmdMessage.Signals.S02_Brake =  logical2Numeric(app, app.brakeOnOffCheckBox.Value);
    app.cruiseControlCmdMessage.Signals.S03_VehicleSpeed =  app.vehicleSpeedSlider.Value;
    app.cruiseControlCmdMessage.Signals.S04_CoastSetSw =  logical2Numeric(app, app.cruiseCoastSetCheckBox.Value);
    app.cruiseControlCmdMessage.Signals.S05_AccelResSw =  logical2Numeric(app, app.cruiseAccelResumeCheckBox.Value);

    % Set up periodic transmission of this CAN message.  Actual transmission starts/stops with CAN channel start/stop.
    transmitPeriodic(app.canChannelObj, app.cruiseControlCmdMessage, 'On', 0.1);
end
To see what the CAN message object looks like, execute the following:
cruiseControlCmdMessage = canMessage(canChannelObj.Database, 'CruiseCtrlCmd')cruiseControlCmdMessage =
Message with properties:
Message Identification
ProtocolMode: 'CAN'
ID: 256
Extended: 0
Name: 'CruiseCtrlCmd'
Data Details
Timestamp: 0
Data: [0 0]
Signals: [1×1 struct]
Length: 2
Protocol Flags
Error: 0
Remote: 0
Other Information
Database: [1×1 can.Database]
UserData: []
cruiseControlCmdMessage.Signals
ans = struct with fields:
    S03_VehicleSpeed: 0
      S05_AccelResSw: 0
      S04_CoastSetSw: 0
           S02_Brake: 0
     S01_CruiseOnOff: 0
setupCANTransmitMessages uses the following Vehicle Network Toolbox functions:
canMessageto build a CAN message based defined in the CAN database object.transmitPeriodicto queue the message stored in the UI propertyapp.cruiseControlCmdMessagefor periodic transmission on the channel defined by the channel object stored in the UI propertyapp.canChannelObj, at the rate specified by the last argument, in this case every 0.1 seconds.
Set Up to Receive CAN Messages
The UI needs to receive CAN messages on a periodic basis to update the plots with feedback from the Cruise Control algorithm within the Simulink model. To achieve this, first create a MATLAB timer object as shown in the this code fragment.
% create a timer to receive CAN msgs
app.receiveCANmsgsTimer = timer('Period', 0.5,...
    'ExecutionMode', 'fixedSpacing', ...
    'TimerFcn', @(~,~)receiveCANmsgsTimerCallback(app));
The timer object will call the timer callback function receiveCANmsgsTimerCallback every 0.5 seconds. receiveCANmsgsTimerCallback, shown in the code fragment below, retrieves all the CAN messages from the bus, uses the helper function getCruiseCtrlFBCANmessage to extract the CAN messages fed back from the Cruise Control Algorithm model, and updates the UI plots with the extracted CAN message data.
% receiveCANmsgsTimerCallback Timer callback function for GUI updating
function receiveCANmsgsTimerCallback(app)
    try
        % Receive available CAN messages.
        msg = receive(app.canChannelObj, Inf, 'OutputFormat', 'timetable');

        % Update Cruise Control Feedback CAN message data.
        newFbData = getCruiseCtrlFBCANmessage(app, msg);

        if ~newFbData
            return;
        end

        % Update target speed and engaged plots with latest data from CAN bus.
        updatePlots(app);
    catch err
        disp(err.message)
    end
end
To see what the messages returned from the receive command look like, run the following code:
% Queue periodic transmission of a CAN message to generate some message data once the channel
% starts.
transmitPeriodic(canChannelObj, cruiseControlCmdMessage, 'On', 0.1);

% Start the channel.
start(canChannelObj);

% Wait 1 second to allow time for some messages to be generated on the bus.
pause(1);

% Retrieve all messages from the bus and output the results as a timetable.
msg = receive(canChannelObj, Inf, 'OutputFormat','timetable')
msg=10×8 timetable
    0.016169 sec    256    0    'CruiseCtrlCmd'    [0,0]    2    1×1 struct    0    0
    0.12518 sec    256    0    'CruiseCtrlCmd'    [0,0]    2    1×1 struct    0    0
    0.23315 sec    256    0    'CruiseCtrlCmd'    [0,0]    2    1×1 struct    0    0
    0.34315 sec    256    0    'CruiseCtrlCmd'    [0,0]    2    1×1 struct    0    0
    0.45114 sec    256    0    'CruiseCtrlCmd'    [0,0]    2    1×1 struct    0    0
    0.56016 sec    256    0    'CruiseCtrlCmd'    [0,0]    2    1×1 struct    0    0
    0.6692 sec    256    0    'CruiseCtrlCmd'    [0,0]    2    1×1 struct    0    0
    0.77918 sec    256    0    'CruiseCtrlCmd'    [0,0]    2    1×1 struct    0    0
    0.88211 sec    256    0    'CruiseCtrlCmd'    [0,0]    2    1×1 struct    0    0
    0.98119 sec    256    0    'CruiseCtrlCmd'    [0,0]    2    1×1 struct    0    0
% Stop the channel.
stop(canChannelObj)
receiveCANmsgsTimerCallback uses the following Vehicle Network Toolbox functions:
receiveto retrieve CAN messages from the CAN bus. In this case, the function is configured to retrieve all messages since the previous invocation and output the results as a MATLAB timetable.
Extract Select CAN Messages
The helper function getCruiseCtrlFBCANmessage filters out the "CruiseCtrlFB" messages from all the retrieved CAN messages, extracts the tspeedFb and engagedFb signals from these messages, and concatenates these to MATLAB timeseries objects for the tspeedFb and engagedFb signals. These timeseries objects are stored in the UI properties app.tspeedFb and app.engagedFb, respectively. The stored timeseries signals are used to update the plots for each signal on the UI. Note the use of the seconds method to convert the time data stored in the timetable from a duration array into the equivalent numeric array in units of seconds in the timeseries objects for each signal.
function newFbData = getCruiseCtrlFBCANmessage(app, msg)
    % Exit if no messages were received as there is nothing to update.
    if isempty(msg)
        newFbData = false;
        return;
    end

    % Extract signals from all CruiseCtrlFB messages.
    cruiseCtrlFBSignals = canSignalTimetable(msg, "CruiseCtrlFB");

    % if no messages then just return as there is nothing to do
    if isempty(cruiseCtrlFBSignals)
        newFbData = false;
        return;
    end

    if ~isempty(cruiseCtrlFBSignals)
        % Received new Cruise Control Feedback messages, so create time series from CAN signal data
        % save the Target Speed feedback signal.
        if isempty(app.tspeedFb) % cCeck if target speed feedback property has been initialized.
            app.tspeedFb = cell(2,1);

            % It appears Simulink.SimulationData.Dataset class is not
            % compatible with MATLAB Compiler, so change the way we store data
            % from a Dataset format to cell array.

            % Save target speed actual data.
            app.tspeedFb = timeseries(cruiseCtrlFBSignals.F02_TargetSpeed, seconds(cruiseCtrlFBSignals.Time),...
                'Name','CruiseControlTargetSpeed');
        else  % Add to existing data.
            % Save target speed actual data.
            app.tspeedFb = timeseries([app.tspeedFb.Data; cruiseCtrlFBSignals.F02_TargetSpeed], ...
                [app.tspeedFb.Time; seconds(cruiseCtrlFBSignals.Time)],'Name','CruiseControlTargetSpeed');
        end

        % Save the Cruise Control Engaged actual signal.
        % Check if Cruise engaged property has been initialized.
        if isempty(app.engagedFb)
            app.engagedFb = cell(2,1);

            % It appears Simulink.SimulationData.Dataset class is not
            % compatible with MATLAB Compiler, so change the way we store data
            % from a Dataset format to cell array.

            % Save cruise engaged command data.
            app.engagedFb = timeseries(cruiseCtrlFBSignals.F01_Engaged,seconds(cruiseCtrlFBSignals.Time),...
                'Name','CruiseControlEngaged');
        else  % Add to existing logsout.
            % Save cruise engaged command data.
            app.engagedFb = timeseries([app.engagedFb.Data; cruiseCtrlFBSignals.F01_Engaged], ...
                [app.engagedFb.Time; seconds(cruiseCtrlFBSignals.Time)],'Name','CruiseControlEngaged');
        end

        newFbData = true;
    end
end
The helper function getCruiseCtrlFBCANmessage uses the following Vehicle Network Toolbox functions:
canSignalTimetableto return a MATLAB timetable containing the signals from the CAN message CruiseCtrlFB.
Start the CAN Channel
When the CAN channel object app.canChannelObj has been instantiated and messages have been set up to be transmitted and received, we can now start the channel. When the user clicks Start Sim on the UI, we want the channel to start just before we start running the Simulink model. To achieve this, the helper function startSimApplication is called. startSimApplication, shown in the code fragment below, checks to make sure we are using a virtual CAN channel, because this is the only type that makes sense if you are using only desktop simulation. Next, it checks to make sure the Simulink model we want to connect to is loaded in memory using the bdIsLoaded command. If the model is loaded and is not already running, the UI plots are cleared to accept new signal data, the CAN channel is started using the helper function startCANChannel, and the model is started.
function startSimApplication(app, index)
    % Start the model running on the desktop.

    % Check to see if hardware or virtual CAN channel is selected, otherwise do nothing.
    if app.canChannelInfo.DeviceModel(index) == "Virtual"
        % Check to see if the model is loaded before trying to run.
        if bdIsLoaded(app.mdl)
            % Model is loaded, now check to see if it is already running.
            if ~strcmp('running',get_param(app.mdl,'SimulationStatus'))
                % Model is not already running, so start it
                % flush the CAN Receive message buffers.
                app.tspeedFb = [];
                app.engagedFb = [];

                % Clear figure window.
                cla(app.tspeedPlot)
                cla(app.engagedPlot)

                % Start the CAN channels and update timer if it isn't already running.
                startCANChannel(app);

                % Start the model.
                set_param(app.mdl, 'SimulationCommand', 'start');

                % Set the sim start/stop button icon to the stop icon indicating the model has
                % been successfully started and is ready to be stopped at the next button press.
                app.SimStartStopButton.Icon = "IconEnd.png";
                app.StartSimLabel.Text = "Stop Sim";
            else
                % Model is already running, inform the user.
                warnStr = sprintf('Warning: Model %s is already running', app.mdl);
                warndlg(warnStr, 'Warning');
            end
        else
            % Model is not yet loaded, so warn the user.
            warnStr = sprintf('Warning: Model %s is not loaded\nPlease load the model and try again', app.mdl);
            warndlg(warnStr, 'Warning');
        end
    end
end
The helper function startCANChannel is shown in the code fragment below. This function checks to make sure the channel is not already running before it starts it. Next, it starts the MATLAB timer object so that the timer callback function receiveCANmsgsTimerCallback, described in the previous section, is called every 0.5 seconds to retrieve CAN message data from the bus.
function startCANChannel(app)
    % Start the CAN channel if it isn't already running.
    try
        if ~app.canChannelObj.Running
            start(app.canChannelObj);
        end
    catch
        % do nothing.
    end

    % Start the CAN receive processing timer - check to see if it is already running. This allows us to change CAN channels
    % with or without starting and stopping the model running on the real time target.
    if strcmpi(app.receiveCANmsgsTimer.Running, 'off')
        start(app.receiveCANmsgsTimer);
    end
end
startCANchannel uses the following Vehicle Network Toolbox function:
startto start the CAN channel running. The channel will remain on-line until astopcommand is issued.
Stop the CAN Channel
When the user clicks Stop Sim on the UI, we want to stop the Simulink model just before stopping the CAN channel. To achieve this, the helper function stopSimApplication is called. stopSimApplication, shown in the code fragment below, checks to make sure we are using a virtual CAN channel, because this is the only type that makes sense if you are using only desktop simulation. Next, it stops the Simulink model and calls the helper function stopCANChannel to stop the CAN channel.
function stopSimApplication(app, index)
    % Stop the model running on the desktop.
    try
        % Check to see if hardware or virtual CAN channel is selected.
        if app.canChannelInfo.DeviceModel(index) == "Virtual"
            % Virtual channel selected, so issue a stop command to the
            % the simulation, even if it is already stopped.
            set_param(app.mdl, 'SimulationCommand', 'stop')

            % Stop the CAN channels and update timer.
            stopCANChannel(app);
        end

        % Set the sim start/stop button text to Start indicating the model has
        % been successfully stopped and is ready to start again at the next
        % button press.
        app.SimStartStopButton.Icon = "IconPlay.png";
        app.StartSimLabel.Text = "Start Sim";
    catch
        % Do nothing at the moment.
    end
end
The helper function stopCANChannel is shown in the code fragment below. This function stops the CAN channel, then stops the MATLAB timer object so that the timer callback function receiveCANmsgsTimerCallback, described previously, is no longer called to retrieve messages from the bus.
function stopCANChannel(app)
    % Stop the CAN channel.
    stop(app.canChannelObj);

    % Stop the CAN message processing timer.
    stop(app.receiveCANmsgsTimer);
end
stopCANchannel uses the following Vehicle Network Toolbox function:
stopto stop the CAN channel. The channel will remain offline until anotherstartcommand is issued.
Add CAN Log and Replay Capability
In this step, we will describe the key Vehicle Network Toolbox functions used to add the ability to log, save, and replay CAN messages. To implement this functionality, we instantiate a second CAN channel, identical to the first one created. Because the second CAN channel object is identical to the first one, it will see and collect the same messages as the first CAN channel object. The second CAN channel will be started when the user clicks Start Logging on the UI. The channel continues to run and collect messages until the user clicks Stop Logging. Once the user stops logging CAN messages, we will retrieve all the messages that have accumulated in the message buffer for the second CAN channel object, extract the messages we are interested in replaying, and save them to a MAT-file. Once the messages have been saved, we can replay them using the first CAN channel to provide an input stimulus to the Simulink Cruise Control algorithm model for debugging and algorithm verification purposes.
This description covers the following topics:
Setup a channel to log CAN messages
Starting and Stopping the channel
Retrieving and extracting logged CAN messages
Saving the extracted messages to a file
Loading saved messages from a file
Start playback of logged CAN messages
Stop playback of logged CAN messages
Set Up a CAN Channel Object in the UI to Log CAN Messages
In a manner directly analogous to how the first CAN channel was instantiated, the formatted CAN channel constructor string stored in app.canChannelConstructorSelected is used by a new helper function setupCANLogChannel to create a second instance of a CAN channel object, connect the same network configuration database (.dbc) file as was used for the first channel, and set the bus speed as shown in the code fragment below. The resulting channel object is stored in the UI property app.canLogChannelObj.
function setupCANLogChannel(app)
    % Open CAN database file.
    db = canDatabase('CruiseControl.dbc');

    % Create a CAN channel for sending and receiving messages.
    app.canLogChannelObj = eval(app.canChannelConstructorSelected);

    % Attach CAN database to channel for received message decoding.
    app.canLogChannelObj.Database = db;

    % Set the baud rate (can only do this if the UI has channel initialization access).
    if app.canLogChannelObj.InitializationAccess
        configBusSpeed(app.canLogChannelObj, 500000);
    end
end
To see an example CAN database object, execute the following code:
db = canDatabase('CruiseControl.dbc')db =
Database with properties:
Name: 'CruiseControl'
Path: 'C:\Users\jvijayak\OneDrive - MathWorks\Documents\MATLAB\ExampleManager\jvijayak.Bdoc23b.j2277816\vnt-ex00964061\CruiseControl.dbc'
UTF8_File: 'C:\Users\jvijayak\OneDrive - MathWorks\Documents\MATLAB\ExampleManager\jvijayak.Bdoc23b.j2277816\vnt-ex00964061\CruiseControl.dbc'
Nodes: {2×1 cell}
NodeInfo: [2×1 struct]
Messages: {2×1 cell}
MessageInfo: [2×1 struct]
Attributes: {'BusType'}
AttributeInfo: [1×1 struct]
UserData: []
To see an example CAN channel object, execute the following code:
% Instantiate the CAN channel object using the channel constructor string.
canLogChannelObj = eval(canChannelConstructor);

% Attach the CAN database to the channel object.
canLogChannelObj.Database = db
canLogChannelObj =
  Channel with properties:

   Device Information
            DeviceVendor: 'MathWorks'
                  Device: 'Virtual 1'
      DeviceChannelIndex: 1
      DeviceSerialNumber: 0
            ProtocolMode: 'CAN'

   Status Information
                 Running: 0
       MessagesAvailable: 0
        MessagesReceived: 0
     MessagesTransmitted: 0
    InitializationAccess: 0
        InitialTimestamp: [0×0 datetime]
           FilterHistory: 'Standard ID Filter: Allow All | Extended ID Filter: Allow All'

   Channel Information
               BusStatus: 'N/A'
              SilentMode: 0
         TransceiverName: 'N/A'
        TransceiverState: 'N/A'
       ReceiveErrorCount: 0
      TransmitErrorCount: 0
                BusSpeed: 500000
                     SJW: []
                   TSEG1: []
                   TSEG2: []
            NumOfSamples: []

   Other Information
                Database: [1×1 can.Database]
                UserData: []
setupCANLogChannel uses the following Vehicle Network Toolbox functions:
canChannelto instantiate the channel object using the eval command and the CAN channel constructor string stored in the app UI propertyapp.canChannelConstructorSelected. The resultant channel object is stored in the app UI propertyapp.canLogChannelObj.canDatabaseto create a CAN database (.dbc) object representing the DBC file. This object is stored in theDatabaseproperty of the channel object.
Start the CAN Log Channel
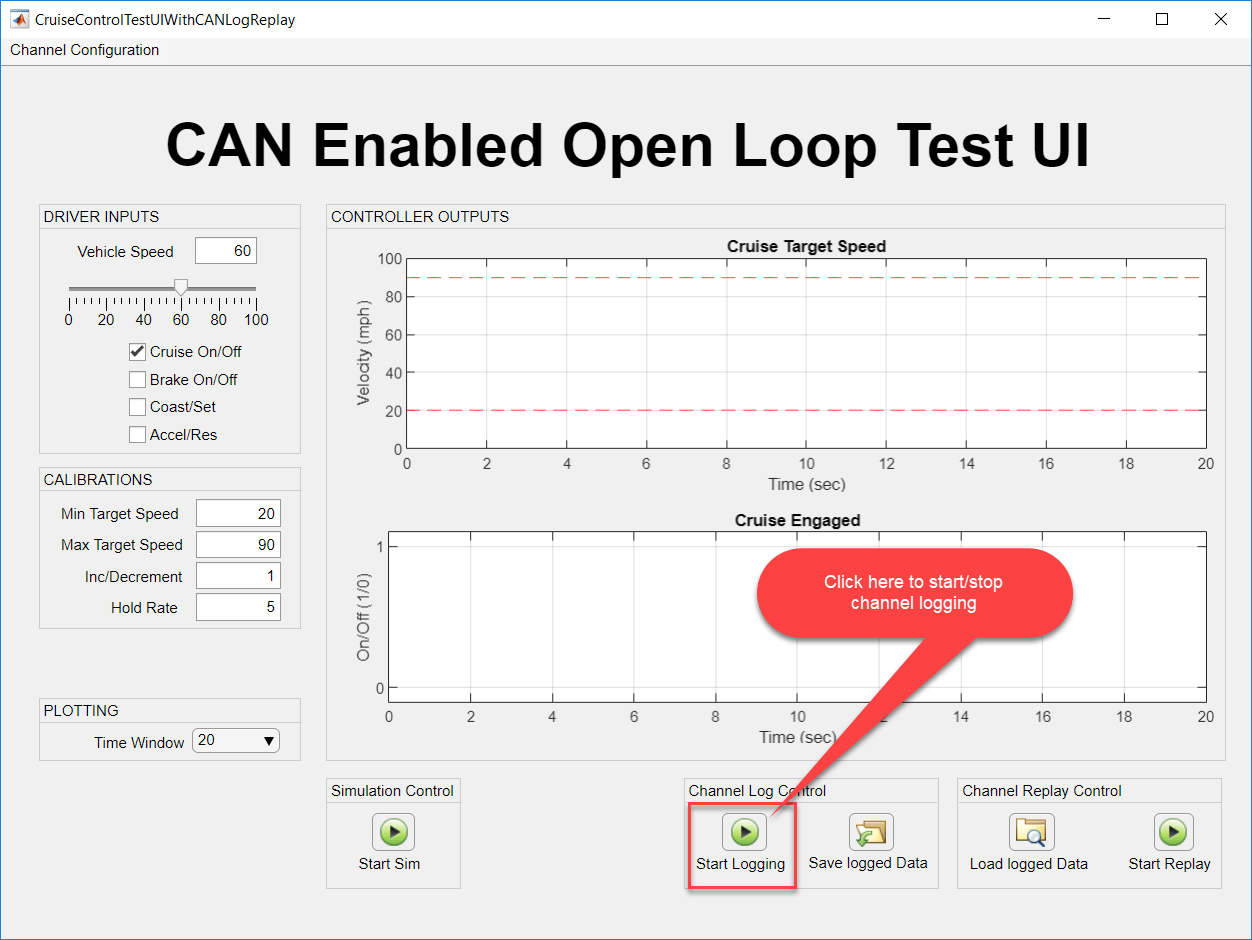
As with the first CAN channel, the CAN channel object app.canLogChannelObj, was instantiated when the test application UI is opened. When the user clicks Start Logging, we call the helper function startCANLogChannel, shown in the code fragment below. This function checks to see if the second CAN channel is already running and starts it if isn't.
function startCANLogChannel(app)
    % Start the CAN Log channel if it isn't already running.
    try
        if ~app.canLogChannelObj.Running
            start(app.canLogChannelObj);
        end
    catch
        % Do nothing.
    end
end
startCANLogChannel uses the following Vehicle Network Toolbox function:
startto start the CAN channel running. The channel will remain online until astopcommand is issued.
Stop the CAN Log Channel
When the user clicks Stop Logging on the UI, the button callback calls the helper function stopCANLogging, shown in the code fragment below. stopCANLogging stops the CAN channel and retrieves all the messages accumulated in the second channel buffer since the second CAN channel was started by the user clicking Start Logging.
function stopCANLogging(app)
    % Stop the CAN Log channel.
    stop(app.canLogChannelObj);

    % Get the messages from the CAN log message queue.
    retrieveLoggedCANMessages(app);

    % Update the button icon and label.
    app.canLoggingStartStopButton.Icon = 'IconPlay.png';
    app.StartLoggingLabel.Text = "Start Logging";
end
stopCANLogging uses the following Vehicle Network Toolbox function:
stopto stop the CAN channel. The channel will remain offline until another start command is issued.
Retrieve and Extract Logged Messages
Once the logging CAN channel has been stopped, the helper function retrieveLoggedCANMessages, shown in the code fragment below, is called to retrieve all the CAN messages from the second channel bus. The CAN messages are acquired from the second channel bus using the receive command and logical indexing is used to extract the "CruiseCtrlCmd" messages from all the message timetable returned by the receive command.
function retrieveLoggedCANMessages(app)
    try
        % Receive available CAN message
        % initialize buffer to make sure it is empty.
        app.canLogMsgBuffer = [];

        % Receive available CAN messages.
        msg = receive(app.canLogChannelObj, Inf, 'OutputFormat', 'timetable');

        % Fill the buffer with the logged Cruise Control Command CAN message data.
        app.canLogMsgBuffer = msg(msg.Name == "CruiseCtrlCmd", :);
    catch err
        disp(err.message)
    end
end
To see what the messages returned from the receive command look like in the timetable format, run the following code:
% Queue periodic transmission of CAN messages to generate sample message data once the channel starts.
cruiseControlFbMessage = canMessage(db, 'CruiseCtrlFB');
transmitPeriodic(canChannelObj, cruiseControlFbMessage, 'On', 0.1);
transmitPeriodic(canChannelObj, cruiseControlCmdMessage, 'On', 0.1);

% Start the first channel.
start(canChannelObj);

% Start the second (logging) channel.
start(canLogChannelObj);

% Wait 1 second to allow time for some messages to be generated on the bus.
pause(1);

% Stop the channels.
stop(canChannelObj)
stop(canLogChannelObj)

% Retrieve all messages from the logged message bus and output the results as a timetable.
msg = receive(canLogChannelObj, Inf, 'OutputFormat','timetable')
msg=52×8 timetable
    0.073091 sec    256    0    'CruiseCtrlCmd'    [0,0]    2    1×1 struct    0    0
    0.073094 sec    512    0    'CruiseCtrlFB'    [0,0]    2    1×1 struct    0    0
    0.18515 sec    256    0    'CruiseCtrlCmd'    [0,0]    2    1×1 struct    0    0
    0.18515 sec    512    0    'CruiseCtrlFB'    [0,0]    2    1×1 struct    0    0
    0.29512 sec    256    0    'CruiseCtrlCmd'    [0,0]    2    1×1 struct    0    0
    0.29513 sec    512    0    'CruiseCtrlFB'    [0,0]    2    1×1 struct    0    0
    0.40412 sec    256    0    'CruiseCtrlCmd'    [0,0]    2    1×1 struct    0    0
    0.40413 sec    512    0    'CruiseCtrlFB'    [0,0]    2    1×1 struct    0    0
    0.51208 sec    256    0    'CruiseCtrlCmd'    [0,0]    2    1×1 struct    0    0
    0.51208 sec    512    0    'CruiseCtrlFB'    [0,0]    2    1×1 struct    0    0
    0.62109 sec    256    0    'CruiseCtrlCmd'    [0,0]    2    1×1 struct    0    0
    0.62109 sec    512    0    'CruiseCtrlFB'    [0,0]    2    1×1 struct    0    0
    0.73113 sec    256    0    'CruiseCtrlCmd'    [0,0]    2    1×1 struct    0    0
    0.73113 sec    512    0    'CruiseCtrlFB'    [0,0]    2    1×1 struct    0    0
      ⋮
% Extract only the Cruise Control Command CAN messages.
msgCmd = msg(msg.Name == "CruiseCtrlCmd", :)
msgCmd=26×8 timetable
    0.073091 sec    256    0    'CruiseCtrlCmd'    [0,0]    2    1×1 struct    0    0
    0.18515 sec    256    0    'CruiseCtrlCmd'    [0,0]    2    1×1 struct    0    0
    0.29512 sec    256    0    'CruiseCtrlCmd'    [0,0]    2    1×1 struct    0    0
    0.40412 sec    256    0    'CruiseCtrlCmd'    [0,0]    2    1×1 struct    0    0
    0.51208 sec    256    0    'CruiseCtrlCmd'    [0,0]    2    1×1 struct    0    0
    0.62109 sec    256    0    'CruiseCtrlCmd'    [0,0]    2    1×1 struct    0    0
    0.73113 sec    256    0    'CruiseCtrlCmd'    [0,0]    2    1×1 struct    0    0
    0.83307 sec    256    0    'CruiseCtrlCmd'    [0,0]    2    1×1 struct    0    0
    0.9331 sec    256    0    'CruiseCtrlCmd'    [0,0]    2    1×1 struct    0    0
    1.0431 sec    256    0    'CruiseCtrlCmd'    [0,0]    2    1×1 struct    0    0
    1.1531 sec    256    0    'CruiseCtrlCmd'    [0,0]    2    1×1 struct    0    0
    1.2631 sec    256    0    'CruiseCtrlCmd'    [0,0]    2    1×1 struct    0    0
    1.3703 sec    256    0    'CruiseCtrlCmd'    [0,0]    2    1×1 struct    0    0
    1.4776 sec    256    0    'CruiseCtrlCmd'    [0,0]    2    1×1 struct    0    0
      ⋮
retrieveLoggedCANMessages uses the following Vehicle Network Toolbox functions:
receiveto retrieve CAN messages from the CAN bus. In this case, the function is configured to retrieve all messages since the previous invocation and output the results as a MATLAB timetable.
Save Messages to a File
When the user clicks Save Logged Data on the UI, the helper function saveLoggedCANDataToFile is called. This function opens a file browser window using the uinputfile function. uinputfile returns the filename and path selected by the user to store the logged CAN message data. The Vehicle Network Toolbox function canMessageReplayBlockStruct is used to convert the CAN messages from a MATLAB timetable into a form that the CAN Replay block can use. Once the logged CAN message data has been converted and saved to a file it can be recalled and replayed later using the Vehicle Network Toolbox "Replay" Simulink block. To replay messages in MATLAB with Vehicle Network Toolbox with the replay command, the timetable itself is passed as input to the function.
function savedLoggedCANDataToFile(app)
    % Raise dialog box to prompt user for a CAN log file to store the logged data.
    [FileName,PathName] = uiputfile('*.mat','Select a .MAT file to store logged CAN data');

    if FileName ~= 0
        % User did not cancel the file selection operation, so OK to save
        % convert the CAN log data from Timetable to struct of arrays so the data is compatible
        % with the VNT Simulink Replay block.
        canLogStructOfArrays = canMessageReplayBlockStruct(app.canLogMsgBuffer);
        save(fullfile(PathName, FileName), 'canLogStructOfArrays');

        % Clear the buffer after saving it.
        app.canLogMsgBuffer = [];
    end
end
saveLoggedCANDataToFile uses the following Vehicle Network Toolbox function:
canMessageReplayBlockStructto convert the CAN messages stored in the MATLAB timetable into a form that can be used by the CAN message Replay block.
Load Messages from a File
When the user clicks Load Logged Data on the UI, the helper function loadLoggedCANDataFromFile is called. This function opens a file browser window using the uigetfile function, which returns the logged message filename selected by the user. The logged CAN message data is loaded from the file and converted back into a timetable representation for use with the Vehicle Network Toolbox replay command. Note that the same data file could be used directly with the Vehicle Network Toolbox Replay Simulink block if the user desired to replay the data from the Simulink model. You might choose to replay the data using the Replay block instead of from the UI using the replay command because the Replay block works with the Simulink debugger, pausing playback when the simulation halts on a breakpoint. The replay command, in contrast, does not recognize when the Simulink model halts on a breakpoint and would simply keep playing the stored message data from the file. For the purposes of the example, we will replay the data using the replay command.
function loadLoggedCANDataFromFile(app)
    % Raise dialog box to prompt user for a CAN log file to load.
    [FileName,PathName] = uigetfile('*.mat','Select a CAN log file to load');

    % Return focus to main UI after dlg closes.
    figure(app.UIFigure)

    if FileName ~= 0
        % User did not cancel the file selection operation, so OK to load
        % make sure the message buffer is empty before loading in the logged CAN data.
        app.canLogMsgBuffer = [];

        % Upload the saved message data from the selected file.
        canLogMsgStructOfArrays = load(fullfile(PathName, FileName), 'canLogStructOfArrays');

        % Convert the saved message data into timetables for the replay command.
        app.canLogMsgBuffer = canMessageTimetable(canLogMsgStructOfArrays.canLogStructOfArrays);
    end
end
loadLoggedCANDataFromFile uses the following Vehicle Network Toolbox function:
canMessageTimetableto convert the CAN messages stored in a form compatible with the CAN message Replay Simulink block back into a MATLAB timetable for use with thereplayfunction.
Start Playback of Logged Messages
After the logged CAN message data has been loaded into the UI and reformatted it is ready for playback using the Vehicle Network Toolbox replay command. When the user clicks Start Replay on the UI, the helper function startPlaybackOfLoggedCANData is called. In order to replay the logged CAN message data over the first CAN channel, all activity associated with this channel must be halted and any buffered message data cleared. As shown in the code fragment below, startPlaybackOfLoggedCANData turns off periodic transmission of CAN messages, stops the CAN channel, clears any CAN message data buffered in the UI, and clears the plots displaying the signal data fed back from the Cruise Control algorithm model. The CAN channel is then restarted, and the logged CAN message data is replayed.
function startPlaybackOfLoggedCANData(app)
    % Turn off periodic transmission of CruiseCtrlCmd CAN message from UI controls.
    transmitPeriodic(app.canChannelObj, app.cruiseControlCmdMessage, 'Off');

    % Stop the UI CAN channel so we can instead use if for playback.
    stopCANChannel(app)

    % Flush the existing CAN messages stored for plotting.
    flushCANFbMsgQueue(app)

    % Clear the existing plots.
    cla(app.tspeedPlot)
    cla(app.engagedPlot)

    % Start the CAN Channel and replay the logged CAN message data.
    startCANChannel(app)

    % Replay the logged CAN data on the UI CAN Channel.
    replay(app.canChannelObj, app.canLogMsgBuffer);
end
startPlaybackOfLoggedCANData uses the following Vehicle Network Toolbox functions:
transmitPeriodicto disable periodic transmission of the command signals sent to the Cruise Control algorithm model in the "CruiseCtrlCmd" message.replayto replay logged CAN message data on the first CAN channel.
Stop Playback of Logged Messages
When the user clicks Stop Replay on the UI, the helper function stopPlaybackOfLoggedCANData is called. In order to halt the playback of logged CAN message data the CAN channel where the data is being replayed must be stopped. Once that is done the periodic transmission of the "CruiseCtrlCmd" message can be re-enabled and the channel restarted so that the user will once again be able to inject test stimulus signals to the Cruise Control algorithm model interactively from the UI. As shown in the code fragment below, stopPlaybackOfLoggedCANData first stops the channel, which halts the replay of the logged message data. Logged message data is cleared from local buffers on the UI as well as the plots displaying the signal data fed back from the Cruise Control algorithm model. Periodic transmission of the "CruiseCtrlCmd" message is re-enabled, and the CAN channel restarted.
function stopPlaybackOfLoggedCANData(app)
    % Stop the playback CAN channel.
    stopCANChannel(app)

    % Flush the existing CAN messages stored for plotting.
    flushCANFbMsgQueue(app)

    % Clear the existing plots.
    cla(app.tspeedPlot)
    cla(app.engagedPlot)

    % Re-enable periodic transmission of CruiseCtrlCmd CAN message from UI controls.
    transmitPeriodic(app.canChannelObj, app.cruiseControlCmdMessage, 'On', 0.1);

    % Restart the CAN Channel from/To UI.
    startCANChannel(app)
end
stopPlaybackOfLoggedCANData uses the following Vehicle Network Toolbox functions:
stopto stop the CAN channel to halt replay of the logged CAN message data.transmitPeriodicto re-enable periodic transmission of the command signals sent to the Cruise Control algorithm model in the "CruiseCtrlCmd" message.startto re-start the CAN channel so the user can once again inject test stimulus signals to the Cruise Control algorithm model interactively from the UI.
Add Virtual CAN Channel Communication to the Simulink Cruise Control Algorithm Model
In this step, we describe how Vehicle Network Toolbox Simulink blocks were used to add virtual CAN communication capability to the Simulink Cruise Control algorithm model.
This description will cover the following topics:
Adding CAN message receive capability
Adding CAN message transmit capability
Pushing CAN channel configuration information from the UI to the Simulink model
Open the Cruise Control Algorithm Simulink Model
Run the helper functions to configure the workspace with needed data parameters and then open the Cruise Control algorithm test harness model. With the Simulink model open, you can explore the portions of the model explained in the sections below. Execute helperPrepareTestBenchParameterData followed by helperConfigureAndOpenTestBench.
Add CAN Message Receive Capability
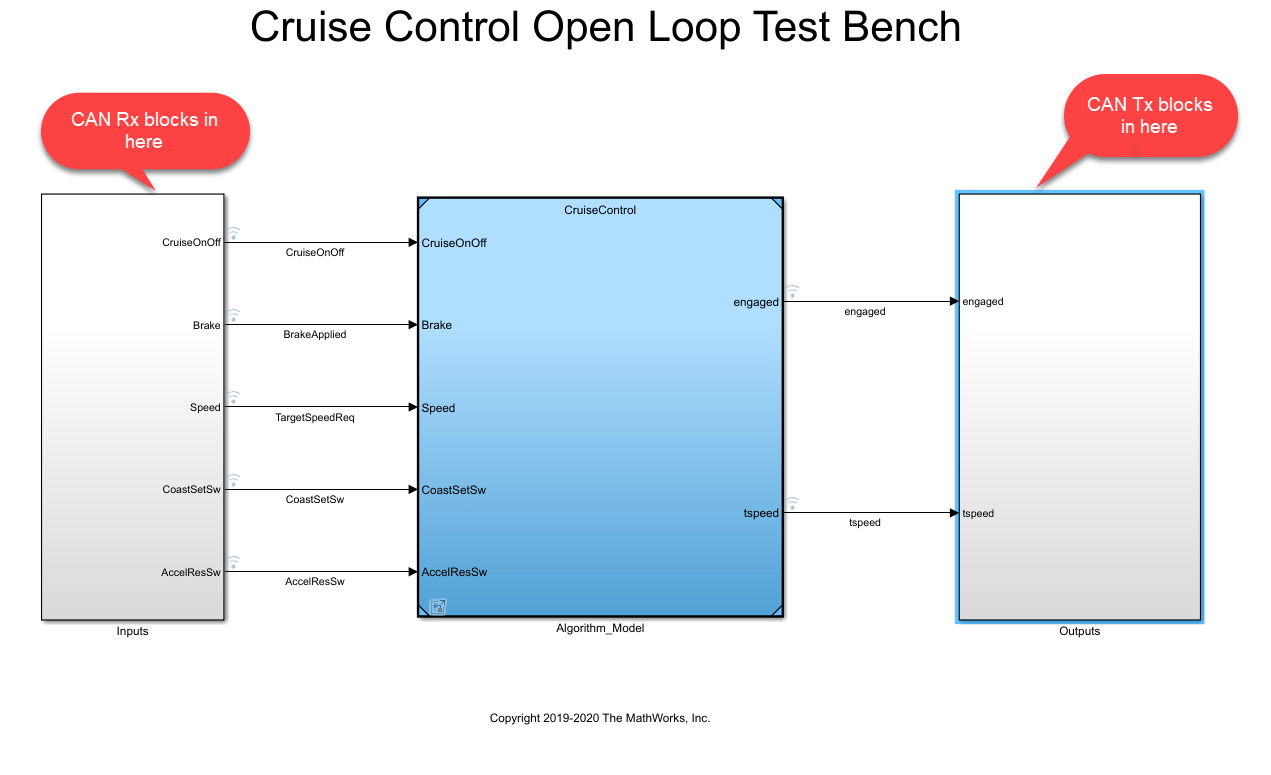
For the Cruise Control algorithm Simulink model to receive CAN data from the test UI requires a block to connect the Simulink model to a specific CAN device, a block to receive CAN messages from the selected device, and a block to unpack the data payload of the messages received into individual signals. To accomplish this, an "Inputs" subsystem is added to the Cruise Control algorithm Simulink model. The "Inputs" subsystem uses Vehicle Network Toolbox CAN Configuration, CAN Receive, and CAN Unpack blocks interconnected as shown in the screen shot below.
The CAN Configuration Block allows the user to determine which of the available CAN devices and channels to connect with the Simulink model. The CAN Receive block receives CAN messages from the CAN device and channel selected in the CAN Configuration block. It also allows the user to receive all messages on the bus or apply a filter to receive only select messages. The CAN Unpack block has been configured to read a user defined network database (.dbc) file. This allows the user to determine the message name, message ID, and data payload to unpack signals with this block. Simulink input ports are automatically added to the block for each signal defined in the message in the network database file.
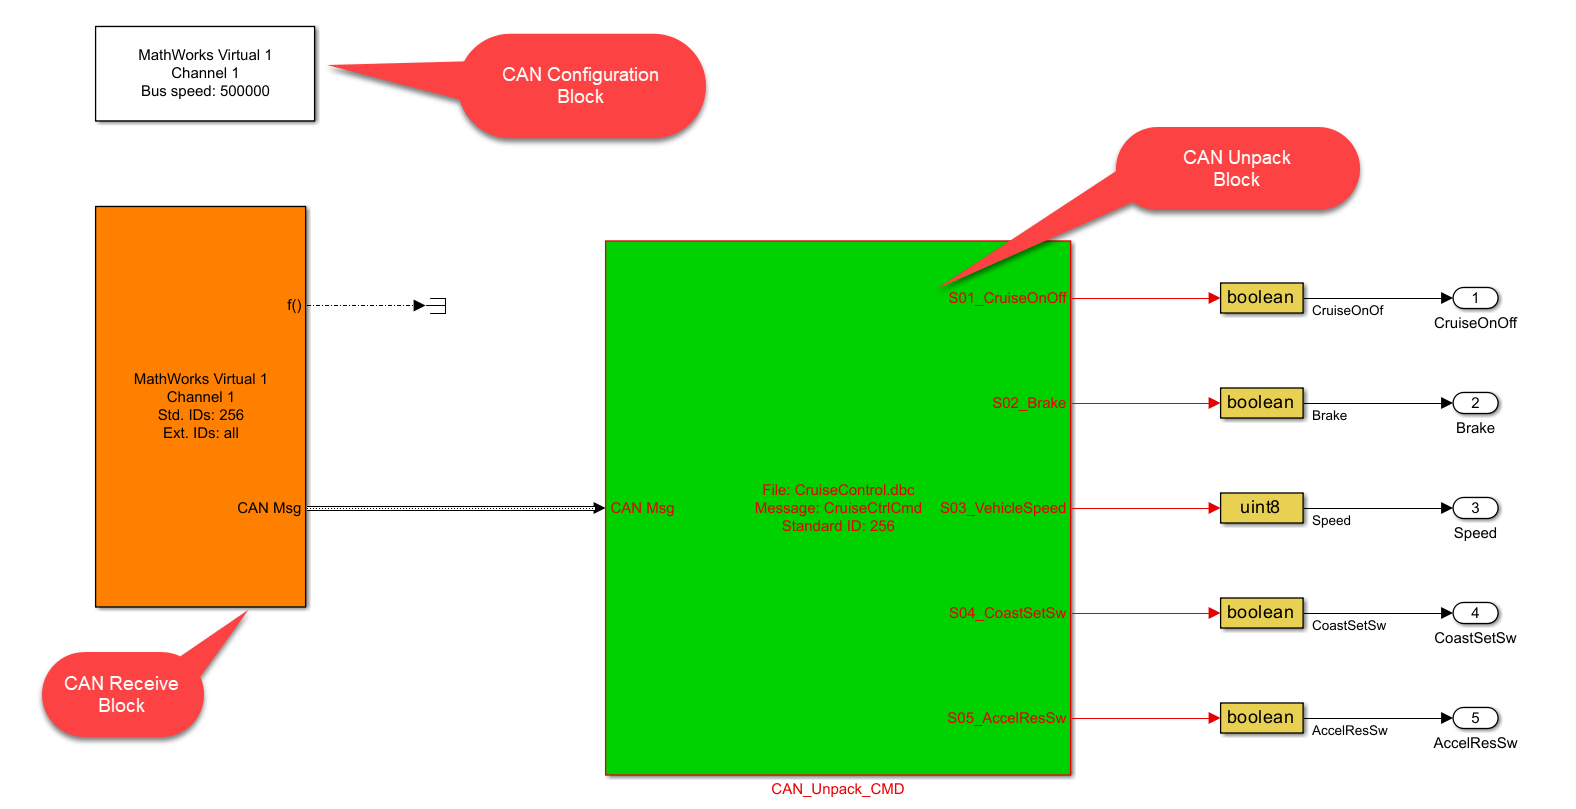
The "Inputs" subsystem of the Cruise Control algorithm Simulink model uses the following Vehicle Network Toolbox Simulink blocks to receive CAN messages:
CAN Configuration block to select which CAN channel device to connect to the Simulink model.
CAN Receive block to receive the CAN messages from the CAN device selected in the CAN Configuration block.
CAN Unpack block to unpack the payload of the received CAN message(s) into individual signals, one for each data item defined in the message.
Add CAN Message Transmit Capability
For the Cruise Control algorithm Simulink model to transmit CAN data to the test UI requires a block to connect the Simulink model to a specific CAN device, a block to pack Simulink signals into the data payload of one or more CAN messages, and a block to transmit the CAN messages from the selected device. To accomplish this, an "Outputs" subsystem is added to the Cruise Control algorithm Simulink model. The "Outputs" subsystem uses Vehicle Network Toolbox CAN pack and CAN Transmit blocks interconnected as shown in the screen shot below.
The CAN Pack block has been configured to read a user defined network database (.dbc) file. This allows the user to determine the message name, message ID, and data payload to pack signal with this block. Simulink output ports are automatically added to the block for each signal defined in the message in the network database file. The CAN Transmit block will transmit the message assembled by the Pack Block on the CAN channel and CAN device selected by the user with the Configuration block. Note that a second CAN Configuration block is not required since the "Outputs" subsystem is transmitting CAN messages on the same CAN channel and device used to receive CAN messages.
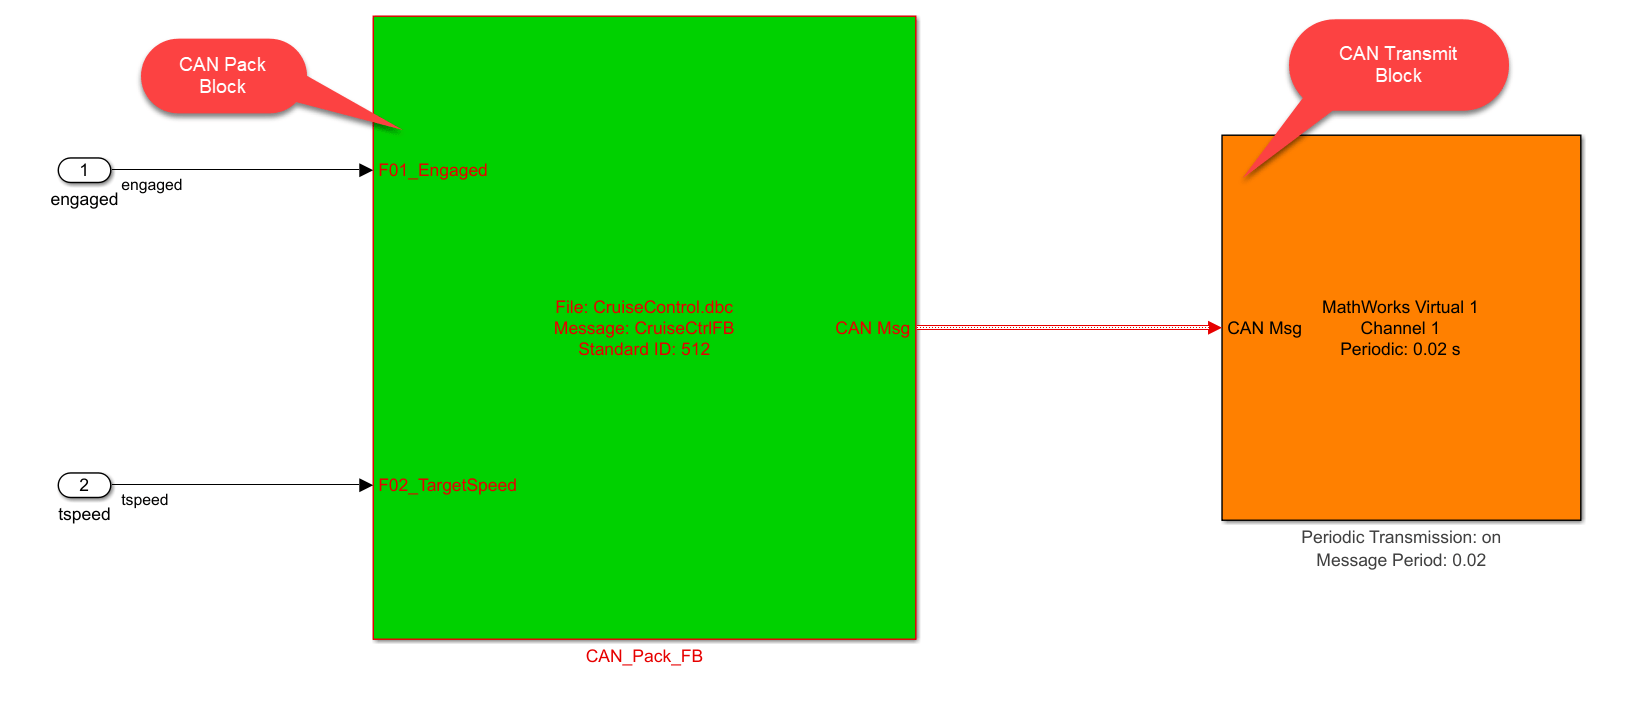
The "Outputs" subsystem of the Cruise Control algorithm Simulink model uses the following Vehicle Network Toolbox Simulink blocks to transmit CAN messages:
CAN Pack block to unpack the payload of the received CAN message(s) into individual signals, one for each data item defined in the message.
CAN Transmit block to receive the CAN messages from the CAN device selected in the CAN Configuration block.
Push CAN Channel Configuration from the UI to the Simulink Model
Because the user selects which of the available CAN devices and channels to use from the UI, this information needs to be sent to the Cruise Control algorithm Simulink model to keep the CAN device and channel configurations between the UI and the Simulink model in sync. To accomplish this, the CAN device and channel information used by the CAN Configuration, CAN Transmit, and CAN Receive blocks must be configured programmatically from the UI. Every time a user selects a CAN device and CAN channel from the UI "Channel Configuration/Select CAN Channel" menu, the helper function updateModelWithSelectedCANChannel is called. As shown in the code fragment below, updateModelWithSelectedCANChannel finds the block path for the CAN Configuration, CAN Transmit, and CAN Receive blocks within the Cruise Control algorithm Simulink model. Using set_param commands, the Device, DeviceMenu, and ObjConstructor block properties for each of these three blocks are set to the corresponding properties from the CAN device and CAN channel selected by the user.
function updateModelWithSelectedCANChannel(app, index)
    % Check to see if we are using a virtual CAN channel and whether the model is loaded.
    if app.canChannelInfo.DeviceModel(index) == "Virtual" && bdIsLoaded(app.mdl)
        % Using a virtual channel.

        % Find path to CAN configuration block.
        canConfigPath = find_system(app.mdl,'Variants', 'AllVariants', 'LookUnderMasks', 'all',...
            'FollowLInks', 'on', 'Name', 'CAN Configuration');

        % Find path to CAN transmit block.
        canTransmitPath = find_system(app.mdl,'Variants', 'AllVariants', 'LookUnderMasks', 'all',...
            'FollowLInks', 'on', 'Name', 'CAN Transmit');

        % Find path to CAN receive block.
        canReceivePath = find_system(app.mdl,'Variants', 'AllVariants', 'LookUnderMasks', 'all',...
            'FollowLInks', 'on', 'Name', 'CAN Receive');

        % Push the selected CAN channel into the simulation model CAN Configuration block.
        set_param(canConfigPath{1}, 'Device', app.canChannelDeviceSelected);
        set_param(canConfigPath{1}, 'DeviceMenu', app.canChannelDeviceSelected);
        set_param(canConfigPath{1}, 'ObjConstructor', app.canChannelConstructorSelected);

        % Push the selected CAN channel into the simulation model CAN Receive block.
        set_param(canReceivePath{1}, 'Device', app.canChannelDeviceSelected);
        set_param(canReceivePath{1}, 'DeviceMenu', app.canChannelDeviceSelected);
        set_param(canReceivePath{1}, 'ObjConstructor', app.canChannelConstructorSelected);

        % Push the selected CAN channel into the simulation model CAN Transmit block.
        set_param(canTransmitPath{1}, 'Device', app.canChannelDeviceSelected);
        set_param(canTransmitPath{1}, 'DeviceMenu', app.canChannelDeviceSelected);
        set_param(canTransmitPath{1}, 'ObjConstructor', app.canChannelConstructorSelected);
    end
end
Use the UI and Model Together
With both the model and UI open, you can explore interacting with the model in the UI. Click Start Sim to put the model and UI online. Experiment with the "Driver Inputs" and "Calibrations" sections of the UI to control the model and actuate the cruise control algorithm. You will see the cruise control engagement and speed values plotted in the UI. You can also use the logging and replay features described previously via the UI controls.
Creating a UI in this manner, gives you a powerful and flexible test interface customizable to your application. It is valuable when debugging and optimizing your algorithm in simulation. By changing the selected CAN device from virtual channels to physical channels, you can continue to use the UI to interact with the algorithm running in a rapid prototyping platform or target controller.