Main Content

basebandTransceiver

Configure SDR as baseband transceiver

Since R2022a

Add-On Required: This feature requires the Wireless Testbench™ Support Package for NI™ USRP™ Radios add-on.

Description

Use the basebandTransceiver object to configure the specified software-defined radio (SDR) as a baseband transceiver to simultaneously transmit and capture IQ waveforms over the air.

This diagram shows a conceptual overview of capturing and transmitting radio signals in Wireless Testbench™ using a radio that you configure with this object. The onboard data buffering ensures contiguous data capture and transmit. The transmission controller enables you to specify continuous or single-shot transmissions.

Creation

Description

bbtrx = basebandTransceiver(radio) creates a baseband transceiver application object for the specified radio radio.

Note

The object requires exclusive access to radio hardware resources. Before creating this object, clear any existing Wireless Testbench application object associated with the specified radio from the workspace.

example

bbtrx = basebandTransceiver(radio,PropertyName=Value) sets properties using one or more name-value arguments. For example, CaptureDataType="double" sets the data type of the returned captured data to double.

example

bbrx = basebandTransceiver(radio,Preload=true,PropertyName=Value) loads the application onto the radio during object creation. (since R2025a)

Use this syntax when you plan to schedule or synchronize operations using the radio time.

example

Input Arguments

expand all

Radio setup configuration, specified as one of these options.

  • String scalar — The name of a radio setup configuration you saved using the Radio Setup wizard. To list all saved radio setup configurations, call the radioConfigurations function with no input arguments. For example, "MyRadio".

  • Radio object — A radio object that corresponds to a radio setup configuration you saved using the Radio Setup wizard. For example, to create a radio object for a radio setup configuration with the name "MyRadio", call radio = radioConfigurations("MyRadio").

    Use this option when you want to use synchronization features. You can refer to radio object properties to get information about the radio setup configuration that the object corresponds to, such as the model number of the radio, the radio IP address, and the synchronization options. Additionally, you can:

    For more information, see Time Synchronize Operations on NI USRP Radios.

For a list of supported radios, see Supported Radio Devices.

Since R2025a

Option to load the application onto the radio, specified as one of these options.

  • false — The application is loaded onto the radio the first time you call the transmit or capture function.

  • true — Load the application onto the radio during object creation. This takes a few extra seconds.

    Use this option when you plan to schedule or synchronize operations that use this object. Loading the application onto the radio at object creation prevents the radio time from being reset when you the transmit or capture function. Specifying properties during object creation is also recommended, as updating some object properties will cause the radio time to be reset.

Data Types: logical

Properties

expand all

Transmit center frequency in Hz, specified as a one of these options.

  • Positive numeric scalar — The object applies this value by scalar expansion to each antenna in the TransmitAntennas property.

  • Numeric array — The object applies the ith array element value to the ith antenna in the TransmitAntennas property.

The valid center frequency range depends on the radio device.

Radio DeviceCenter Frequency

USRP™ N300

1 MHz to 6 GHz

USRP N310

1 MHz to 6 GHz

USRP N320

1 MHz to 6 GHz

USRP N321

1 MHz to 6 GHz

USRP X300

10 MHz to 6 GHz

USRP X310

10 MHz to 6 GHz

USRP X410

1 MHz to 8 GHz

Note

When setting this property for multiple antennas on a USRP N300 or USRP N310 radio, consider these hardware characteristics.

  • The antenna ports on the RF0 and RF1 radio channels use the same center frequency. Therefore, set identical center frequency values for the antennas specified as "RF0:TX/RX" and "RF1:TX/RX".

  • The antenna ports on the RF2 and RF3 radio channels use the same center frequency. Therefore, set identical center frequency values for the antennas specified as "RF2:TX/RX" and "RF3:TX/RX". These antennas are available only on a USRP N310 radio.

Transmit radio antenna, specified as one of these options.

  • String constant — Specifies single antenna use.

  • String array — Specifies multiple antenna use. (since R2024b)

Use this table to identify the supported radio antenna ports on your radio device and the corresponding string constants that you can specify for this property. The default value depends on the radio.

Radio DeviceSupported Antenna PortString Scalar

USRP N300

RF0 channel: TX/RX port"RF0:TX/RX" (default)
RF1 channel: TX/RX port"RF1:TX/RX"

USRP N310

RF0 channel: TX/RX port"RF0:TX/RX" (default)
RF1 channel: TX/RX port"RF1:TX/RX"
RF2 channel: TX/RX port"RF2:TX/RX"
RF3 channel: TX/RX port"RF3:TX/RX"

USRP N320

RF0 channel: TX/RX port"RF0:TX/RX" (default)
RF1 channel: TX/RX port"RF1:TX/RX"

USRP N321

RF0 channel: TX/RX port"RF0:TX/RX" (default)
RF1 channel: TX/RX port"RF1:TX/RX"

USRP X300

RFA channel: TX/RX port

"RFA:TX/RX" (default)

RFB channel: TX/RX port

"RFB:TX/RX"

USRP X310

RFA channel: TX/RX port

"RFA:TX/RX" (default)

RFB channel: TX/RX port

"RFB:TX/RX"

USRP X410

DB0 RF0 channel: TX/RX 0 port

"DB0:RF0:TX/RX0" (default)

DB0 RF1 channel: TX/RX 0 port

"DB0:RF1:TX/RX0"

DB1 RF0 channel: TX/RX 0 port

"DB1:RF0:TX/RX0"

DB1 RF1 channel: TX/RX 0 port

"DB1:RF1:TX/RX0"

The maximum number of antenna connections available depends on the radio. Use this table to determine the maximum combined number of antennas you can specify with the TransmitAntennas and CaptureAntennas properties.

Radio DeviceMaximum Number of Antennas

USRP N300

2

USRP N310

4

USRP N320

4

USRP N321

4

USRP X300

2

USRP X310

2

USRP X410

4

Note

When you update this property, the execution time of the next object function call increases by a few seconds.

Example: TransmitAntennas=["RF0:TX/RX","RF1:TX/RX"] specifies two transmit antennas.

Data Types: string

Transmit radio gain in dB, specified as one of these options.

  • Positive numeric scalar — The object applies this value by scalar expansion to each antenna that you specify in the TransmitAntennas property.

  • Numeric array — The object applies the ith array element value to the ith antenna in the TransmitAntennas property.

The valid gain range depends on the radio device.

Radio DeviceTransmit Radio Gain

USRP N300

0 dB to 65 dB

USRP N310

0 dB to 65 dB

USRP N320

0 dB to 60 dB

USRP N321

0 dB to 60 dB

USRP X300

0 dB to 31.5 dB

USRP X310

0 dB to 31.5 dB

USRP X410

0 dB to 60 dB

Data Types: double

Capture center frequency in Hz, specified as one of these options.

  • Positive numeric scalar — The object applies this value by scalar expansion to each antenna in the CaptureAntennas property.

  • Numeric array — The object applies the ith array element value to the ith antenna in the CaptureAntennas property.

The valid center frequency range depends on the radio device.

Radio DeviceCenter Frequency

USRP N300

1 MHz to 6 GHz

USRP N310

1 MHz to 6 GHz

USRP N320

1 MHz to 6 GHz

USRP N321

1 MHz to 6 GHz

USRP X300

10 MHz to 6 GHz

USRP X310

10 MHz to 6 GHz

USRP X410

1 MHz to 8 GHz

Note

When setting this property for multiple antennas on a USRP N300 or USRP N310 radio, consider these hardware characteristics.

  • The antenna ports on the RF0 and RF1 radio channels use the same center frequency. Therefore, set identical center frequency values for the antennas specified as "RF0:RX2" and "RF1:RX2".

  • The antenna ports on the RF2 and RF3 radio channels use the same center frequency. Therefore, set identical center frequency values for the antennas specified as "RF2:RX2" and "RF3:RX2". These antennas are available only on a USRP N310 radio.

Data Types: double

Capture radio antenna, specified as one of these options.

  • String constant — Specifies single antenna use.

  • String array — Specifies multiple antenna use. (since R2024b)

Use this table to identify the supported radio antenna ports on the radio device and the corresponding string constants that you can specify for this property. The default value depends on the radio.

Radio DeviceSupported Antenna PortString Scalar

USRP N300

RF0 channel: RX2 port"RF0:RX2" (default)
RF1 channel: RX2 port"RF1:RX2"

USRP N310

RF0 channel: RX2 port"RF0:RX2" (default)
RF1 channel: RX2 port"RF1:RX2"
RF2 channel: RX2 port"RF2:RX2"
RF3 channel: RX2 port"RF3:RX2"

USRP N320

RF0 channel: RX2 port"RF0:RX2" (default)
RF1 channel: RX2 port"RF1:RX2"

USRP N321

RF0 channel: RX2 portRF0 channel: RX2 port

USRP X300

RFA channel: RX2 port

"RFA:RX2" (default)

RFB channel: RX2 port

"RFB:RX2"

USRP X310

RFA channel: RX2 port

"RFA:RX2" (default)

RFB channel: RX2 port

"RFB:RX2"

USRP X410

DB0 RF0 channel: RX 1 port

"DB0:RF0:RX1" (default)

DB0 RF1 channel: RX 1 port

"DB0:RF1:RX1"

DB1 RF0 channel: RX 1 port

"DB1:RF0:RX1"

DB1 RF1 channel: RX 1 port

"DB1:RF1:RX1"

The maximum number of antenna connections available depends on the radio. Use this table to determine the maximum combined number of antennas you can specify with the CaptureAntennas and TransmitAntennas properties.

Radio DeviceMaximum Number of Antennas

USRP N300

2

USRP N310

4

USRP N320

4

USRP N321

4

USRP X300

2

USRP X310

2

USRP X410

4

Note

When you update this property, the execution time of the next object function call increases by a few seconds.

Example: CaptureAntennas=["RF0:RX2","RF1:RX2"] specifies two capture antennas.

Data Types: string

Capture radio gain in dB, specified as one of these options.

  • Positive numeric scalar — The object applies this value by scalar expansion to each antenna in the CaptureAntennas property.

  • Numeric array — The object applies the ith array element value to the ith antenna in the CaptureAntennas property.

The valid gain range depends on the radio device.

Radio DeviceCapture Radio Gain

USRP N300

0 dB to 75 dB

USRP N310

0 dB to 75 dB

USRP N320

0 dB to 60 dB

USRP N321

0 dB to 60 dB

USRP X300

0 dB to 31.5 dB

USRP X310

0 dB to 31.5 dB

USRP X410

0 dB to 60 dB

Data Types: double

Baseband sample rate in Hz, specified as a positive numeric scalar. For more information on how the radio achieves the specified sample rate, see Baseband Sample Rate in NI USRP Radios.

The valid sample rate depends on the radio device.

Radio DeviceSample Rate

USRP N300

  • 120,945 Hz to 76.8 MHz

  • 122.88 MHz

  • 125.00 MHz

  • 153.60 MHz (default)

USRP N310

USRP N320

  • 196,851 Hz to 125 MHz

  • 200.00 MHz

  • 245.76 MHz

  • 250.00 MHz (default)

USRP N321

USRP X300

  • 181,418 Hz to 100 MHz

  • 184.32 MHz

  • 200.00 MHz (default)

USRP X310

USRP X410

  • 241,890 Hz to 125 MHz

  • 245.76 MHz

  • 250.00 MHz (default)

  • 491.52 MHz (since R2025a)

  • 500 MHz (since R2025a)

Note

  • When you update this property, the execution time of the next object function call increases by a few seconds.

  • If you have a USRP X410 radio and you set this property to 491.52 MHz or 500 MHz, consider the following capture and transmit function limitations:

    • You can capture data only in the foreground.

    • You must specify the capture length to be less than or equal to the onboard radio memory buffer size.

    • If you change the SampleRate property between a sample rate greater than 250 MHz and a sample rate less than or equal to 250 MHz, a new FPGA image is loaded to the radio when you call the transmit or capture function. This can take up to a minute.

Data Types: double

Since R2025a

Data type of the transmitted data, specified as "int16", "double", or "single".

Use this property to specify the data type of the data that you transmit with the transmit function.

Note

  • You must specify a waveform with the same data type in your call to the transmit function, or the data type you specify with this argument will be overwritten.

  • When you update this property, the execution time of the next object function call increases by a few seconds.

Data Types: string

Data type of the captured data, specified as "int16", "double", or "single". Use this property to set the data type of the captured data that the capture object function returns.

Note

When you update this property, the execution time of the next object function call increases by a few seconds.

Data Types: string

Behavior of the capture object function upon dropped samples, specified as one of these values.

  • "error" — The object function stops with an error message.

  • "warning" — The object function displays a warning message.

  • "none" — The object function ignores dropped samples.

Data Types: string

Object Functions

captureCapture IQ data using baseband receiver or transceiver
isCapturingStatus of capture running in background using baseband receiver or transceiver
captureOutputsRetrieve outputs from capture run in background using baseband receiver or transceiver
stopCaptureStop capture running in background using baseband receiver or transceiver
transmitTransmit waveform using baseband transmitter or transceiver
stopTransmissionStop transmission from baseband transmitter or transceiver

Examples

collapse all

Create a baseband transceiver object, specifying a radio setup configuration previously saved in the Radio Setup wizard.

bbtrx = basebandTransceiver("MyRadio")
bbtrx = 
  basebandTransceiver with properties:

          TransmitRadioGain: 10
    TransmitCenterFrequency: 2.4000e+09
           TransmitAntennas: "RF0:TX/RX"
           CaptureRadioGain: 10
     CaptureCenterFrequency: 2.4000e+09
            CaptureAntennas: "RF0:RX2"
            CaptureDataType: "int16"
       DroppedSamplesAction: "error"
                 SampleRate: 250000000

Set the baseband sample rate.

bbtrx.SampleRate = 122.88e6;

Set the transmit and capture center frequencies.

bbtrx.TransmitCenterFrequency = 2.2e9;
bbtrx.CaptureCenterFrequency = 2.2e9;

Generate a random transmit waveform.

txWaveform = complex(randn(1000,1),randn(1000,1));

Transmit the generated waveform continuously with the radio associated with the baseband transceiver object using the default transmit antenna.

transmit(bbtrx,txWaveform,"continuous");

Capture IQ data with the radio associated with the baseband transceiver object using the default capture antenna.

[data,~] = capture(bbtrx,milliseconds(3));

Stop the continuous transmission after data capture is complete.

stopTransmission(bbtrx);

Create a baseband transceiver object, specifying a radio setup configuration previously saved in the Radio Setup wizard. Specify two transmit antennas and two capture antennas, each with a different center frequency.

bbtrx = basebandTransceiver("MyRadio", ...
    TransmitAntennas=["RF0:TX/RX","RF1:TX/RX"], ...
    TransmitCenterFrequency=[2.2e9,2.4e9], ...
    CaptureAntennas=["RF0:RX2","RF1:RX2"], ...
    CaptureCenterFrequency=[2.2e9,2.4e9])
bbtrx = 
  basebandTransceiver with properties:

          TransmitRadioGain: 10
    TransmitCenterFrequency: [2.2000e+09 2.4000e+09]
           TransmitAntennas: ["RF0:TX/RX"    "RF1:TX/RX"]
           CaptureRadioGain: 10
     CaptureCenterFrequency: [2.2000e+09 2.4000e+09]
            CaptureAntennas: ["RF0:RX2"    "RF1:RX2"]
            CaptureDataType: "int16"
       DroppedSamplesAction: "error"
                 SampleRate: 153600000

Generate two random complex transmit waveforms with a length of 1000 samples.

length = 1000;
txWaveform = [complex(randn(length,1),randn(length,1)), ...
    complex(randn(length,1),randn(length,1))];

Transmit the generated waveform continuously with the radio associated with the baseband transceiver object.

transmit(bbtrx,txWaveform,"continuous");

Capture IQ data with the radio associated with the baseband transceiver object.

[data,~] = capture(bbtrx,length);

The output data is a 1000-by-2 array. Each column contains the data captured on one antenna, in the order that they are specified.

Stop the continuous transmission when the capture is complete.

stopTransmission(bbtrx);

Create a radio object, specifying a radio setup configuration previously saved using the Radio Setup wizard.

radio = radioConfigurations("MyRadio");

Create a baseband transceiver object, specifying your radio object. Specify the Preload name-value argument as true to load the application onto the radio during object creation. Specify RF properties for the transmit and receive channels.

bbtrx = basebandTransceiver(radio, ...
    Preload=true, ...
    TransmitDataType="double", ...
    TransmitAntennas="RFA:TX/RX", ...
    TransmitCenterFrequency=2.4e9, ...
    TransmitRadioGain=10, ...
    CaptureAntennas="RFA:RX2", ...
    CaptureCenterFrequency=2.4e9, ...
    CaptureRadioGain=10);

Set the time for synchronously applying changes to RF properties as 2 seconds in the future.

cmdTime = getRadioTime(radio)+2
cmdTime = 
2.1484

Transmit a waveform continuously.

transmit(bbtrx,[-1;0;1;0],"continuous");

Schedule a 0.2 second long background capture to start 0.1 seconds before the scheduled command time.

capture(bbtrx,seconds(0.2),Background=true,StartTime=cmdTime-0.1);

Set the command time and verify.

setCommandTime(radio,cmdTime)
getCommandTime(radio)
ans = 
2.1484

Update the transmit and capture radio gains to 20 dB. These changes take effect synchronously at the command time.

bbtrx.TransmitRadioGain = 20;
bbtrx.CaptureRadioGain = 20;

Clear the command time. This takes effect immediately after the scheduled property updates take effect.

clearCommandTime(radio);

Wait for the capture operation to complete.

while isCapturing(bbtrx)
    pause(0.1)
end

Return the captured data to the workspace.

data = captureOutputs(bbtrx);

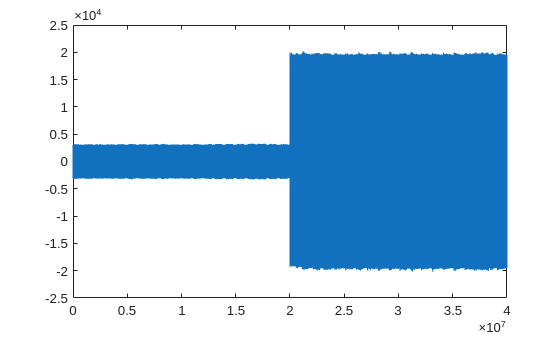
Plot the captured data. The plot shows the data captured 0.1 seconds either side of the command time.

plot(real(data))

Figure contains an axes object. The axes object contains an object of type line.

Tips

You cannot use save and load to store and reload Wireless Testbench objects. Instead, you can re-create the object with these steps:

  1. Write code to create a basebandTransceiver object with a saved radio setup configuration radio and set the properties.

  2. Save the code to a script.

  3. Run the script in a new MATLAB® session with the same saved radio setup configuration.

Version History

Introduced in R2022a

expand all