Install and Use Function Wizard
The Function Wizard add-in, available with MATLAB® Compiler™, provides a control panel that you use in Microsoft® Excel® to create custom Excel macros using one or more MATLAB Compiler Excel add-ins. The generated macro consists of Microsoft Visual Basic® for Applications (VBA) code that you can modify for additional customization. To use the wizard, you do not need knowledge of VBA programming.
The Function Wizard enables you to create Excel macros that specify the placement and output of data from compiled MATLAB functions to the worksheets. You pass Excel worksheet values to a compiled MATLAB model, and then return model output to a cell or range of cells in the worksheet. Use the Function Wizard to handle MATLAB functions that have structure array arguments or multiple outputs.
For a complete example on creating an Excel macro using the Function Wizard, see Create Macro Using Multiple MATLAB Functions.
Install Function Wizard
You install the Function Wizard in Excel the same way you install MATLAB Compiler generated add-ins. For instructions, see Install Excel Add-Ins.
The add-in file for the Function Wizard is located at
matlabroot\toolbox\matlabxl\matlabxl\win64\FunctionWizard.xlaC:\Program
Files\MATLAB\R2026a\toolbox\matlabxl\matlabxl\win64\FunctionWizard.xla. This file
contains a macro that adds the Function Wizard add-in button to the
Home tab.
Start Function Wizard
Note
Before you can use the Function Wizard add-in, you must first register the MATLAB utility libraries. For details, see Register MATLAB Utility Libraries.
Click the Function Wizard add-in button on the Home tab to start the Function Wizard. When the wizard has initialized, the control panel opens.
Function Wizard Control Panel

Note
Closing the Function Wizard control panel does not remove any MATLAB functions or arguments that you add in an Excel session, but closing Excel resets the Function Wizard.
Define Functions to Execute
Add the MATLAB function you want to execute with the Function Wizard.
In the control panel, click Add Function in the Setup Functions area. The MATLAB Components dialog box opens.
In the Available Components area, select the name of your component from the drop-down list.
Note
If your component is not listed, make sure you have registered its DLL. For details, see Register Add-Ins and COM Components.
From Functions for Class
classname, select the function you want to execute.Click Add Function. The Function Properties dialog box opens.
Tip
The Function Syntax and Help area in the Function Properties dialog box displays the first help text line in a MATLAB function. This description can be helpful for end users who are unfamiliar with the MATLAB function.
Define Input Arguments
Note
The Function Wizard does not currently support the MATLAB
sparse or complex data types.
From the Function Properties dialog box, define input argument properties for your MATLAB function.
On the Input tab, click Set Input Data. The Input Data for
xdialog box opens, wherexis the name of the input variable.
Select the type of input argument.
Range refers to a range of cells in the worksheet. Click the text box or the cell select button on the right, then choose the cells from your worksheet that contain input data.
To automatically recalculate the spreadsheet data each time it changes, select the Auto recalculate on change option.
Caution
Avoid selecting ranges using arrow keys. If you must use arrow keys to select ranges, apply the necessary fix from the Microsoft site: https://mskb.pkisolutions.com/kb/291110.
Value refers to a value you specify in the text box. Enter a value to use as the input data and select the data type in the dropdown list.
If the argument refers to a structure array (struct), select This is a MATLAB structure array argument and click OK. The Input Data for Structure Array Argument
xdialog box opens.
The Function Wizard supports one and two-dimensional structure arrays for both input and output.
When you deploy a function with struct array arguments, let end users know which arguments are structure arrays and list their field names.
In the Structure Array Organization area, select either Element by Element Organization or Plane Organization. For more information, see Ways to Organize Data in Structure Arrays.
To add fields for each of your struct array arguments, click Add Field. The Field for Structure Array Argument dialog box opens.

In the Name field, define the name for the structure array field. The name you specify must exactly match the field name of the structure array in your MATLAB function.
In the Range field, specify the range of the field for the structure array.

Click OK to add the field.
Repeat these steps for each field in the structure array.
To specify how to format dates and handle empty cells for this input data, click Options in the Input Data for
xdialog box. The Input Conversion Options dialog box opens.
From the Coerce Numeric to Type drop-down list, select a data type to control the conversion of numeric data.
From the Treat Missing Data As drop-down list, specify either Zero or NaN (Not a Number).
Click OK to add the input argument.
Repeat the procedure for each input argument for your function.
Define Output Arguments
In the Function Properties dialog box, define output argument properties for your MATLAB function.
On the Output tab, click Set Output Data. The Output Data for
ydialog box appears, whereyis the name of the output variable.
Tip
You can also specify MATLAB Compiler to automatically resize output data (Auto Resize), transpose it (Transpose), or output it in date format (Output as date).
In the Range field, specify the type of output argument as either a range of cells or a MATLAB structure array.
For details on using structure array arguments, see Define Input Arguments.
To enable Excel to dynamically select the number of output cells, select Auto Resize if it is not already selected.
Click Done in the Output Data for
ydialog box to add the output argument.
Repeat the procedure for each output argument for your MATLAB function.
Note
When working with functions that have multiple outputs, define a separate output range for each argument.
Test and Save Macro
Once you are finished adding arguments to your MATLAB function, click Done in the Function Properties dialog box. Your function appears in the Active Functions list of the control panel in the Function Wizard. You can edit function arguments at any time by selecting your function in the list and then clicking Edit/Set Data.

To test your macro, click Execute in the Execute Functions area. Cell ranges defined as output arguments are automatically populated with your function output on the current Excel sheet.
To save your macro:
In the Create Macros area of the control panel, enter a name for your macro in the Macro Name field.
From the Store Macro In drop-down list, select the workbook to store the macro.
In the Description field, enter a brief description of the macro functionality.
Click Create Macro.
A macro is created and saved in the target Excel workbook.
Execute Macro in Excel
Run the macro in Microsoft Excel.
Tip
You may need to enable the proper security settings before running macros in Microsoft Excel. For information about macro permissions and related error messages, see Errors and Solutions.
In Microsoft Excel, click View > Macros > View Macros.
Select the macro from the Macro name drop-down list.
Click Run. Cell ranges defined as output arguments are automatically populated with your function output.
Access Microsoft Visual Basic Code (Optional)
To access or modify the Visual Basic code in your macro:
From the Excel Developer tab, click Visual Basic, or press ALT+F11 to open the Visual Basic Editor. In older versions of Excel, it may be located under Tools > Macro > Visual Basic Editor.
In the Project - VBAProject window, double-click to expand
VBAProject (Book1).Expand the
Modulesfolder and double-click theMatlab Macrosmodule.The Visual Basic Code window opens with the code for this project.
Map Macro to Button (Optional)
To create a form control button that runs the macro when you click the button:
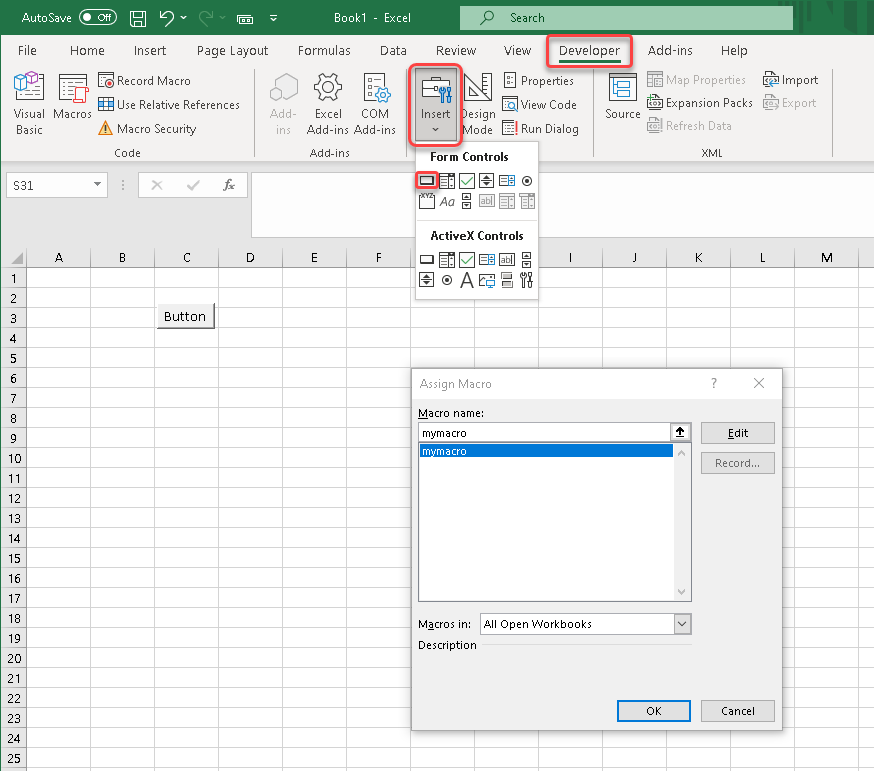
From the Excel Developer tab, click Insert.
From the Form Controls menu, select the Button (Form Control) icon.
Tip
To see the various control labels, point your mouse over the Form Controls menu.
In the Assign Macros dialog box, select the macro you want to assign the button to and click OK.