Highway Lane Following with RoadRunner Scenario
This example shows how to simulate a highway lane following application, designed in Simulink®, with RoadRunner Scenario.
Introduction
RoadRunner Scenario is an interactive editor that enables you to design scenarios for simulating and testing automated driving systems. You can place vehicles, define their paths and interactions in the scenario, and then simulate the scenario in the editor. RoadRunner Scenario supports in-editor playback for scenario visualization and connecting to other simulators, such as MATLAB® and Simulink, for cosimulation.
A highway lane following system steers a vehicle to travel within its lanes. It also maintains a set velocity, or a safe distance from a leading vehicle in the same lane. A highway lane following system typically uses camera and radar sensors to detect lanes and vehicles. It uses vision processing algorithms to detect lanes and vehicles in images from the camera, then fuses the vehicle detections from the camera with detections from a radar to improve the robustness of its perception. The controller uses the lane detections, vehicle detections, and set speed to control steering and acceleration. This example shows how to use RoadRunner Scenario to cosimulate with the Simulink highway lane following test bench model used in the Highway Lane Following example.
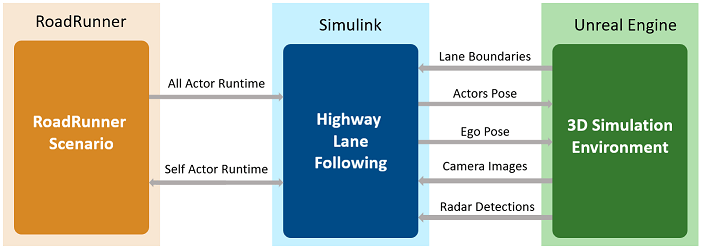
This figure shows an overview of the information exchanged between RoadRunner Scenario, the highway lane following test bench model in Simulink, and the Unreal Engine® simulation environment. The highway lane following model reads all actor runtimes from RoadRunner Scenario and passes the actor pose and ego pose information in Unreal Engine simulation environment.The ego vehicle has attached camera and radar sensors in Unreal Engine simulation environment and the highway lane following model gets the ground truth lane boundaries, camera images, and radar detections from these sensors. The model uses this information to control the ego vehicle and write back the new ego pose to RoadRunner Scenario.
In this example, you:
Set up the environment — Configure MATLAB settings to interact with RoadRunner Scenario.
Explore RoadRunner scenario — Explore the RoadRunner scene and scenario required for simulating the highway lane following system.
Explore the test bench model — The test bench contains an interface for RoadRunner Scenario, the highway lane following model, and a metrics assessment subsystem that assesses model performance using ground truth data.
Simulate the lane following scenario — Cosimulate the lane following scenario with RoadRunner Scenario and Unreal Engine.
Explore additional scenarios — These scenarios test the system under additional conditions.
This example shows cosimulation with the Unreal Engine from Epic Games®.
if ~ispc
    error(['This example is supported only on Microsoft.',char(174),' Windows',char(174),'.'])
end
This example requires the Automated Driving Toolbox™ Interface for Unreal Engine 4 Projects support package. For more information on downloading and installing support packages, see Get and Manage Add-Ons.
pathToCurvedRRScene = fullfile(matlabshared.supportpkg.getSupportPackageRoot,"toolbox","shared","sim3dprojects","spkg","roadrunner","RoadRunnerProject","Scenes","CurvedRoad.rrscene");
pathToStrightRRScene = fullfile(matlabshared.supportpkg.getSupportPackageRoot,"toolbox","shared","sim3dprojects","spkg","roadrunner","RoadRunnerProject","Scenes","StraightRoad.rrscene");
pathToAssets = fullfile(matlabshared.supportpkg.getSupportPackageRoot,"toolbox","shared","sim3dprojects","spkg","roadrunner","RoadRunnerProject","Assets","Markings","*.rrmeta");

if (~exist(pathToCurvedRRScene, 'file') && ~exist(pathToStrightRRScene, 'file'))
    error('This example requires you to download and install Automated Driving Toolbox Interface for Unreal Engine 4 Projects support package');
end
Set Up Environment
This section shows how to set up the environment to cosimulate the highway lane following system with RoadRunner Scenario.
Specify the path to your local RoadRunner installation folder. This code shows the path for the default installation location on Windows.
rrAppPath = "C:\Program Files\RoadRunner " + matlabRelease.Release + "\bin\win64";
Specify the path to your RoadRunner project. This code shows the path to a sample project folder on Windows.
rrProjectPath = "C:\RR\MyProjects";
To update the path for the RoadRunner installation folder, get the root object within the settings hierarchical tree. For more information, see SettingsGroup.
s = settings;
s.roadrunner.application.InstallationFolder.TemporaryValue = rrAppPath;
Open RoadRunner using the specified path to your project.
rrApp = roadrunner(rrProjectPath);
The rrApp RoadRunner object enables you to interact with RoadRunner from the MATLAB workspace. You can open the scenario and update scenario variables using this object. For more information on this object, see roadrunner.
To explore the test bench model, load the highway lane following with RoadRunner Scenario project.
openProject("HLFWithRRScenario");
Copy the RoadRunner scene, scenario, and behavior files to the RoadRunner project.
HLFWithRRScenarioProject = currentProject;
projectPath = convertStringsToChars(HLFWithRRScenarioProject.RootFolder);
projectRootFolder = projectPath(1:find(projectPath=='\',1,'last')-1);

copyfile(pathToCurvedRRScene,fullfile(rrProjectPath,"Scenes"),'f')
copyfile(pathToStrightRRScene,fullfile(rrProjectPath,"Scenes"),'f')
copyfile(fullfile(projectRootFolder,"HLFTestScenarios/RoadRunner/Scenarios"),fullfile(rrProjectPath,"Scenarios"),'f')
copyfile(fullfile(projectRootFolder,"HLFWithRRScenario/TestBench/HLF.rrbehavior.rrmeta"),fullfile(rrProjectPath,"Assets","Behaviors"),'f')
copyfile(pathToAssets, fullfile(rrProjectPath,"Assets/Markings"),'f')
Explore RoadRunner Scenario
This example reuses the scenarios from the Highway Lane Following example in RoadRunner. This example uses the CurvedRoad.rrscene to simulate the highway lane following model. The scene contains a two-way, four-lane, curved highway road. The road centers, and lane markings in this scene closely match a section of curved road scene provided with the Unreal Engine simulation environment.Open the scene.
openScene(rrApp,"CurvedRoad.rrscene")

The scenario_LFACCRR_03_Curve_StopnGo.rrscenario file is a RoadRunner scenario compatible with the HighwayLaneFollowingRRTestBench model. This is an open-loop scenario containing multiple target vehicles on a curved road. This example uses RoadRunner Scenario vehicle assets that closely match the vehicles in Unreal Engine simulation environment. You need RoadRunner Asset Library license to render these vehicles in RoadRunner Scenario.
In this scenario, a lead vehicle slows down in front of the ego vehicle while other vehicles travel in adjacent lanes. Open the scenario.
openScenario(rrApp,"scenario_LFACCRR_03_Curve_StopnGo.rrscenario")

To simulate the lane following behavior for the ego vehicle, specify custom behavior for it using the HLF.rrbehavior.rrmeta file.

Connect to the RoadRunner Scenario server for cosimulation using the createSimulation function and enable data logging.
rrSim = createSimulation(rrApp);
set(rrSim,Logging="on");
rrSim is a ScenarioSimulation object. Use this object to set variables and to read scenario and map-related information.
The highway lane following application is designed to run at a step size of 0.1. Set the simulation step size of RoadRunner Scenario.
Ts = 0.1;
set(rrSim,StepSize=Ts)
Explore Test Bench Model
In this example, you use a system-level simulation test bench model to simulate and test the behavior of the lane following model with RoadRunner Scenario. Open the test bench model.
open_system("HighwayLaneFollowingRRTestBench")

The test bench model contains RoadRunner Scenario blocks, which configure, read from, and write to RoadRunner Scenario. It also contains these modules:
Sensors and Vehicles— Subsystem that specifies and updates the Unreal Engine simulation environment along with the camera and radar sensors used for simulation.Pack Actor Poses— MATLAB System object™ that provides inputs to the vehicles in the Unreal Engine simulation environment from the driving-scenario-compatible poses of the target actors read from RoadRunner Scenario.Lane Marker Detector— Algorithm model that detects the lane boundaries in the frame captured by the camera sensor.Vehicle Detector— Algorithm model that detects vehicles in the frame captured by the camera sensor.Forward Vehicle Sensor Fusion— Algorithm model that fuses vehicle detections from the camera and radar sensors.Lane Following Decision Logic— Algorithm model that specifies the lateral and longitudinal decision logic that provides information to the controller related to the most important object (MIO) and lane center.Lane Following Controller— Algorithm model that specifies steering angle and acceleration controls.Vehicle Dynamics— Subsystem that specifies the dynamic model of the ego vehicle.Metrics Assessment— Subsystem that assesses system-level and component-level behaviors.
The Lane Marker Detector, Vehicle Detector, Forward Vehicle Sensor Fusion, Lane Following Decision Logic, Lane Following Controller, Vehicle Dynamics, and Metrics Assessment subsystems are based on the subsystems used in the Highway Lane Following example. This example focuses on the RoadRunner Scenario blocks and the Sensors and Vehicles subsystem.
RoadRunner Scenario Blocks
The RoadRunner Scenario blocks consist of:
RoadRunner Scenario— Defines the interface for an actor model.Ego Pose Reader— RoadRunner Scenario Reader block that reads the ego pose.Actor Pose Reader— RoadRunner Scenario Reader block that reads the poses of target actors.Ego Pose Writer— RoadRunner Scenario Writer block that writes the updated ego pose back to RoadRunner Scenario.
Sensors and Vehicles Subsystem
The Sensors and Vehicles subsystem specifies sensors and vehicles in the Unreal Engine simulation environment. The target actors in the Unreal Engine simulation environment update their poses using RoadRunner Scenario. The camera sensor and radar sensor are attached to the ego vehicle. They capture images and radar detections from the Unreal Engine simulation environment, and provide the detections to the algorithm models of the highway lane following system for further processing.
Open the Sensors and Vehicles subsystem.
open_system("HighwayLaneFollowingRRTestBench/Sensors and Vehicles")

The Simulation 3D Scene Configuration block specifies the scene and the road network. Its SceneName parameter value is Curved road.
The vehicle positions are specified by these parts of the subsystem:
The
EgoandTargetsinputs specify the current positions of the ego and target vehicles, respectively, in RoadRunner Scenario.The
HelperConvertDSPoseToSim3Dsystem converts the Driving Scenario compatible pose from RoadRunner Scenario to the X,Y, and Yaw coordinates used by the Simulation 3D Vehicle Ground Following Block.Each Simulation 3D Vehicle with Ground Following block implements a vehicle at the specified position in the Unreal Engine simulation environment.
The
HeplerComputeGroundTruthBoxesSystem object™ computes the ground truth vehicle bounding boxes using actual actor positions received from the Scenario Reader block and labeled image data received from the Simulation 3D Camera block.
The sensors have a Parent Name parameter value of Simulation 3D Vehicle With Ground Following 1, assigning them to the ego vehicle:
The Simulation 3D Camera block captures the front view of the ego vehicle. The Lane Marker Detector block and Vehicle Detector block process the output image from this block to detect the lanes and vehicles, respectively.
The Simulation 3D Probabilistic Radar Configuration block detects vehicles in the Unreal Engine simulation environment.
The Simulation 3D Vision Detection Generator block provides the ground truth lane boundaries and actor position truth used by the
Metrics Assessmentsubsystem.
Simulate Lane Following Scenario
Disable the MPC update messages.
mpcverbosity("off");
This example uses the helperSLHighwayLaneFollowingWithRRSetup helper function to set up the ego and target actor profiles along with the sensor parameters. These values are scenario dependent, and can change based on the selected scenario.
helperSLHighwayLaneFollowingWithRRSetup(rrApp,rrSim,scenarioFileName="scenario_LFACCRR_03_Curve_StopnGo")
This model may take a couple of minutes to update the diagram when you compile it for the first time. Update the model before running the simulation.
set_param("HighwayLaneFollowingRRTestBench",SimulationCommand="update")
Simulate the scenario and observe how the ego vehicle stays in the current lane and adjusts its speed to avoid collision with the lead vehicle.
set(rrSim,SimulationCommand="Start")
while strcmp(rrSim.get("SimulationStatus"),"Running")
    pause(1)
end

Plot the lateral controller performance results.
hFigLatResults = helperPlotLFLateralResults(logsout);

Close the figure.
close(hFigLatResults)
Examine the simulation results.
The Detected lane boundary lateral offsets plot shows the lateral offsets of the detected left-lane and right-lane boundaries from the centerline of the lane. The detected values are close to the ground truth of the lane, but deviate by small quantities.
The Lateral deviation plot shows the lateral deviation of the ego vehicle from the centerline of the lane. Ideally, lateral deviation is 0 meters, which implies that the ego vehicle follows the centerline exactly. Small deviations occur when the vehicle changes velocity to avoid collision with another vehicle.
The Relative yaw angle plot shows the relative yaw angle between the ego vehicle and the centerline of the lane. The relative yaw angle is very close to 0 radians, which implies that the heading angle of the ego vehicle matches the yaw angle of the centerline closely.
The Steering angle plot shows the steering angle of the ego vehicle.
Plot the longitudinal controller performance results.
hFigLongResults = helperPlotLFLongitudinalResults(logsout,time_gap,default_spacing);

Close the figure.
close(hFigLongResults)
Examine the simulation results.
The Relative longitudinal distance plot shows the distance between the ego vehicle and the MIO. In this case, the ego vehicle approaches the MIO and gets close to it, or exceeds the safe distance in some cases.
The Relative longitudinal velocity plot shows the relative velocity between the ego vehicle and the MIO. In this example, the vehicle detector detects only positions, so the tracker in the control algorithm estimates the velocity. The estimated velocity is less than the actual (ground truth) MIO relative velocity.
The Absolute acceleration plot shows that the controller commands the vehicle to decelerate when it gets too close to the MIO.
The Absolute velocity plot shows that the ego vehicle initially follows the set velocity, but when the MIO slows down, the ego vehicle also slows down to avoid a collision.
During simulation, the model logs signals to the base workspace as logsout and records the output of the camera sensor to forwardFacingCamera.mp4. You can use the helperPlotLFDetectionResultsRR function to visualize the simulated detections similar to how recorded data is explored in the Forward Collision Warning Using Sensor Fusion example. You can also record the visualized detections to a video file to enable review by others who do not have access to MATLAB.
Plot the detection results from logged data, generate a video, and open the Video Viewer app.
hVideoViewer = helperPlotLFDetectionResultsRR(logsout, "forwardFacingCamera.mp4", ...
     camera, radar, "scenario_LFACCRR_03_Curve_StopnGo",actorProfiles,...
    "RecordVideo", true,...
    "RecordVideoFileName", "scenario_LFACCRR_03_Curve_StopnGo" + "_VPA",...
    "OpenRecordedVideoInVideoViewer", true,...
    "VideoViewerJumpToTime", 11.0);

Explore Other Scenarios
In this example, you have explored the behavior for the scenario_LFACCRR_03_Curve_StopnGo.rrscenario scenario, which uses the CurvedRoad.rrscene scene. You can use the same test bench model to explore other scenarios. This example provides these additional scenarios that are compatible with the HighwayLaneFollowingWithRRTestBench model.
scenario_LFRR_01_Straight_RightLane.rrscenarioscenario_LFRR_02_Straight_LeftLane.rrscenarioscenario_LFRR_03_Curve_LeftLane.rrscenarioscenario_LFRR_04_Curve_RightLane.rrscenarioscenario_LFACCRR_01_Curve_DecelTarget.rrscenarioscenario_LFACCRR_02_Curve_AutoRetarget.rrscenarioscenario_LFACCRR_03_Curve_StopnGo.rrscenarioscenario_LFACCRR_04_Curve_CutInOut.rrscenarioscenario_LFACCRR_05_Curve_CutInOut_TooClose.rrscenarioscenario_LFACCRR_06_Straight_StopandGoLeadCar.rrscenario
The scenarios with the Curve keyword in the name use the CurvedRoad.rrscene. The remaining scenarios use the |StraightRoad.rrscene|scene, which contains a two-way, four-lane, straight highway road. You can open the scene using this command.
openScene(rrApp,"StraightRoad.rrscene")
These scenarios represent two types of testing.
The scenarios with the
scenarioLFRRprefix test lane detection and lane following algorithms without obstructions from other vehicles.The scenarios with the
scenarioLFACCRRprefix test lane detection and lane following algorithms with other vehicles within the sensor coverage area of the ego vehicle.
You can explore these scenarios in RoadRunner. For example, to open the scenario_LFACCRR_06_Straight_StopandGoLeadCar.rrscenario scenario, enter this command.
openScenario(rrApp,"scenario_LFACCRR_06_Straight_StopandGoLeadCar.rrscenario")
You can configure the HighwayLaneFollowingWithRRTestBench model to simulate these scenarios using the helperSLHighwayLaneFollowingWithRRSetup function. For example, to configure the model to run the scenario_LFACCRR_06_Straight_StopandGoLeadCar.rrscenario scenario, enter this command.
helperSLHighwayLaneFollowingWithRRSetup(rrApp,rrSim,scenarioFileName="scenario_LFACCRR_06_Straight_StopandGoLeadCar")
Enable the MPC update messages.
mpcverbosity("on");
See Also
Blocks
- Simulation 3D Camera | Simulation 3D Scene Configuration | Simulation 3D Probabilistic Radar Configuration | Simulation 3D Vision Detection Generator | Simulation 3D Vehicle with Ground Following | RoadRunner Scenario | RoadRunner Scenario Reader | RoadRunner Scenario Writer