Set Acquisition Parameters in Image Acquisition Explorer
Before acquiring images or video in the Image Acquisition Explorer app, set acquisition parameters such as region of interest (ROI) and device-specific properties. The preview updates in real-time as you change these parameters.
If your device supports hardware triggering, you can also set hardware triggering options before acquiring images or video. These options are only available when you select Hardware Trigger in the toolstrip.
After specifying acquisition parameters, you can specify where to save your captured image or video data. For more information, see Log Data in Image Acquisition Explorer. Then, you can capture image snapshots and record video. For more information, see Preview and Acquire Data in Image Acquisition Explorer.
Acquisition Parameters Panels
Set acquisition parameters in Image Acquisition Explorer from the following panels next to the preview.
ROI Position — Define the region of interest.
Device Properties — Change device-specific properties.
If your device supports hardware triggering and you select Hardware Trigger in the toolstrip, the following panel is also available.
Hardware Trigger — Set up hardware triggering options.
Set Region of Interest
By default, your acquisition consists of the entire frame that the device acquires, which is equal to the selected format's default resolution. If you want to acquire a portion of the frame, use the ROI Position panel to set the desired region. The ROI window defines the actual size of the frame logged by the app, measured with respect to the top-left corner of an image frame.
Click the Select ROI button to adjust the ROI selection window manually or interactively.
Set the ROI manually by specifying one or more of the X-Offset, Y-Offset, Width, or Height values until you reach the desired region. The ROI selection window in the preview resizes as you make changes.

Set the ROI interactively by clicking and dragging the edges of the selection window that appears in the preview. You can resize and move the selection window to outline the region you want to capture. The values for X-Offset, Y-Offset, Width, and Height update as you adjust the selection window. You can manually specify these values as well while you interactively change the selection window.
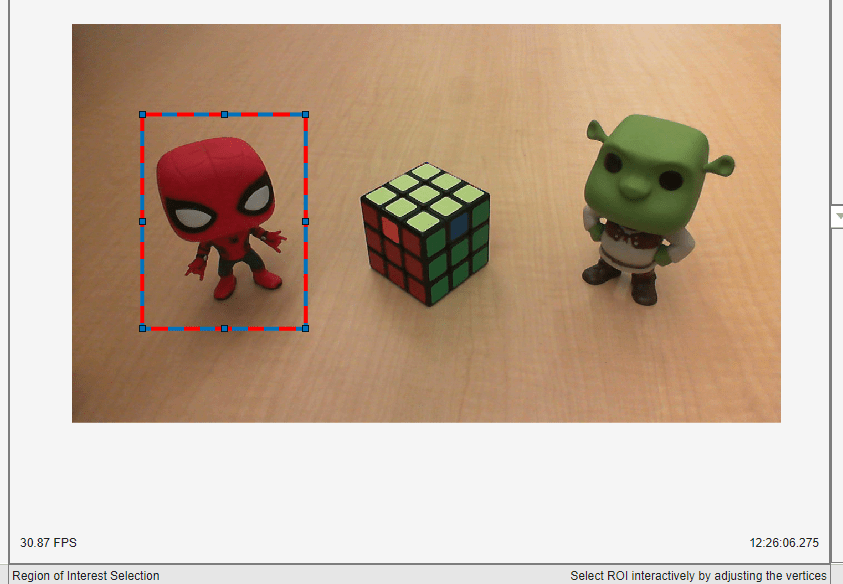
When you are satisfied with the selected ROI, click Apply to confirm your selection. After applying your changes, you can reset the ROI to your device's default at any time by clicking Reset ROI.
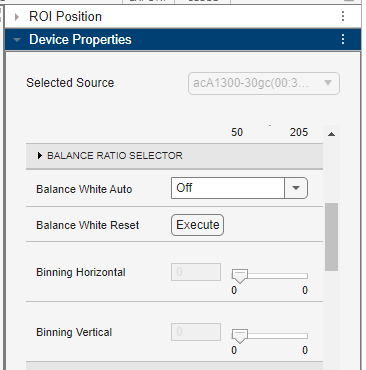
Set Device-Specific Parameters
View or change device-specific properties using the Device Properties panel. The specific properties that appear depend on your device.
For example, if FrameRate appears in the
Device Properties, that means your
device has a FrameRate property. The information
in the Device Properties panel comes from your
device. The value set there is the frame rate that your device uses,
in frames per second. If FrameRate does not
appear in the panel, your device does not support that
property.
The Selected Source specifies the name of the selected source for the current device. Many device adaptors have only one input source. If your device supports multiple source names, they appear in the drop-down list.

For GigE Vision® and GenICam™ GenTL cameras, you can view, set, and execute GigE Vision and GenICam commands from this panel. To execute a command, click Execute next to the command name.
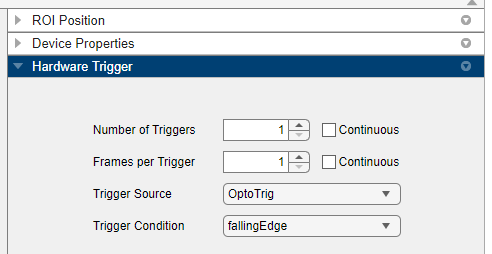
Set Up Hardware Triggering
The Hardware Trigger panel is available only for devices that support hardware triggering. It appears when you select the Hardware Trigger option in the Record section of the app toolstrip. You can set the following parameters in this panel.
Number of Triggers — Number of triggers before acquisition is completed.
Frames per Trigger — Number of frames to acquire per trigger.
Trigger Source — Hardware source that is monitored for trigger conditions. When the condition specified in Trigger Condition is met, the trigger is executed and the acquisition starts. Trigger Source is device-specific. The drop-down list shows the mechanisms your particular device can use to receive triggers from the hardware source.
Trigger Condition — Condition that must be met from the Trigger Source before a trigger event occurs. Trigger Condition is device-specific. The drop-down list shows the conditions that your particular device can wait for from the hardware source.
The total number of frames that are acquired when you start an
acquisition depends on Number of Triggers and
Frames Per Trigger. For example, if you
set Number of Triggers to 2
and Frames Per Trigger to 4,
the total number of frames in the acquisition is 8.
For more information about hardware triggers and how to use them with
a videoinput object, see Using a Hardware Trigger.