Detect Air Compressor Sounds on a Raspberry Pi Using Wavelet Scattering and TensorFlow Lite Network
This example shows how to generate and deploy code to detect air compressor sounds using the Wavelet Scattering block from DSP System Toolbox® and a pretrained TensorFlow™ Lite deep learning network on a Raspberry Pi® device in Simulink.
Third party Prerequisites
Raspberry Pi hardware
TensorFlow Lite library on the target ARM® hardware
Environment variables on the target for the compilers and libraries.
For more information on how to build the TensorFlow Lite library and set the environment variables, see Prerequisites for Deep Learning with TensorFlow Lite Models (Deep Learning Toolbox).
We recommend completing the following examples to ensure that the Raspberry Pi device has been set up properly to run the steps outlined in this example:
Get Started with Simulink Support Package for Raspberry Pi Hardware (Simulink)
Generate Code for TensorFlow Lite (TFLite) Model and Deploy on Raspberry Pi (Deep Learning Toolbox)
Data and TensorFlow Lite model Description
This example uses a dataset that contains recordings from air compressors. The data set is classified into eight classes, including one healthy state and seven faulty states. This example extracts features from the input data using wavelet scattering and passes the generated features to a pretrained TensorFlow Lite network to classify the input data into one of the eight classes. For more information on training the network, see Fault Detection Using Wavelet Scattering and Recurrent Deep Networks (Wavelet Toolbox).
To download the trained TensorFlow Lite model, run the following commands. These commands download and unzip the files to a location on the MATLAB® path.
zipFile = matlab.internal.examples.downloadSupportFile('dsp','AirCompressorTFLiteMdl.zip');
dataFolder = fileparts(zipFile);
unzip(zipFile,cd);
Streaming Setup
This example uses two Simulink models to illustrate detection of air compressor sounds on a Raspberry Pi device.
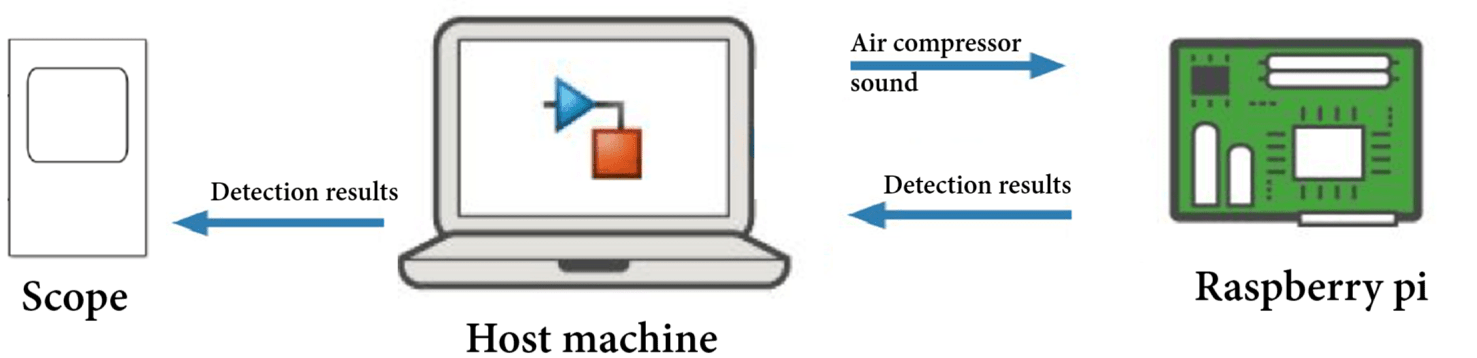
The model AirCompressorFaultDetectionHostModel.slx runs on the host machine allows the user to select the type of air compressor sound to be processed. The model sends the audio data to the Raspberry Pi device using a UDP Send block.
The model AirCompressorFaultDetectionTargetModel.slx runs on the target Raspberry Pi hardware. This model receives the air compressor sound data from the AirCompressorFaultDetectionHostModel using a UDP Receive block, extracts wavelet features from the audio data, passes the features to a TensorFlow Lite network to obtain classification scores, and sends back the scores to the AirCompressorFaultDetectionHostModel using a UDP Send block.
The AirCompressorFaultDetectionHostModel model receives the classification scores from the AirCompressorFaultDetectionTargetModel using a UDP Receive block, processes the received classification scores and displays the class label corresponding to the detection.
Host Model
Open and examine the Simulink model AirCompressorFaultDetectionHostModel.slx. This model runs on the host computer.
model1 = 'AirCompressorFaultDetectionHostModel';
open_system(model1);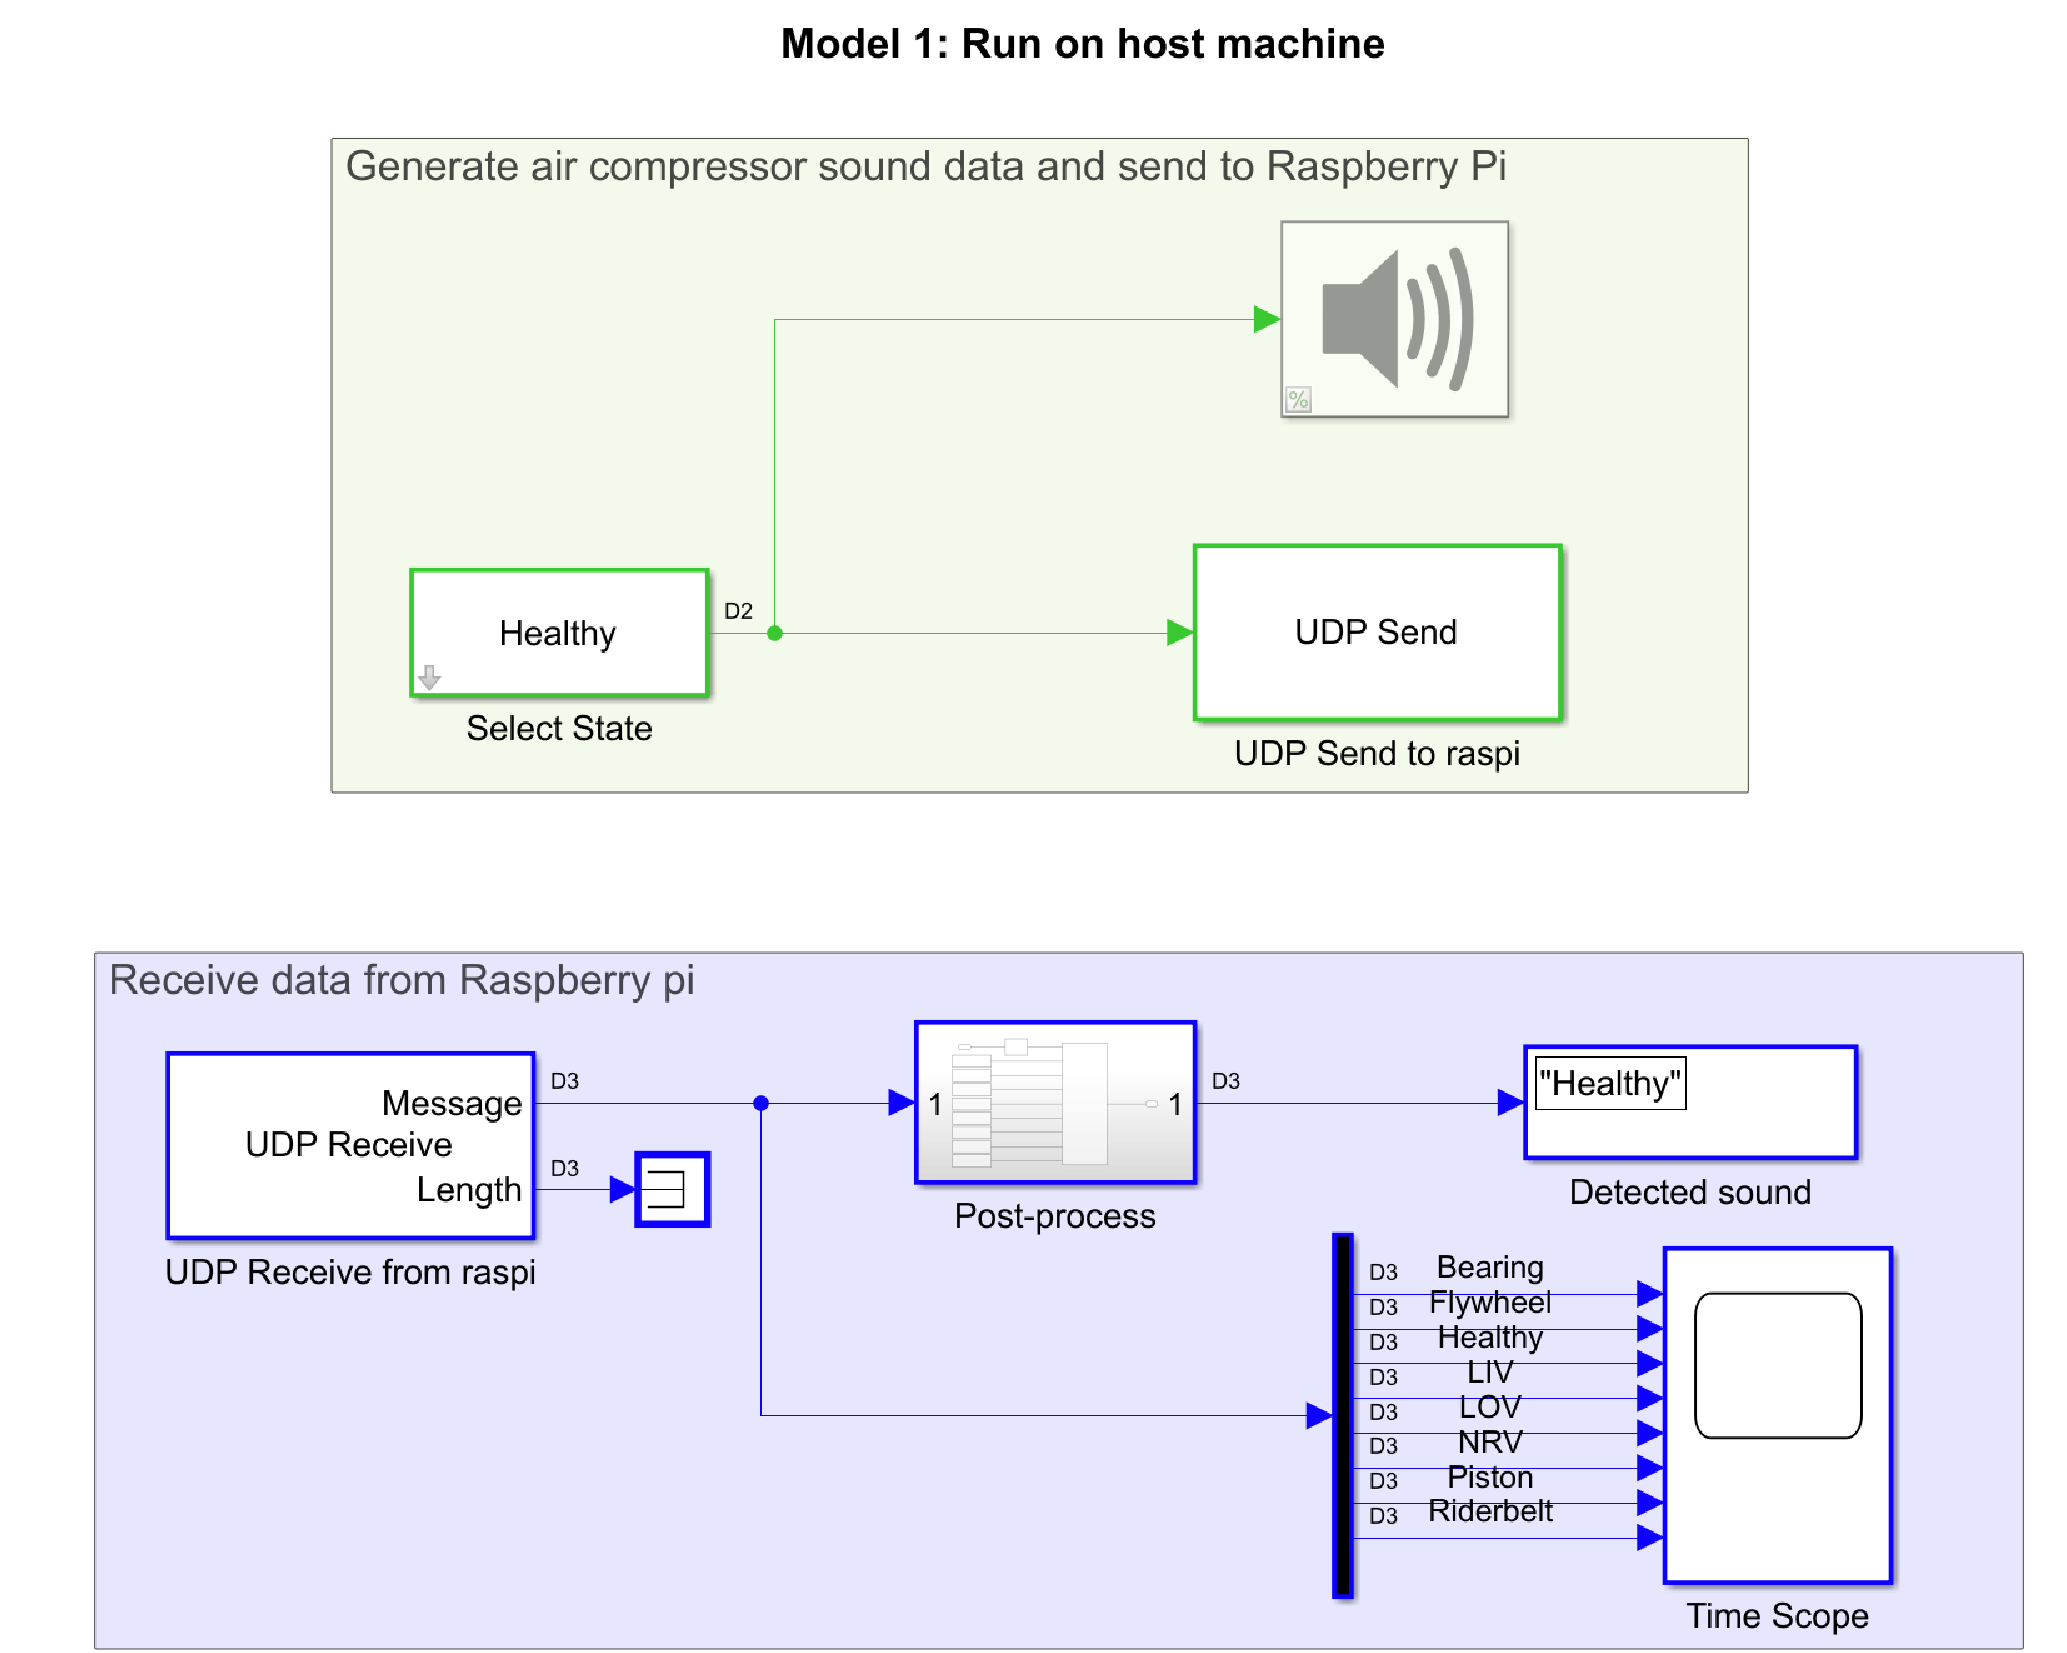
You can change the type of air compressor sound while the simulation is running by double clicking the Select State block and choosing a different type of sound from the drop-down list. Uncomment the Audio Device Writer to listen to the selected air compressor sound using an audio device on the host computer.
The UDP Send to raspi block sends the air compressor sound data to the Raspberry Pi via UDP. Update the target IP address for your Raspberry Pi on the UDP Send block. You can do this by setting the value of targetIPAddress in the code snippet below or by setting the Remote IP address parameter on the UDP Send to raspi block dialog.
targetIPAddress = '''172.21.19.91''';
set_param([model1 '/UDP Send to raspi'], 'remoteURL', targetIPAddress)
The model uses a UDP Receive block to receive the UDP packets from AirCompressorFaultDetectionTargetModel containing the detection scores for each class. The Post-process subsystem identifies the class with the highest score and outputs the corresponding class name. You can also see the classification scores for each class on the Time Scope block
Air Compressor Sound Detection Model
Open and examine the Simulink model AirCompressorFaultDetectionTargetModel.slx. This model runs on the target Raspberry Pi device.
model2 = 'AirCompressorFaultDetectionTargetModel';
open_system(model2);
The model uses a UDP Receive block to receive the UDP packets sent from the host computer. Verify that the Local IP Port parameter on the UDP Receive from host block has been set to the same value (25000) as the Remote IP Port parameter on the UDP Send to raspi block in AirCompressorFaultDetectionHostModel.slx to ensure proper transmission of data.
The Wavelet Scattering block extracts wavelet features from the received data. The extracted features are reshaped and passed to a MATLAB Function (Simulink) block that uses the loadTFLiteModel (Deep Learning Toolbox) function to load the trained TensorFlow Lite network and the predict (Deep Learning Toolbox) function to use the network to obtain classification scores for each class.
function out = TFLitePredict(input)

    persistent tfliteNet;

    if isempty(tfliteNet)
        tfliteNet = loadTFLiteModel('AirCompressorMdl.tflite');
    end

    tfliteNet.NumThreads = 6;

    out = predict(tfliteNet, input);

end
The classification scores are sent back to the AirCompressorFaultDetectionHostModel using a UDP Send block. Update the IP address of your host machine on the UDP Send to host block. You can do this by setting the value of hostIPAddress in the code snippet below or by setting the Remote IP address parameter on the UDP Send to host block dialog.
hostIPAddress = '''172.21.19.247''';
set_param([model2 '/UDP Send to host'], 'remoteURL', hostIPAddress)
Ensure that the Remote IP Port parameter on the UDP Send to host block has been set to the same value (25001) as the Local IP Port parameter on the UDP Receive from raspi block in AirCompressorFaultDetectionHostModel.slx.
Configure Air Compressor Sound Detection Model
In order to run the model AirCompressorFaultDetectionTargetModel on the Raspberry Pi board, configure the model using the following steps:
To open the Model Configuration Parameters dialog box, click the gear icon on the Simulink model toolstrip.
In the Configuration Parameters dialog box, select Hardware Implementation.
Set the Hardware board parameter to
Raspberry Pi. This selection automatically populates the parameters in the Hardware board settings with the default values for the Raspberry Pi board. In the Hardware board settings pane, expand Target hardware resources and select Board Parameters. Specify these parameter values:
Device Address: The IP address or host name of the hardware.
Username: Specify the root user name of the Linux® system running on the hardware. The default user name of the Raspian Linux distribution is
pi.Password: Specify the root password of the Linux system running on the hardware. The default password of the Raspian Linux distribution is
raspberry.
Click Apply. Click OK to save your changes
4. In the Code generation pane:
Set the System target file to ert.tlc.
Set the Language to C++.
Under the Code Style Pane, set the Dynamic array container type to
coder::array.
Deploy Air Compressor Sound Detection Model on Raspberry Pi Hardware
Generate an executable from the model AirCompressorFaultDetectionTargetModel.slx.
slbuild(model2);
### Unable to find Simulink cache file "AirCompressorFaultDetectionTargetModel.slxc".
### Searching for referenced models in model 'AirCompressorFaultDetectionTargetModel'.
### Total of 1 models to build.
### Starting build procedure for: AirCompressorFaultDetectionTargetModel
### Generating code and artifacts to 'Model specific' folder structure
### Generating code into build folder: C:\ExampleManagera13214\user.Bdoc.j2861955\deeplearning_shared-ex47117441\AirCompressorFaultDetectionTargetModel_ert_rtw
### Invoking Target Language Compiler on AirCompressorFaultDetectionTargetModel.rtw
### Using System Target File: S:\12\pvenupra.Bdoc.j2861955\runnable\matlab\rtw\c\ert\ert.tlc
### Loading TLC function libraries
........
### Generating TLC interface API for custom data
.
### Initial pass through model to cache user defined code
.
### Caching model source code
...............................................................................
...................................................
### Writing header file AirCompressorFaultDetectionTargetModel_types.h
### Writing source file AirCompressorFaultDetectionTargetModel.cpp
### Writing header file AirCompressorFaultDetectionTargetModel_private.h
### Writing header file AirCompressorFaultDetectionTargetModel.h
.
### Writing header file rtwtypes.h
### Writing header file rtGetInf.h
### Writing source file rtGetInf.cpp
### Writing header file rtGetNaN.h
### Writing source file rtGetNaN.cpp
.
### Writing header file rt_nonfinite.h
### Writing source file rt_nonfinite.cpp
### Writing source file AirCompressorFaultDetectionTargetModel_data.cpp
### Writing header file rtmodel.h
### Writing source file ert_main.cpp
.
### TLC code generation complete (took 17.91s).
### Saving binary information cache.
### Using toolchain: GNU GCC Embedded Linux
### Creating 'C:\ExampleManagera13214\user.Bdoc.j2861955\deeplearning_shared-ex47117441\AirCompressorFaultDetectionTargetModel_ert_rtw\instrumented\AirCompressorFaultDetectionTargetModel.mk' ...
### Building 'AirCompressorFaultDetectionTargetModel': make  -j$(($(nproc)+1)) -Otarget -f AirCompressorFaultDetectionTargetModel.mk all
### Creating HTML report file index.html
### Successful completion of build procedure for: AirCompressorFaultDetectionTargetModel
### Simulink cache artifacts for 'AirCompressorFaultDetectionTargetModel' were created in 'C:\ExampleManagera13214\user.Bdoc.j2861955\deeplearning_shared-ex47117441\AirCompressorFaultDetectionTargetModel.slxc'.

Build Summary

Top model targets:

Model                                   Build Reason                                         Status                        Build Duration
=========================================================================================================================================
AirCompressorFaultDetectionTargetModel  Information cache folder or artifacts were missing.  Code generated and compiled.  0h 3m 44.265s

1 of 1 models built (0 models already up to date)
Build duration: 0h 3m 49.507s
Copy the executable to the Raspberry Pi device.
if ~exist('r','var')
    r = raspi;
end
exeName =[model2 '.elf'];
destination = '/home/pi/';
putFile(r,exeName,destination);
Copy the trained TensorFlow Lite network model to the Raspberry Pi device.
trainedMdl = 'AirCompressorMdl.tflite';
putFile(r,trainedMdl,destination);
Deploy the generated executable.
runCommand = ['./' exeName ' &'];
system(r, runCommand);
Run Simulation
To simulate the AirCompressorFaultDetectionHostModel, select the Run button on the Simulation tab. Note that this example uses simulation pacing to slow down the simulation such that the value of the Simulation time per wall clock parameter is 1 second. This value ensures that the rates at which the two models send and receive data match. You can use simulation pacing to slow down or speed up the simulation to observe its behavior in real time or at a specified speed.
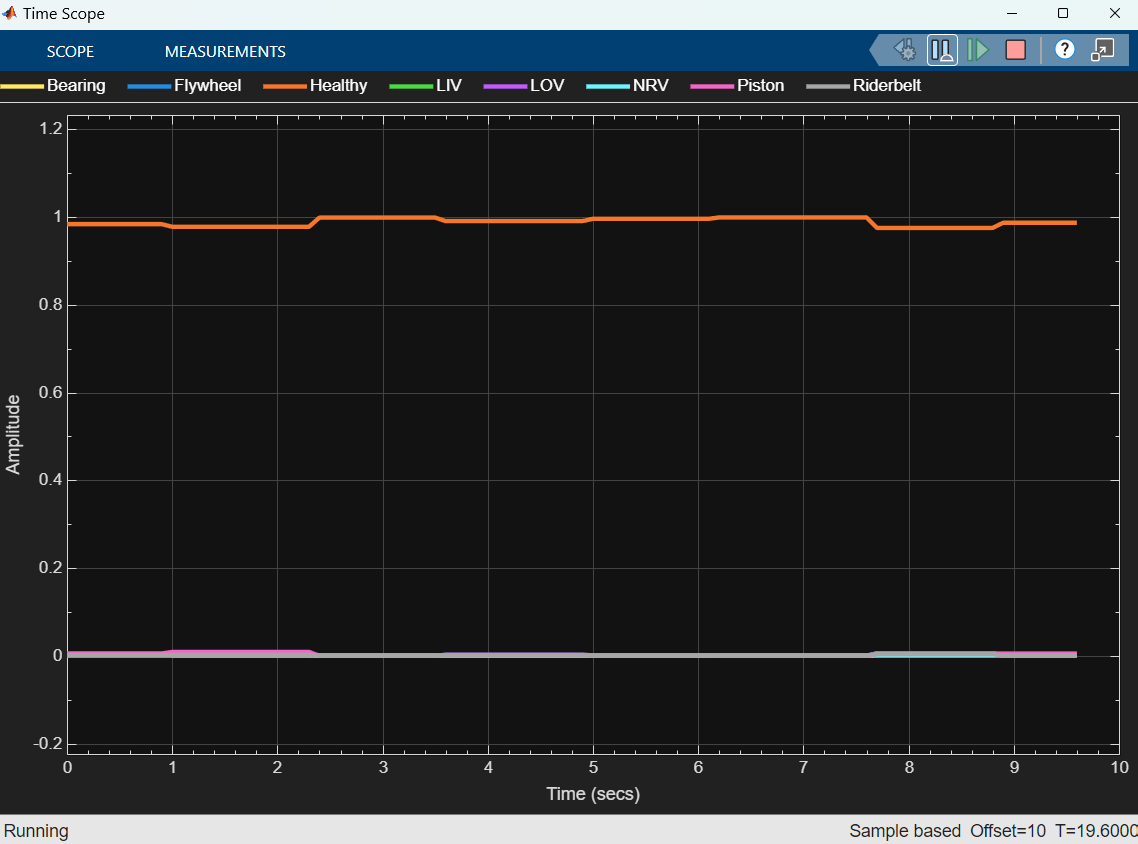
The Time Scope block displays the classification score corresponding to different classes of air compressor sounds. For example, in the screenshot below, you can see that the score for "Healthy" class is the highest compared to rest of the classes:
Stop the execution of the deployed model.
stopExecutable(codertarget.raspi.raspberrypi,exeName)
See Also
Wavelet Scattering | exportNetworkToTensorFlow (Deep Learning Toolbox)