Create an App to Detect Circles in Image
R2026bThis example shows how to build an app to interactively detect circles in a 2‑D image using App Designer. Using the CircleDetectionApp app, users can import an image, choose a circle detection approach, tune parameters, and immediately see detected circles overlaid on the image. Users can then export a mask of the detected circles or the circle centers and radii for downstream operations. For example, they can use the circle centers and radii as inputs to functions such as viscircles and circles2mask. The app supports these circle detection approaches:
imfindcirclesYOLOapproach — Find circular objects in grayscale or RGB images using a pretrained YOLOX object detector by using theimfindcirclesYOLOfunction.imfindcirclesapproach — Find circles whose radii are approximately equal to a specified radius or fall within a specified radius range by using theimfindcirclesfunction.imsegsamapproach — Segment objects using theimsegsamfunction, and filter the detected objects using theCircularitymeasurement of theregionpropsfunction.
The imfindcirclesYOLO approach requires the Image Processing Toolbox™ Model for Circle Detection add-on, and the imsegsam approach requires the Image Processing Toolbox™ Model for Segment Anything Model 2 add-on. You can install the add-ons from the Add-On Explorer. For more information about installing add-ons, see Get and Manage Add-Ons. Both add-ons require desktop MATLAB®, as MATLAB® Online™ and MATLAB® Mobile™ do not support the add-ons.
Open App Designer
App Designer is an interactive development environment for designing apps and custom UI components and programming their behavior.
To build the app from scratch, open App Designer using this command. Alternatively, you can open App Designer by selecting the Design App option on the Apps tab of the MATLAB® toolstrip.
appdesigner
The CircleDetectionApp app is also attached to this example as a supporting file. For information on running the app, see the Detect Circles in Image Using App section.
You can also open this example from the App Designer home page by clicking Show examples in the Apps section of the home page and selecting Detect Circles in Images from the list of examples.
You can customize the code of the app in the attached supporting files. For information on customizing the app, see the Customize the App section.
App Layout Design
The CircleDetectionApp app has two main regions: a toolstrip and a working area.
The toolstrip contains these sections:
Import Image — Consists of UI components used to import 2-D grayscale or color image data from a file or the workspace.
Settings — Consists of UI components used to select a circle detection approach, enable GPU usage, and control circle overlay opacity.
Export — Consists of UI components used to export the mask of the detected circles to a file or the workspace, or to save circle centers and radii to the workspace.
The working area of the app requires contains these sections:
Image — Displays the current image and detected circles. The app displays the image using the
imageshowfunction. The handle of the displayed image is anImageobject. AViewerobject is the parent of theImageobject. For more information about theImageobject, see Image Properties. For more information about theViewerobject, see Viewer Properties.Parameters — Contains approach‑specific parameter controls. Because each detection method requires different inputs, the app dynamically creates the parameter UI when the user changes the selected approach. This section also has a Run button, which initiates circle detection using the specified parameters.
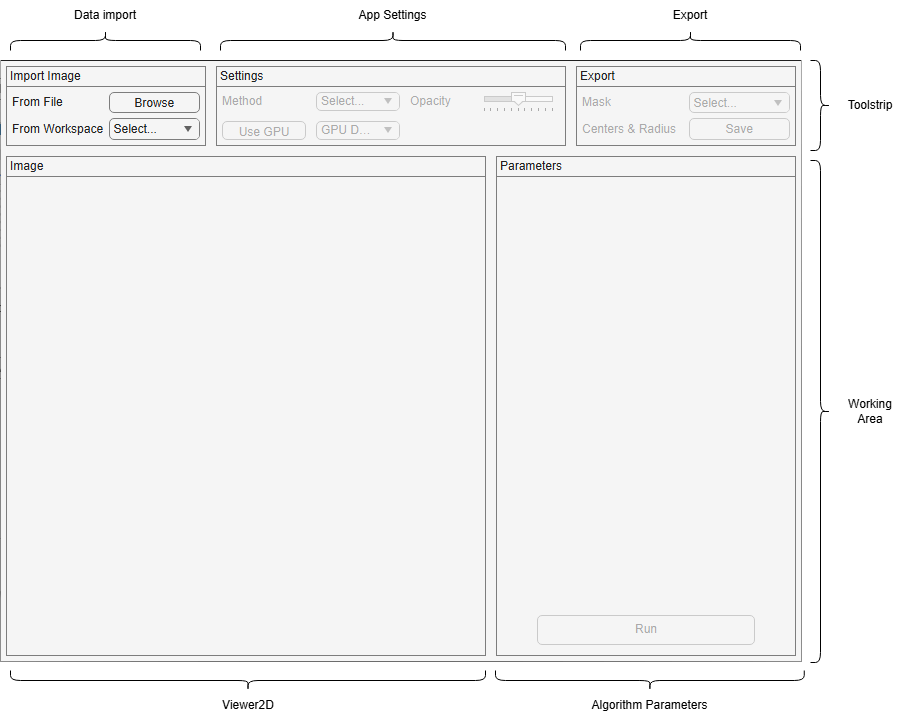
The app uses a grid layout structure to create the defined layout.
Main app figure
Main app grid layout
Toolstrip grid layout
Toolstrip elements like import, settings, and export
Working area grid layout
Image panel containing
ImageobjectParameter grid layout containing the Parameters panel with parameter inputs and Run button
For more information on using grid layout with App Designer, see Use Grid Layout Managers in App Designer.
Define App Properties
The app stores the input image and current detection results in these properties.
Viewer—Viewerobject used to display the image and circle annotations.ImageHandle—Imageobject created byimageshow, used to display and update the loaded image.Centers— Array of center coordinates for the currently detected circles.Radii— Array of radii for the currently detected circles.
These properties enable the app to update the display, adjust visualization, and export results without recomputing detections.
Define App Methods
The app uses methods to import and visualize data, process user input and update the display, export the circle detection results, and control the app state. The app also uses some helper functions to improve code readability and code reusability. These are some of the important app methods.
Reset App on New Data Load
When the user loads a new image into the app, the app clears the existing image data and annotations and displays the new loaded image. The app resets UI elements to their default state and enables the drop-down used to select the circle detection approach. The resetAppOnNewDataLoad method defines this behavior.
function resetAppOnNewDataLoad(app,imageData)
    % Function to reset app when new data is loaded

    % Set the newly loaded image data and reset viewer2d.
    app.ImageHandle.Data = imageData;
    app.Viewer.Interactions = ["pan","zoom"];
    app.Viewer.Annotations = [];

    % Reset UI elements to default state
    app.MethodDropDownLabel.Enable = "on";
    app.MethodDropDown.Enable = "on";
    app.OpacitySliderLabel.Enable = "on";
    app.OpacitySlider.Enable = "on";
    app.enableExport(false);
end
Dynamically Create UI Components for Parameters
When the user selects a circle detection approach from the Method drop-down, the app deletes any existing parameter UI and adds parameters relevant to the selected detection method. If the user selects the imfindcirclesYOLO or the imsegsam method, the app also enables GPU controls. Based on the selected method, the app creates the method-specific parameter UI by calling one of these method-specific functions: createImfindcirclesYolo, createImfindcircles, or createImsegsam. The app enables the Run button. The MethodDropDownValueChanged method defines this behavior.
function MethodDropDownValueChanged(app,event)
    % Callback function to create parameter
    % input UI components for the selected method

    % Remove any existing parameter UI components
    indexToRemove = ismember({app.ParametersGridLayout.Children.Tag},"SelectionParameterGrid");
    delete(app.ParametersGridLayout.Children(indexToRemove));

    value = app.MethodDropDown.Value;
    switch value
        case "imfindcirclesYOLO"
            app.enableGpuSelection(true);
            app.createImfindcirclesYolo();
            app.RunButton.Enable = "on";
        case "imfindcircles"
            app.enableGpuSelection(false);
            app.createImfindcircles();
            app.RunButton.Enable = "on";
        case "imsegsam"
            app.enableGpuSelection(true);
            app.createImsegsam();
            app.RunButton.Enable = "on";
        otherwise
            % If user selected default drop-down value, lock run
            % button
            app.RunButton.Enable = "off";
    end
end
Enable GPU Selection
The imfindcirclesYOLO and imsegsam functions can detect circles faster by using a GPU. To use a GPU with these functions, you must have a Parallel Computing Toolbox™ license. The app checks the system of the user for GPU availability, and provides an option to perform circle detection using a selected GPU or a multi-GPU system. If the app does not detect a GPU, or if the user does not have a Parallel Computing Toolbox license, the app performs circle detection using a CPU. The enableGpuSelection method defines this behavior.
function enableGpuSelection(app,TF)
    % Function to enable selection of GPU if available on current
    % system.
    if TF
        if canUseGPU && license("test","Distrib_Computing_Toolbox") && gpuDeviceCount("available")
            % If system has an available GPU, enable the 'Use GPU'
            % button and show the names of available GPUs
            app.UseGPUButton.Enable = "on";
            app.GpuDeviceNameDropDown.Enable = "on";

            % Get names of available GPU
            gpus = gpuDeviceTable;
            gpus = gpus(gpus.DeviceAvailable == true,:);
            app.GpuDeviceNameDropDown.Items = gpus.Name;
        else
            % No available GPUs found, lock GPU selection
            app.UseGPUButton.Enable = "off";
            app.GpuDeviceNameDropDown.Enable = "off";
            app.GpuDeviceNameDropDown.Items = "GPU Device";
        end
    else
        % Lock GPU selection
        app.UseGPUButton.Enable = "off";
        app.GpuDeviceNameDropDown.Enable = "off";
        app.GpuDeviceNameDropDown.Items = "GPU Device";
    end
    % Default to using CPU
    app.UseGPUButton.Value = 0;
end
Detect Circles and Display Annotations
When the user selects the Run option, the app detects circles using the currently selected method and parameter values. The app begins by clearing any existing overlays and setting an execution environment based on the GPU controls.
If the selected method is imfindcirclesYOLO or imfindcircles, the app directly computes the centers and radii of the circles. If the selected method is imfindcircles, the app supports either a single radius input, in which the user leaves the maximum radius field empty, or a radius range input in which the user specifies both a minimum and maximum radius.
If the selected method is imsegsam, the app applies the imsegsam function to the image, optionally with a point grid mask that specifies the ROI in which to detect circles. The imsegsam function returns a structure of masks for the segmented objects. The app converts each segmented object into a logical mask, and then uses the regionprops function to compute the centroid, major axis length, minor axis length, and circularity of that object. Then, the app filters the objects using the circularity threshold specified by the user to detect the circles, and computes the center and radii of the detected circles using the centroid and axes lengths, respectively.
If the app detects circles, it creates an annotation for each circle using the Circle annotation and adds it to the viewer. The app adjusts the opacity of the circle annotations using the value of the Opacity slider. If no circles are detected, the app notifies the user with a dialog. When the user updates the value of the opacity using the slider, the app immediately updates the opacity of the circle annotations.
The RunButtonPushed method defines the segmentation and annotation display behavior, and OpacitySliderValueChanged method defines the opacity value update behavior.
% Button pushed function: RunButton
function RunButtonPushed(app,event)
    % Callback function to detect circles in the current image
    % using the selected method and parameters

    % Clear any existing circles from display
    app.Viewer.Annotations = [];

    % Check whether to use GPU
    if app.UseGPUButton.Enable && app.UseGPUButton.Value
        executionEnvironment = "gpu";
    else
        executionEnvironment = "cpu";
    end

    d = uiprogressdlg(app.CircleDetectionUIFigure, ...
        Message="Finding Circles, please wait", ...
        Title="Looking for circles", ...
        Indeterminate="on");

    value = app.MethodDropDown.Value;
    switch value
        case "imfindcirclesYOLO"
            [centers,radii] = imfindcirclesYOLO(app.ImageHandle.Data, ...
                Method=app.ModelNameDropDown.Value, ...
                ConfidenceThreshold=app.ConfidenceThresholdEditField.Value,...
                ProcessingSize=[app.ProcessingSizeHeightEditField.Value app.ProcessingSizeWidthEditField.Value], ...
                RadiusRange=[app.MinRadiusEditField.Value app.MaxRadiusEditField.Value], ...
                ExecutionEnvironment=executionEnvironment);
        case "imfindcircles"
            if isempty(app.MaximumRadiusEditField.Value)
                % If max radius is empty, then run the
                % algorithm using the [__] = imfindcircles(A,radius)
                % syntax
                [centers,radii] = imfindcircles(app.ImageHandle.Data,app.MinimumRadiusEditField.Value, ...
                    ObjectPolarity=app.ObjectPolarityDropDown.Value, ...
                    Method=app.ComputationMethodDropDown.Value, ...
                    Sensitivity=app.SensitivityEditField.Value, ...
                    EdgeThreshold=app.EdgeThresholdEditField.Value);
            else
                % If max radius is specified, then run the
                % algorithm using the [__] = imfindcircles(A,radiusRange)
                % syntax
                [centers,radii] = imfindcircles(app.ImageHandle.Data, ...
                    [app.MinimumRadiusEditField.Value app.MaximumRadiusEditField.Value], ...
                    ObjectPolarity=app.ObjectPolarityDropDown.Value, ...
                    Method=app.ComputationMethodDropDown.Value, ...
                    Sensitivity=app.SensitivityEditField.Value, ...
                    EdgeThreshold=app.EdgeThresholdEditField.Value);
            end
        case "imsegsam"
            if strcmp(app.PointGridMaskDropDown.Value,app.DefaultDropDownValue)
                % If PointGridMask drop-down has the default value,
                % then call imsegsam without the PointGridMask name-value argument
                masks = imsegsam(app.ImageHandle.Data, ...
                    PointGridSize=[app.PointGridSizeXEditField.Value app.PointGridSizeYEditField.Value], ...
                    NumCropLevels=app.NumCropLevelsEditField.Value, ...
                    PointBatchSize=app.PointBatchSizeEditField.Value, ...
                    PointGridDownscaleFactor=app.PointGridDownscaleFactorEditField.Value, ...
                    ScoreThreshold=app.ScoreThresholdEditField.Value, ...
                    SelectStrongestThreshold=app.OverallThresholdEditField.Value, ...
                    MinObjectArea=app.MinObjectAreaEditField.Value, ...
                    MaxObjectArea=app.MaxObjectAreaEditField.Value, ...
                    ExecutionEnvironment=executionEnvironment, ...
                    Verbose=false);
            else
                pointGridMask = evalin("base",app.PointGridMaskDropDown.Value);
                masks = imsegsam(app.ImageHandle.Data, ...
                    PointGridSize=[app.PointGridSizeXEditField.Value app.PointGridSizeYEditField.Value], ...
                    PointGridMask=pointGridMask, ...
                    NumCropLevels=app.NumCropLevelsEditField.Value, ...
                    PointBatchSize=app.PointBatchSizeEditField.Value, ...
                    PointGridDownscaleFactor=app.PointGridDownscaleFactorEditField.Value, ...
                    ScoreThreshold=app.ScoreThresholdEditField.Value, ...
                    SelectStrongestThreshold=app.OverallThresholdEditField.Value, ...
                    MinObjectArea=app.MinObjectAreaEditField.Value, ...
                    MaxObjectArea=app.MaxObjectAreaEditField.Value, ...
                    ExecutionEnvironment=executionEnvironment, ...
                    Verbose=false);
            end
            % Initialize a table to which you append the result of
            % regionprops
            stats = table( ...
                zeros(0,2), ...           % Centroid: empty 0x2 double array
                zeros(0,1), ...           % MajorAxisLength: empty 0x1 double
                zeros(0,1), ...           % MinorAxisLength: empty 0x1 double
                zeros(0,1), ...           % Circularity: empty 0x1 double
                VariableNames = ["Centroid","MajorAxisLength","MinorAxisLength","Circularity"]);
            for idx = 1:masks.NumObjects
                % For each mask, find the centroid,
                % major axis, minor axis, and circularity of the segmented region
                mask = false(masks.ImageSize(1),masks.ImageSize(2));
                mask(masks.PixelIdxList{idx}) = true;
                stat = regionprops("table",mask,"Centroid", ...
                    "MajorAxisLength","MinorAxisLength","Circularity");
                stats = [stats; stat];%#ok<AGROW>
            end
            % Filter the regions based on circularity threshold
            stats = stats(stats.Circularity >= app.CircularityEditField.Value,:);
            % Computee centers and radii
            centers = stats.Centroid;
            diameters = mean([stats.MajorAxisLength stats.MinorAxisLength],2);
            radii = diameters/2;
    end
    close(d);
    if ~isempty(centers)
        % For detected circles, create
        % images.ui.graphics.roi.Circle objects with computed centers
        % and radius.
        for idx = 1:size(centers,1)
            images.ui.graphics.roi.Circle(Center=centers(idx,:), ...
                Radius=radii(idx), ...
                Label="", ...
                FacePickable="off", ...
                FaceAlpha=app.OpacitySlider.Value/100, ...
                Interactions="none", ...
                Parent=app.Viewer);
        end
        % Enable exporting
        app.enableExport(true);
        % Save a copy of currently computed centers and radii
        app.Centers = centers;
        app.Radii = radii;
    else
        % No circles were detected in this run
        uialert(app.CircleDetectionUIFigure,"No circles detected! Try modifying parameters.","No circles detected");
        % Lock exporting, and clear the copies of the centers and radii
        app.enableExport(false);
        app.Centers = [];
        app.Radii = [];
    end
end

function OpacitySliderValueChanged(app,event)
    value = app.OpacitySlider.Value;
    for idx = 1:length(app.Viewer.Annotations)
        app.Viewer.Annotations(idx).FaceAlpha = value/100;
    end
end
Export Detected Circles
Users can export masks of the detected circles to a file or to the workspace by selecting the corresponding option in the Mask drop-down in the Export section of the app toolstrip. The app converts the detected circles to a binary mask using the circles2mask function, based on the size of the currently displayed image. It then writes the mask either to a file or to the base workspace depending on the selected export option. The ExportMaskDropDownValueChanged method defines this behavior.
% Value changed function: ExportMaskDropDown
function ExportMaskDropDownValueChanged(app,event)
    % Callback function to export the detected circles mask to a file
    % or to the workspace. Mask is created using the circles2mask
    % function.
    value = app.ExportMaskDropDown.Value;
    switch value
        case "To File"
            % Write final mask to disk
            finalMask = circles2mask(app.Centers,app.Radii,size(app.ImageHandle.Data,1:2));
            filterSpec = app.getSupportedFileFilter(true);
            [file,location] = uiputfile(filterSpec,"Save Mask","mask.png");
             if ~(isequal(file,0) || isequal(location,0))
                try
                    imwrite(finalMask,fullfile(location,file));
                    uialert(app.CircleDetectionUIFigure,"Mask saved successfully","Export Success",Icon="success");
                catch ME
                    uialert(app.CircleDetectionUIFigure,ME.message,"Export Failed");
                end
            end
        case "To Workspace"
            % Write final mask to base workspace
            finalMask = circles2mask(app.Centers,app.Radii,size(app.ImageHandle.Data,1:2));
            assignin("base","circlesMask",finalMask);
            uialert(app.CircleDetectionUIFigure,"Mask saved to workspace successfully","Export Success",Icon="success");
    end
    % Reset drop-down
    app.ExportMaskDropDown.Value = app.DefaultDropDownValue;
end
Users can export the centers and radii of the detected circles to the workspace as a structure by selecting the Save button next to Centers & Radius in the Export section of the app toolstrip. The saved structure contains the centers, radii, and mask size of the detected circles. The CentersRadiusButtonPushed method defines thus behavior.
% Button pushed function: CentersRadiusButton
function CentersRadiusButtonPushed(app,event)
    % Write the current saved centers, radii and mask size to
    % the workspace as a structure
    exportStruct.Centers = app.Centers;
    exportStruct.Radii = app.Radii;
    exportStruct.MaskSize = size(app.ImageHandle.Data,1:2);
    assignin("base","centersAndRadii",exportStruct);
    uialert(app.CircleDetectionUIFigure,"Centers and radii saved to workspace successfully","Export Success",Icon="success");
end
Detect Circles in Image Using App
Run the CircleDetectionApp app.
Import an image either from a file or from the workspace using the options in the Import Image section of the app toolstrip. If you choose to import the image from a file, the app opens a dialog box enabling you to browse files that have image file formats. If you choose to import the image from the workspace, the app filters workspace variables for potential images and displays the variable names in the drop-down. When you import an image, the app resets and displays the imported image in the Image section of the app.
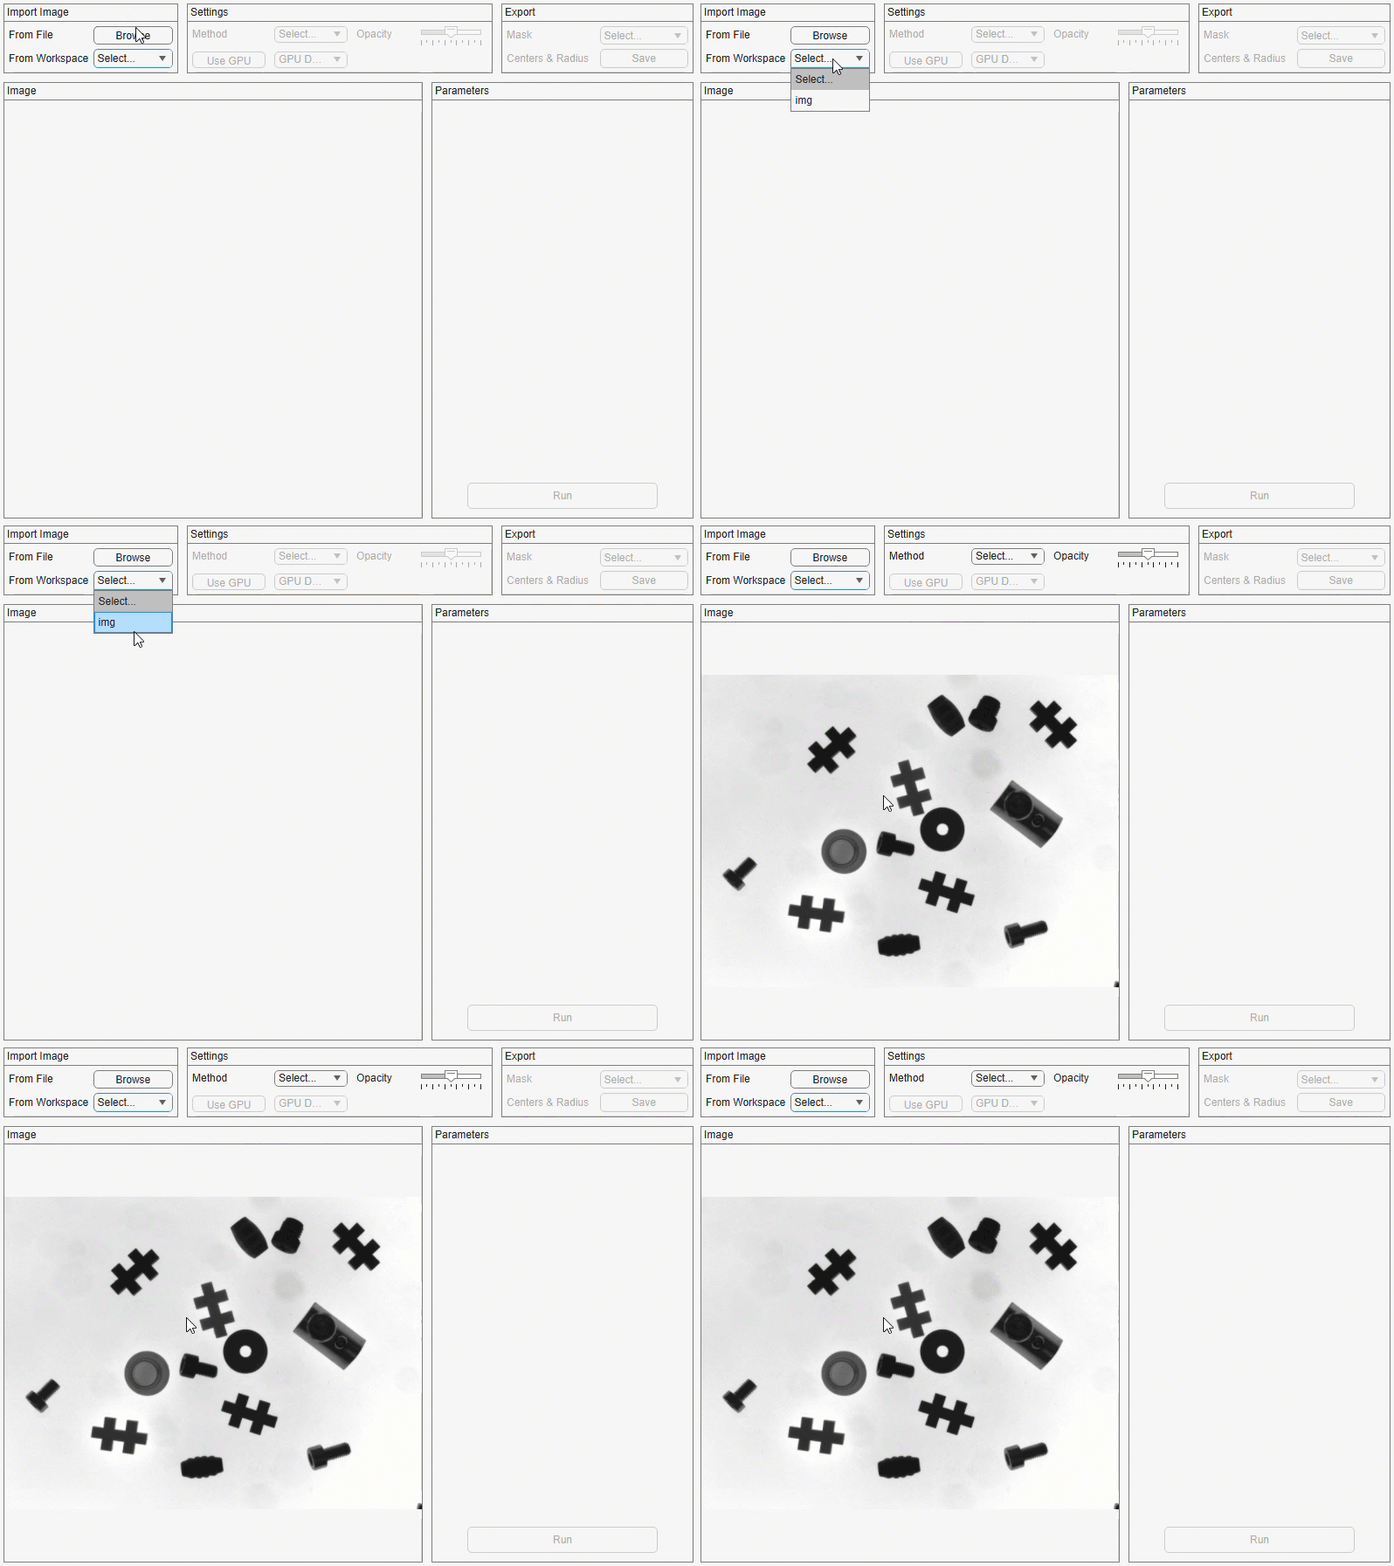
Select a circle detection method in the Settings section of the app toolstrip. For example, to detect circles using the imfindcirclesYOLO approach, select imfindcirclesYOLO in the Method drop-down. To change the parameters for the selected method, update them in the Parameters section. Once you finalize the parameters, select the Run button in the Parameters section. The app detects the circles and overlays them on the image. You can adjust the opacity of the overlay using the Opacity slider in the Settings section of the app toolstrip.
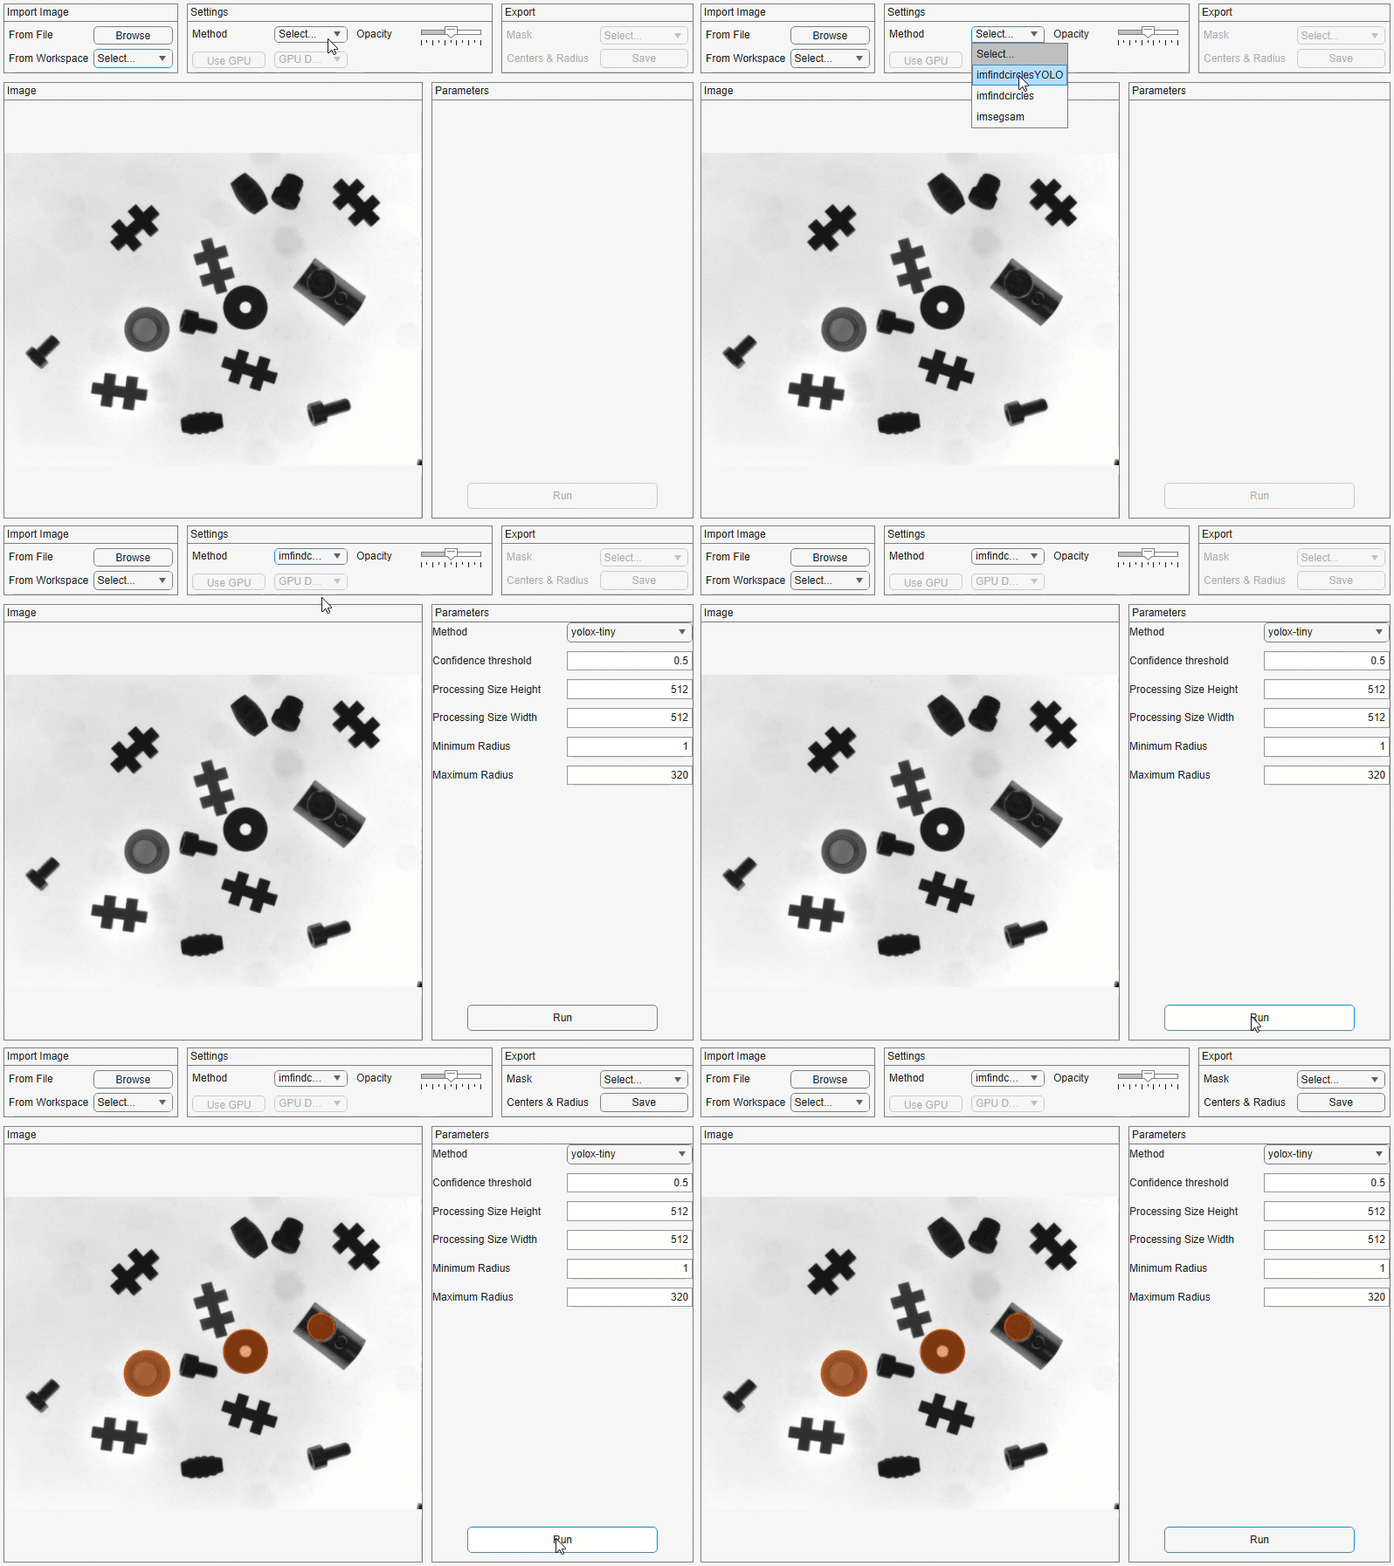
You can export masks of the detected circles to a file or to the workspace by selecting the corresponding option in the Mask drop-down in the Export section of the app toolstrip. You can export the centers and radii of the detected circles to the workspace as a structure by selecting the Save button next to Centers & Radius in the Export section of the app toolstrip. The saved structure contains the centers, radii, and mask size of the detected circles.
Customize the App
You can customize the code of the CircleDetectionApp app in the attached supporting file. You can include support for more circle detection methods by adding them to the list of methods, adding the UI elements required for their parameters, and adding steps to compute the centers and radii of the detected circles from the output of the new method when the Run button is selected.
To customize the app, you can choose one of these options:
Open the attached MLAPP files in App Designer and edit the code in the Code View.
Open the attached MLAPP files in App Designer, select Share in the Designer tab and then Export to MATLAB Class (.m), and save the M file. You can then edit the M file.

