Configurazione delle impostazioni del modello ed esecuzione dell'analisi
Dopo aver preparato il modello per l'analisi, configurare le impostazioni di generazione dei casi di test nella finestra di dialogo Configuration Parameters (Parametri di configurazione). Simulink® Design Verifier™ offre una serie di impostazioni del modello per controllare e personalizzare l'analisi del modello. È possibile utilizzare Design Verifier Pane o la funzione sldvoptions per specificare le impostazioni di analisi di Simulink Design Verifier.
Per impostazione predefinita, le impostazioni del modello di Simulink Design Verifier non vengono visualizzate nella finestra di dialogo Configuration Parameters (Parametri di configurazione). Quando si apre l'app Design Verifier, Simulink Design Verifier associa le impostazioni predefinite al modello. Dopo aver salvato il modello, è possibile accedere alle opzioni di Simulink Design Verifier direttamente dalla finestra di dialogo Configuration Parameters (Parametri di configurazione).
Configurazione delle impostazioni del modello
Configurare le impostazioni del modello per l'analisi della generazione dei test.
1. Aprire il modello sldvexCruiseControl. Nella scheda Design Verifier, nella sezione Prepare (Preparazione), fare clic su Test Generation Settings (Impostazioni della generazione dei test).
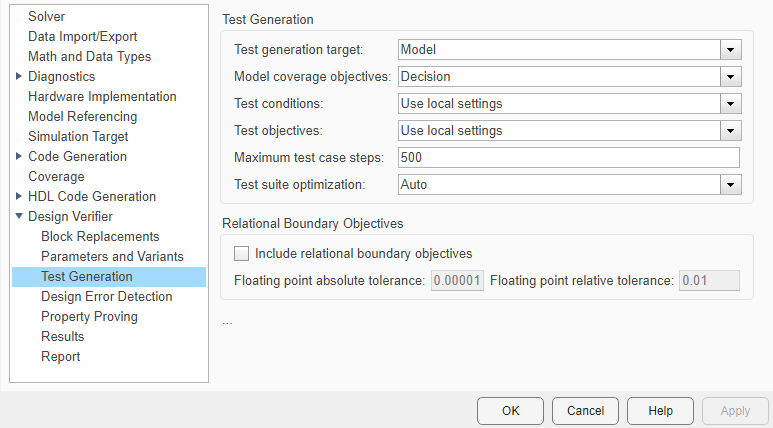
2. Nella finestra di dialogo Configuration Parameters (Parametri di configurazione), nel riquadro Test Generation (Generazione dei test), impostare il parametro Model coverage objectives (Obiettivi di coverage del modello) su Decision. Per questo esempio, l'analisi genera casi di test che registrano solo la coverage delle decisioni.
3. Il parametro Test suite optimization (Ottimizzazione della suite di test) è impostato su Auto, per impostazione predefinita. Se si desidera generare un numero inferiore di casi di test, ma più lunghi, selezionare LongTestcases per il parametro Test suite optimization (Ottimizzazione della suite di test).
4. Fare clic su Apply (Applica), quindi su OK per salvare le modifiche.
Analisi del modello per la generazione di test
Nella scheda Design Verifier, fare clic su Generate Tests (Genera test). Simulink Design Verifier analizza il modello per generare casi di test.
Durante l'analisi, la finestra Results Summary (Riepilogo dei risultati) mostra lo stato di avanzamento dell'analisi. Visualizza informazioni quali il numero di obiettivi di test elaborati, gli obiettivi soddisfatti e il tempo trascorso per l'analisi.
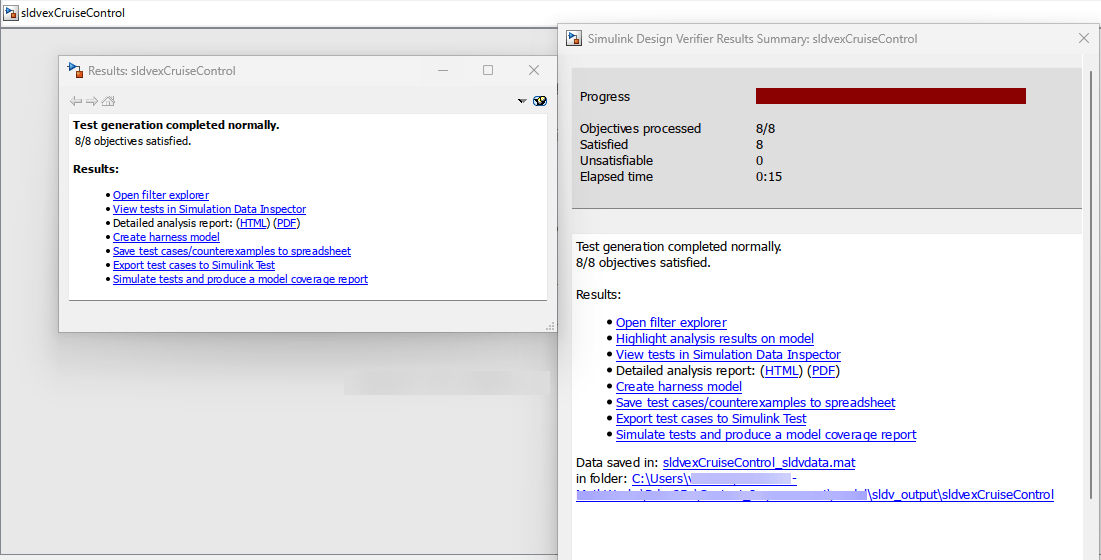
Dopo l'analisi, Simulink Design Verifier genera la finestra Results (Risultati) che mostra lo stato dell'analisi e i risultati.